

Precision Boost Overdrive (PBO) is a feature of AMD Ryzen processors, allowing you to adjust different parameters controlling the boost behaviour of your CPU. This powerful tool can be leveraged to achieve higher operating frequencies to improve performance or, conversely, lower power limits to reduce power consumption and heat output. Though this can absolutely be done through manual overclocking or undervolting, PBO does so while maintaining all the CPU’s intelligent frequency and power-management mechanisms active. Let AMD do the hard work for you. This means that unlike old overclocking methods, now you can push the speed higher without removing the intrinsic efficiency of single-core and idle operation.
To achieve this, PBO dynamically adjusts power and frequency based on set parameters while taking into account the CPU’s real-time conditions, such as temperatures and power draw. PBO lets you set exact power limits, a dynamic voltage curve, a scalar multiplier, or an auto overclock. I will review each of these in more detail, including how to enable and configure them, and what performance and efficiency gains you can expect. For this guide, I will focus on changing these settings through the BIOS, but you can also do so via AMD’s Ryzen Master app.
Before I begin, you may want to install some of the tools recommended in our monitoring and benchmarking apps explainer, which can help you keep an eye on any performance improvements or, god forbid, regressions. Also, while all the settings listed in this guide should be available on any BIOS version – aside from locked OEM firmwares – updating your BIOS to the latest version is a good call to ensure that the latest safety measures are implemented. Lastly, each manufacturer may name these settings slightly differently, but the underlying controls should be the same across Asus, MSI, Gigabyte, ASRock, and other brands.
If your system becomes too unstable to even each the BIOS, you can always press the Clear CMOS button if available on your motherboard or, achieving the same aim, remove the battery from your motherboard after unplugging the AC power cord.
Eco Mode
Let’s start with a simple yet quite effective option that is named Eco mode. This is straightforward; you select a power target, for example 65W, and the CPU configures itself to meet that criteria by adjusting all sorts of internal parameters oblivious to the user. If you just want an efficient system with as little hassle as possible, and don’t mind losing a bit of performance doing so, this is as easy as it gets. Unless you end up with a really bad silicon lottery, your CPU should be able to run stably using this setting.
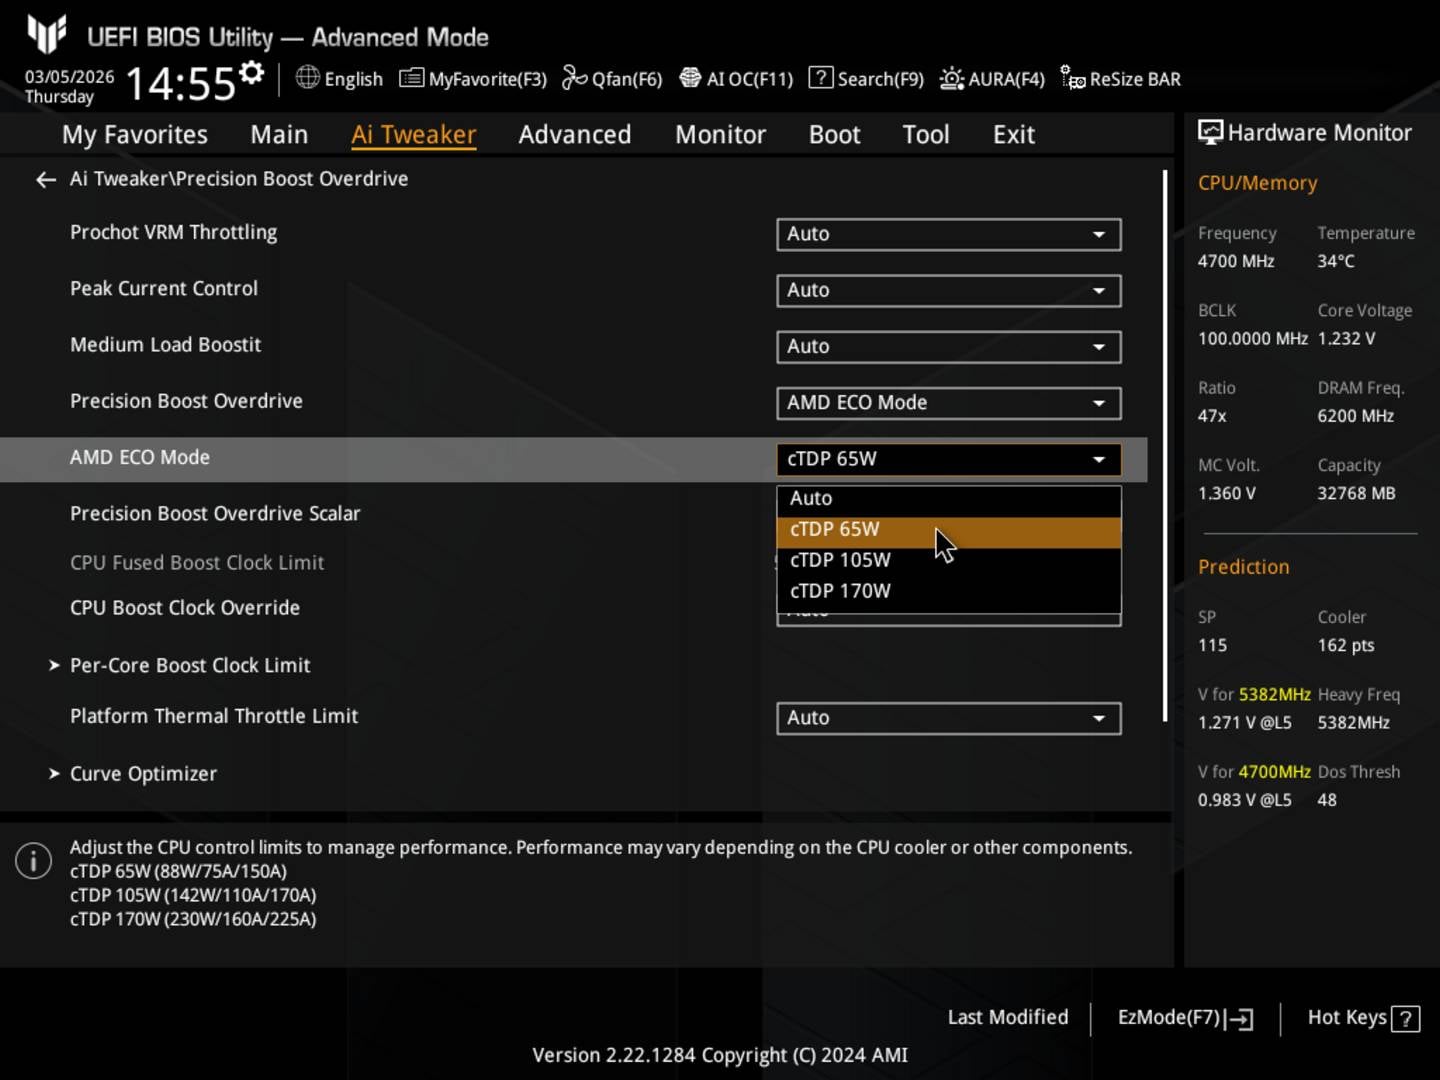
To do so on an Asus AM5 motherboard, go to the BIOS (Del / F2), switch to the Advanced Mode by pressing F7, navigate to the Ai Tweaker tab, then to Precision Boost Overdrive, choose AMD Eco Mode and select the power target you like. It all sounds complicated but takes a couple of seconds to get there once you’re au fait with the firmware.
Enabling 65W Eco Mode on my Ryzen 5 7600X system dropped the power consumption from 138W (240W wall) to 88W (181W wall) and temperatures from 95°C to 67°C (28°C drop) compared to the stock condition. Regarding performance, my Cinebench multi-threaded score dropped by just 7%, from 14,763 points to 13,698. As you can see, if you are chasing efficiency this is a fantastic option. 24% less power consumption and lower temperatures are very good in my book, more so considering the easy activation method.
Thermal Limit
This parameter lets you choose the maximum temperature your CPU can hit. It is useful if you want less heat dumped into your room or prefer to have a quieter system. As you can guess, this will impact performance, depending on how low you set the bar. Furthermore, if you have a strong cooling solution such as a 360mm liquid cooler, this option won’t make any difference since the CPU is likely to never breach mid-level thresholds. In other words, I suggest you go with Eco Mode and save some power while you are at it.
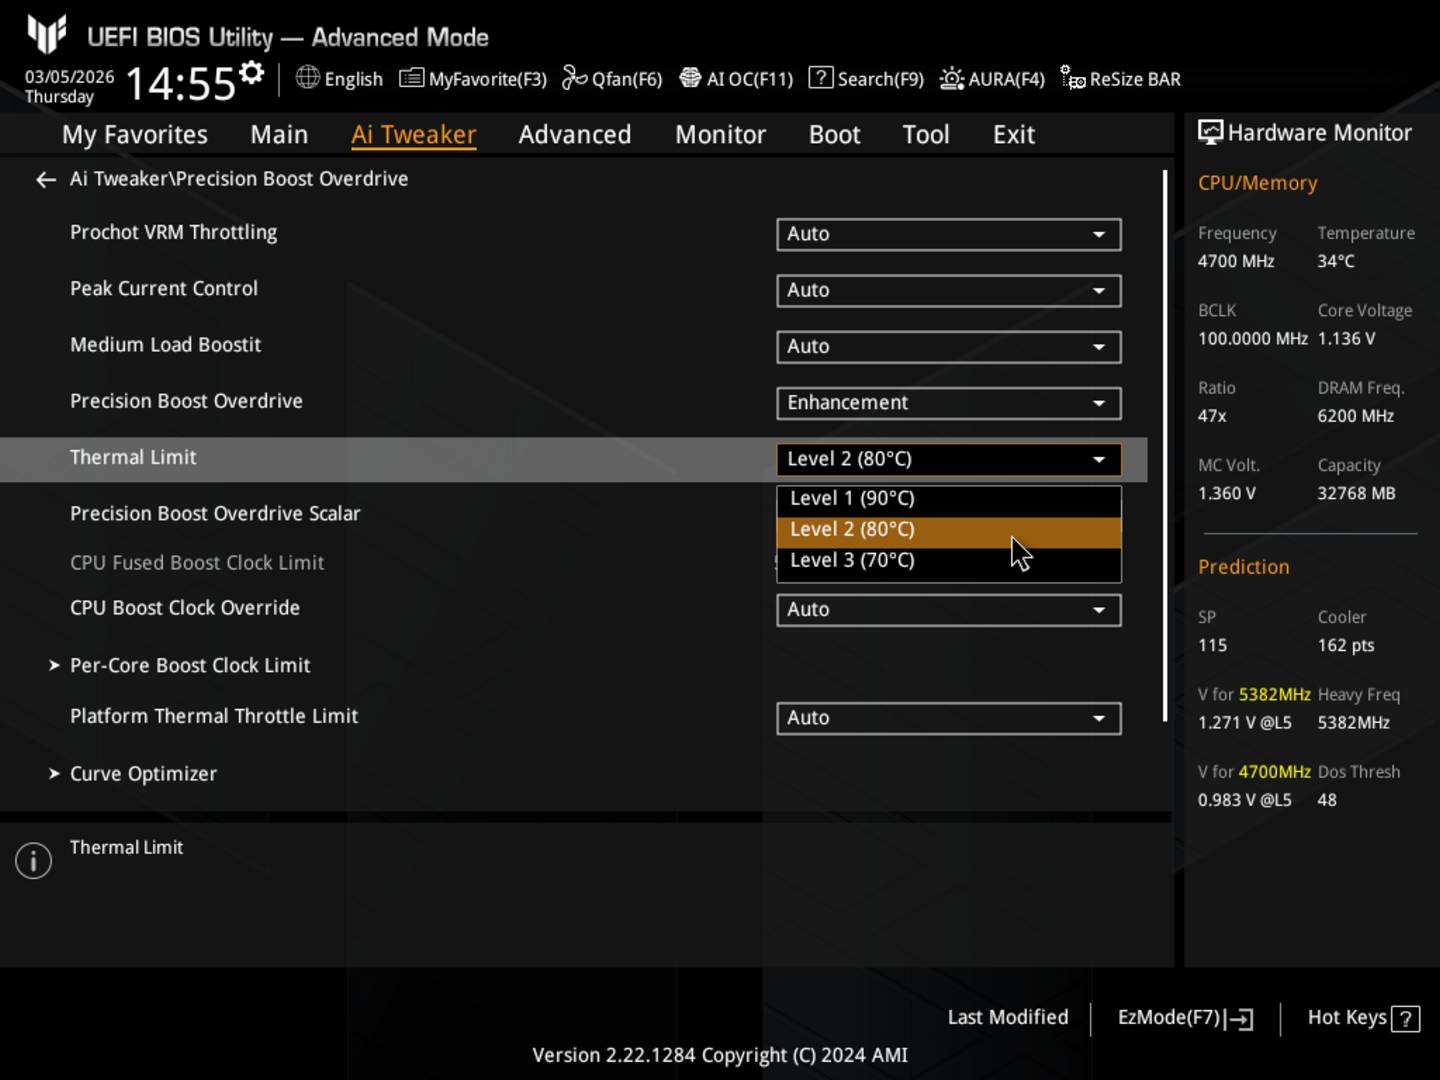
Nevertheless, to do so on the same Asus AM5 motherboard, go to the BIOS (Del / F2), switch to the Advanced Mode by pressing F7, navigate to the Ai Tweaker tab, then to Precision Boost Overdrive – all familiar thus far, right? – and press the Thermal Limit dropdown menu and select your preferred temperature.
Power Limits
If you want more granular control over your CPU, Power Limits is the way to go. This PBO option allows you to configure three CPU parameters. These are:
PPT (Package Power Tracking): The total power passing through the CPU socket, which determines the maximum boost level. Setting this high doesn’t force your CPU to consume all that power; it only allows it to take up to that set amount. A typical use would be if your workload makes the CPU consume 100% of its power budget, thus pushing PPT higher could allow it to clock higher. Understandably, more power means more heat, which needs to be dealt with.
TDC (Thermal Design Current): The sustained current your motherboard VRM can maintain during long multi-core loads. Since modern chips tend to be somewhat power-constrained, allowing more power headroom through TDC can net higher frequencies.
EDC (Electrical Design Current): The peak current your motherboard VRM can deliver during short boost demands, as long as TDC and PPT aren’t exceeded.
Overall, higher limits should improve multi-threaded frequency and thus performance, assuming your cooling solution doesn’t become the bottleneck, while lower figures can save you some power and make your system run cooler. If you want the maximum performance, feel free to max the Platform Thermal Throttle since modern Ryzen CPUs are built to run at their 95°C TjMax. Also, all power-related settings won’t do much if your motherboard’s VRMs can’t deliver the required amount of juice.
While I can’t give specific input parameters for each Ryzen CPU, as a rule of thumb, pushing above the official spec by 20% shouldn’t cause any problem. For example, the Ryzen 5 7600X stock PPT is 142W, so 170W is a good starting point. For TDC and EDC, 132A and 204A, respectively, should get you going. Understandably, if you are looking for efficiency, you should lower these below their default parameters, which can be found using AMD’s Ryzen Master or by looking online. While none of these options should be dangerous for your CPU since they merely authorise it to exceed AMD’s official design, don’t go putting 1,000W on each option, just in case.
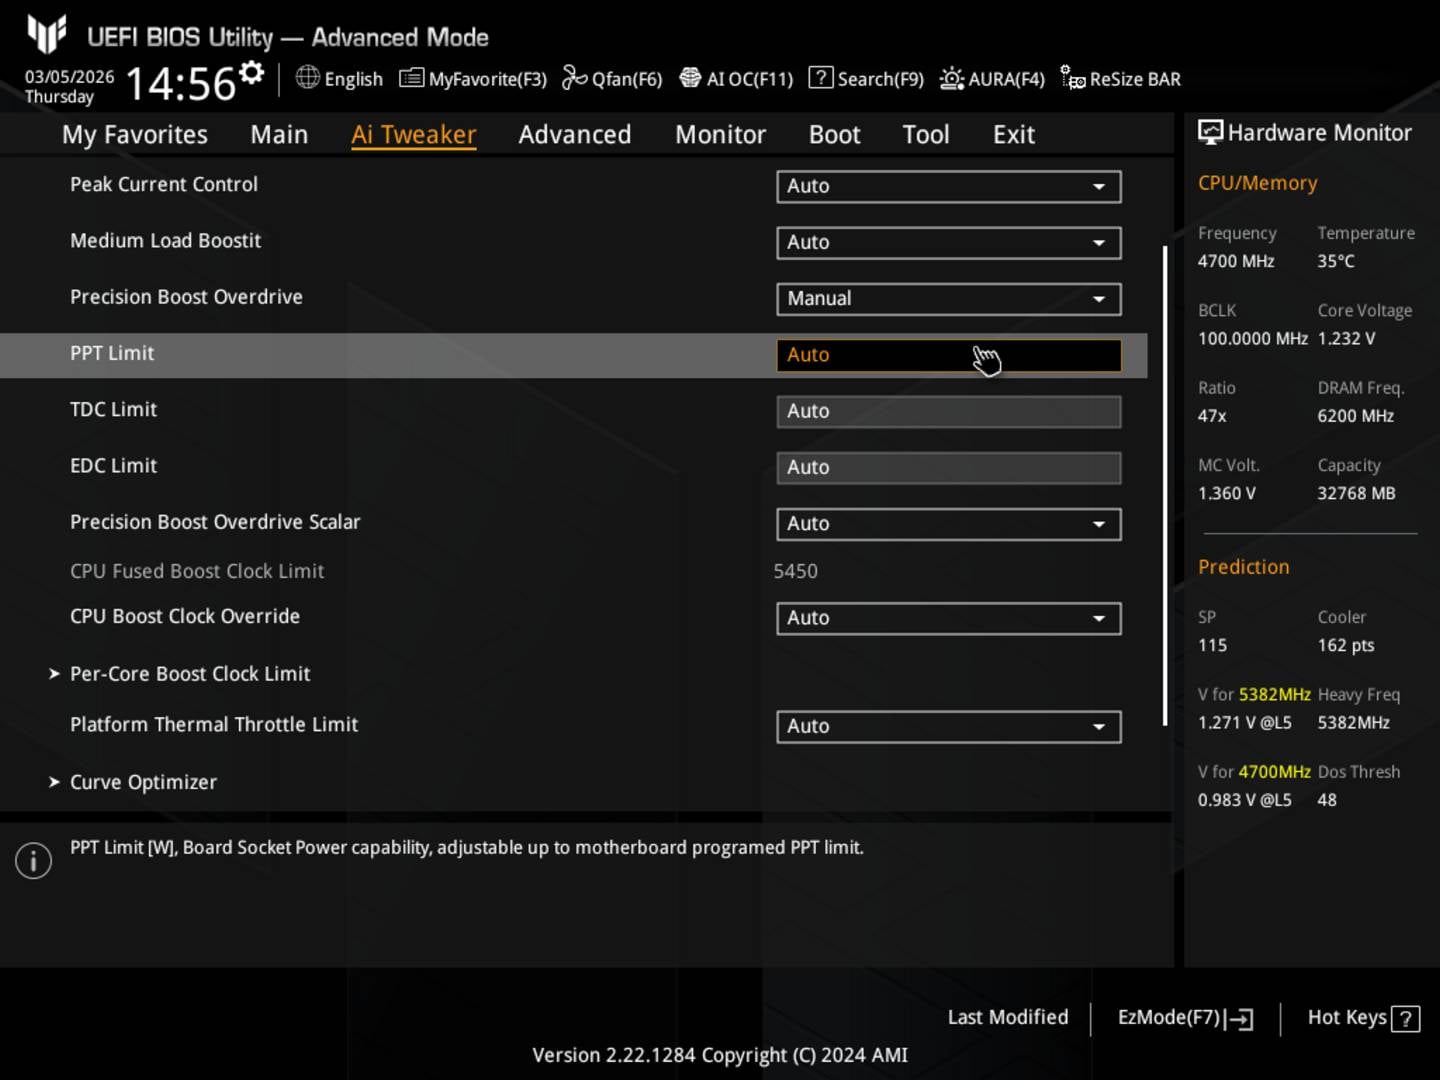
Again, to do so on an Asus AM5 motherboard, follow the usual drill of jumping into the BIOS (Del / F2), switch to the Advanced Mode by pressing F7, navigate to the Ai Tweaker tab, then to Precision Boost Overdrive, and select Manual on the Precision Boost Overdrive dropdown menu.
Setting PPT to 170W (+20%), TDC to 132A (+20%), and EDC to 204A (+20%) on my Ryzen 5 7600X resulted in identical behaviour to the stock condition, i.e. 138W, 95°C, and Cinebench scores. As I noted previously, Power Limits simply allow your CPU to consume more power, meaning there won’t be any benefits if the stock power budget is sufficient. That said, you can go the other way and select lower parameters than your CPU’s stock, which would make Power Limits act like Eco Mode.
Curve Optimiser
Curve Optimiser is my favourite option out of the bunch as it allows you to make your CPU more efficient with little impact on performance. Better yet, if properly configured, it can even boost performance while reducing power consumption and heat output: a nice trick. Each CPU has a specific voltage/frequency (V/F) curve that determines, as the name implies, what voltage is needed to achieve a given frequency. Curve Optimiser lets you offset this curve positively or negatively to supply more or less voltage at each frequency point. On good CPU silicon, this can allow you to achieve the same clock speed at a lower voltage, and thus lower power and temps. Done properly, you’re effectively fine-tuning the VF curve beyond what AMD has done at the factory.
While you can use the positive curve to feed your CPU cores more voltage to sustain high clocks, most Ryzen owners I know use this option to reduce power consumption without losing performance – undervolting in a nutshell. That said, since the curve adjusts the entire V/F curve up or down, you may find that your CPU is unstable at one or two steps of the curve – perhaps you can run heavy loads no problem, but launching a small game crashes the system. In this instance, you can either reduce the setting one step or adjust the curve on each core separately. Based on my experience, you’d better stick with the general CPU curve since tuning each core separately will take a lot of time for little gains. On Ryzen 9000 CPUs, you can unlock even more granularity using Curve Shaper, which lets you adjust specific segments of each core’s V/F curve.
Because of how it all works and potentially sailing close to the wind, I recommended testing your CPU at multiple loads and thread usage. Evaluate a couple of heavy- and light-load games, going in and out of idle state, plus the usual stress tests, from Cinebench to Prime95.
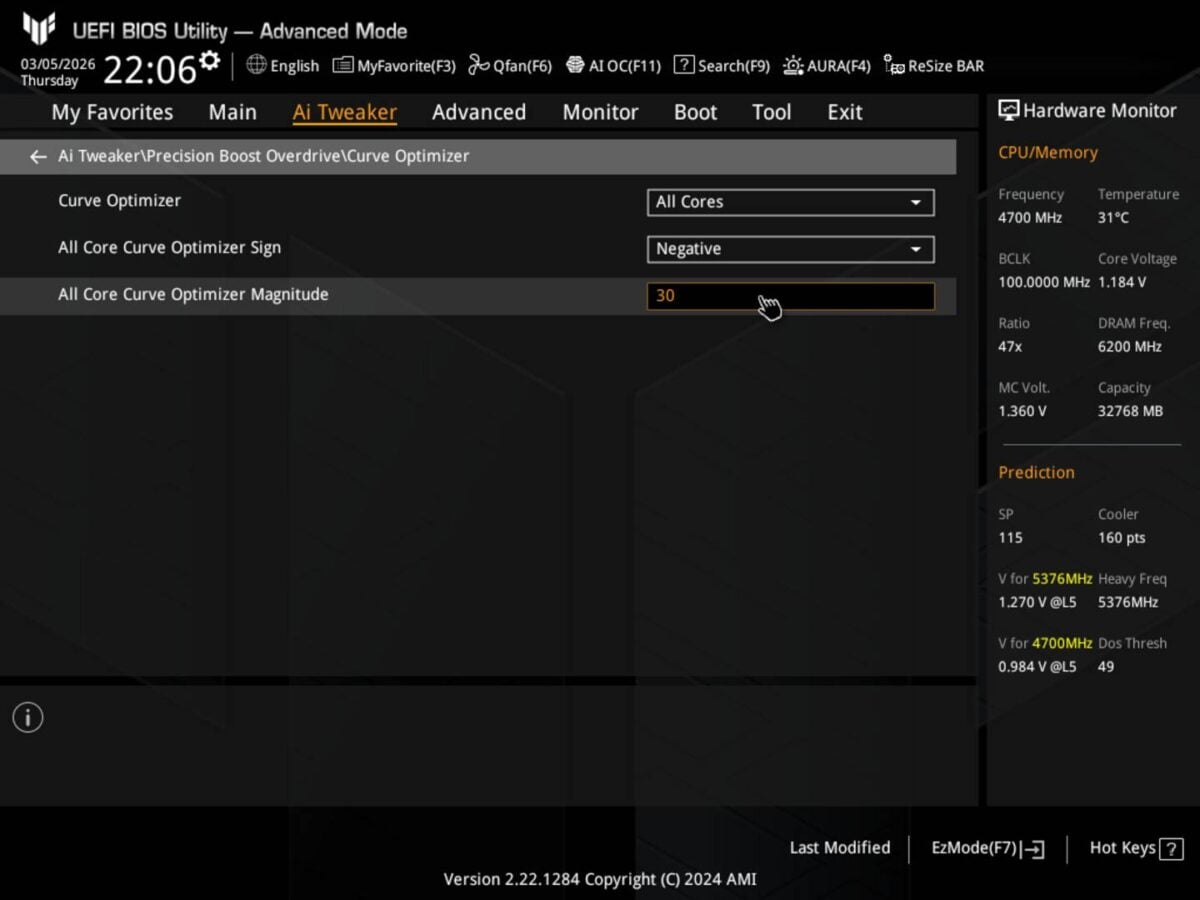
To set your V/F curve, as usual, enter the BIOS (Del / F2), switch to the Advanced Mode by pressing F7, navigate to the Ai Tweaker tab, then to Precision Boost Overdrive, click on Curve Optimiser and a new window will open. From here choose All Cores in the Curve Optimiser dropdown menu, then Negative in the All Core Curve Optimiser Sign, and lastly input the number you like into the All Core Curve Optimiser Magnitude field. The better your CPU silicon is, the further you can go. But Negative 20 to 30 should be within reach for most.
Start at -10 and test your system for stability. If all is good, go to -20 and so on until you find the chip’s limit. When the system becomes unstable or crashes, revert to the latest stable step. For example, if -30 is unstable, try -25, then -20. At this point, you should be good to go, but I still recommend keeping an eye on your system stability for a week or two before trusting it.
On my Ryzen 5 7600X, for example, a -35 configuration dropped power consumption from 138W to 116W (down 15.9%), and temperature from 95°C to 85°C (down 10%). Though already very nice, the best part is that Curve Optimiser did so while boosting multi-core performance by 5% compared to stock, from 14,763 points to 15,514. More speed with less power is a combination I like.
Boost Override
Boost Override, meanwhile, lets you increase the frequency ceiling of your Ryzen CPU. You can select an offset frequency, e.g., 100MHz, and the CPU will try to reach it if its temperature, power, and silicon quality allow it. To put it otherwise, if your CPU can boost up to 5GHz by default, putting +200MHz won’t automatically result in 5.2GHz. Other tricks may need to be employed. This is where, for example, the Power Limits come in handy, as they could give the CPU more headroom to boost. You can also use this to lower the max frequency, but I fail to see the usefulness of such a configuration since there are better options if you are chasing efficiency.
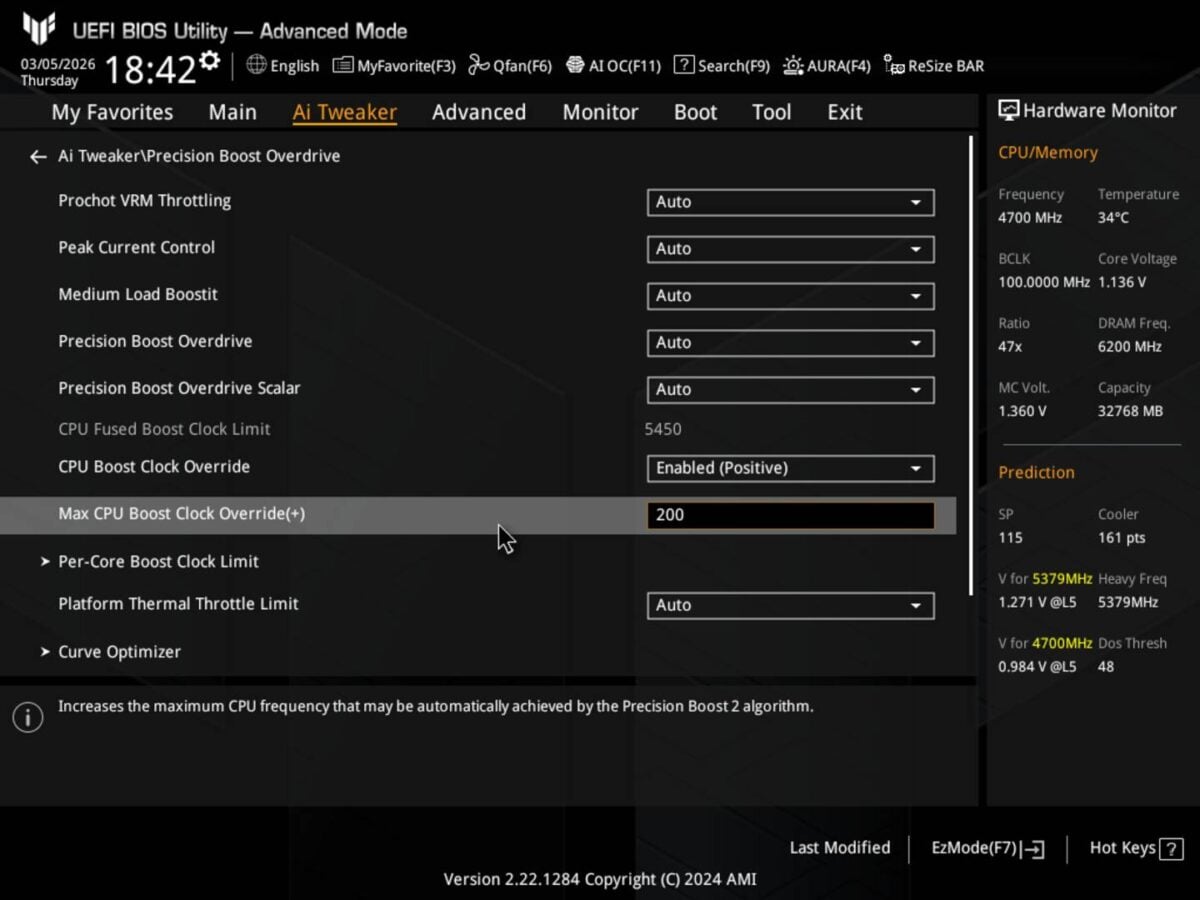
To override your frequency limit, do the previously-described steps in the BIOS to get PBO, then head on the CPU Boost Clock Override dropdown menu select Enable (Positive) and fill how many MHz on top of the official boost clock you want to allow.
Testing a +200MHz Boost Override on my trusty Ryzen 5 7600X netted just a 50MHz increase to single-core frequency, which translated into a 5.5GHz boost clock and 1% single-core score uplift. Since the rest remained identical to stock, this option is also pretty much useless for most users. That said, combining it with Curve Optimiser can net a bit more performance. More on that at the end of the guide.
Scalar
Normally, Ryzen processor firmware manages frequency based on thermals and voltage, and it will reduce it if it sees either of these two elements enter a critical range that could reduce the long-term reliability of the chip. The Scalar setting allows you to override these defaults and push higher voltages and thermals for longer, potentially at the expense of your CPU’s lifespan. Needless to say, I am not a big fan of this option. In case you are still adamant on using it, keep in mind that high Scalar and negative V/F curve are contradictory, and thus shouldn’t be used at the same time.
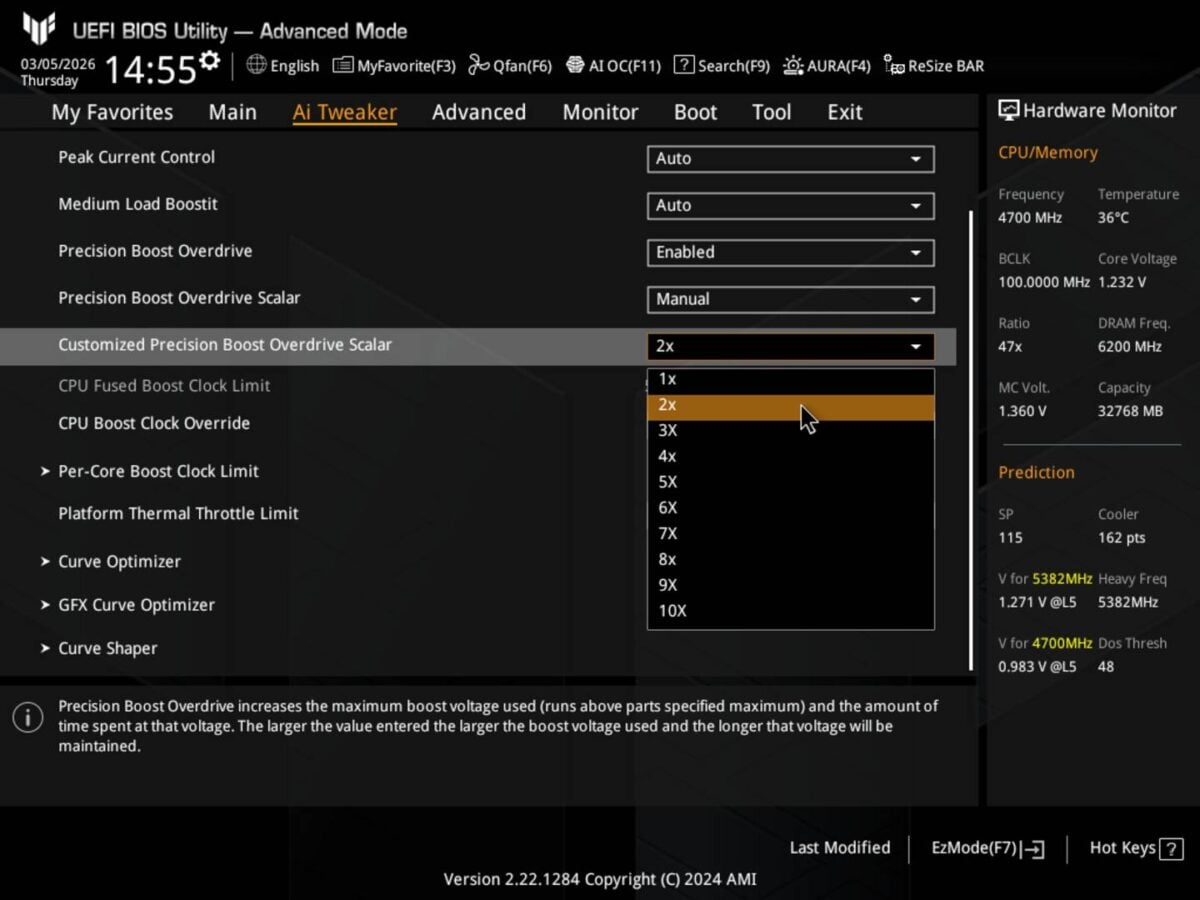
To change the Scalar parameter, do the usual BIOS-entering steps, click on the Precision Boost Overdrive Scalar dropdown menu and select Manual, then on Customised Precision Boost Overdrive Scalar select how aggressive you want it to be (X1 to X10).
I tested X5 Scalar on my Ryzen 5 7600X and found no measurable change over stock condition. So better leave it alone, capische?
Final thoughts
In the end, remember that despite the promise behind each setting, PBO remains at the mercy of silicon quality, cooling, and sometimes even the motherboard’s VRM capabilities. Out of the bunch, I believe Curve Optimiser is the best, followed by Eco Mode, then Power Limits. Oftentimes, the more moderate adjustments yield the best results, so pushing toward the extremes is just an invitation for system instability.
If you are looking for massive performance gains, this may not be for you, which isn’t surprising since it’s a much safer alternative to overclocking and undervolting. However, if you mainly care about efficiency, be it thermal or power, PBO can do wonders while keeping the impact on performance to a minimum. To put it simply, with PBO, less is more, literally.
Below you can see a comparison table between Stock, Eco Mode, Power Limits, Curve Optimiser, Override, and Scalar. For each one I measured several aspects of the CPU to give an idea of the impact of each option. Overall the best remains Curve Optimiser, especially if your CPU can go far (-30 or better), followed by Eco Mode.
| Stock | Eco Mode | Power Limits | Curve -30 | Curve -35 | Override | Scalar | |
| Power wall | 240W | 181W | 240W | 218W | 212W | 239W | 238W |
| Power (HW) | 138W | 88W | 138W | 120W | 116W | 137W | 137W |
| Temp | 95°C | 67°C | 95°C | 85°C | 83°C | 95°C | 95°C |
| R23 Single | 1,949 | 1,950 | 1,943 | 1,941 | 1,941 | 1,969 | 1,943 |
| R23 Multi | 14,763 | 13,698 | 14,767 | 15,347 | 15,514 | 14,728 | 14,690 |
| Clock Single | 5.45GHz | 5.45GHz | 5.45GHz | 5.45GHz | 5.45GHz | 5.50GHz | 5.45GHz |
| Clock Multi | 5.10GHz | 4.75GHz | 5.10GHz | 5.30GHz | 5.32GHz | 5.10GHz | 5.10GHz |
Many of these options can also synergise together to push the improvement further. The best combo I found is: +200MHz Override with -40 Curve Optimiser. This netted me 1,990 single-core points (+2%) and 15,555 multi-core points (+5%), while keeping power consumption at 112W (-18%) and temperature at 80°C (-15%).
| Stock | Override & -40 Curve | |
| Power wall | 240W | 208W |
| Power (sensor) | 138W | 112W |
| Temperature | 95°C | 80°C |
| R23 Single | 1,949 | 1,990 |
| R23 Multi | 14,763 | 15,555 |
| Clock Single | 5.45GHz | 5.50GHz |
| Clock Multi | 5.10GHz | 5.35GHz |
Finding the exact limits of your CPU can be a lot of fun if you’re a geek like me. Go on, see how well you can do and beat my frequency and power figures.