
The option to enter your motherboard BIOS is the first thing you see when you boot your PC. It’s not a place you likely visit too often unless you’re an avid overclocker, but the software comes in handy when you need to set fan curves, change boot priority to a different drive, and tinker with voltages. Over the lifespan of a motherboard, its manufacturer may release multiple firmware/BIOS updates in order to fix unexpected issues or enable support for new processors and RAM. Even new boards often ship with old firmware since it’s been sitting on a shelf somewhere, and it may not support your memory kit.
Personally, I’ve faced memory-related limitations due to older BIOS twice. The first time, my AM4 board was unable to detect 3,600MT/s RAM, forcing me to use a slower speed on the first boot. My friend suffered a similar experience with an AM5 system that couldn’t recognise a DDR5-5600 kit – this time, the BIOS flashback feature saved the day. No matter your reason for updating your BIOS, this step-by-step guide should help you achieve that.
If your computer is working just fine, and the update doesn’t bring you anything important, such as bug fixes like the high SOC voltage issues or adding new features like high-frequency DDR5 support, just leave the BIOS as is. The process is easier than it’s ever been, but there’s still a risk that a bad BIOS update can brick your motherboard, which isn’t worth it without the patch being meaningful.
Also, note that due to BIOS chip storage limitations, some AM4 (Ryzen 1000 to 5000 series) boards can lose older CPU support in order to add compatibility for new ones, so double-check the change log or support list on the manufacturer website to avoid bad surprises.
Ways to update the BIOS
There are three ways to update BIOS. The most common one is downloading the update file and entering BIOS to install it, which is the one we’re focusing on today. The BIOS flashback feature is the second method, which comes in useful if your system can’t boot at all. And you can chance it via Windows using your motherboard brand’s dedicated software, but we wouldn’t recommend it since Windows could crash and brick your board.
In this guide, we are going to update an Asus TUF Gaming X670E-Plus WiFi, but you can follow all you see here to update other models or even other brands. There are only minor differences, some of which we explain at the end of this piece.
Downloading necessary files
To begin with, you need to find and download the latest update files for your motherboard. The easiest way is to Google the exact name and model, though you can also manually search the manufacturer’s website. If you don’t remember your motherboard model, download CPU-Z, launch it, and go to the motherboard section to find your model name. You can also see the BIOS version currently installed.
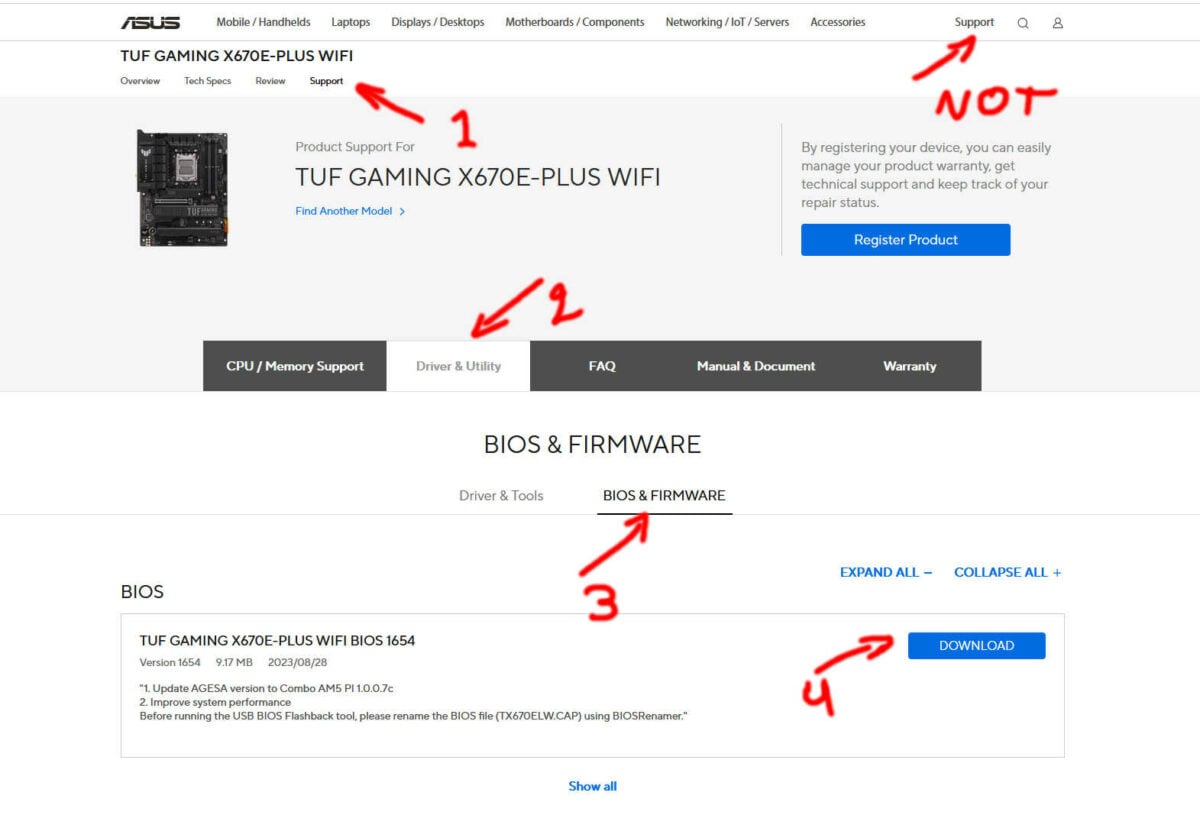
After finding your board, head to ‘Support’ (the one below the board’s name, not general support), select ‘Driver & Utility’, click on ‘BIOS & Firmware’, then download the latest one that suits you. You will find the improvements list below the release date of each version. Try to avoid Beta versions if you can, as they may have unknown issues.
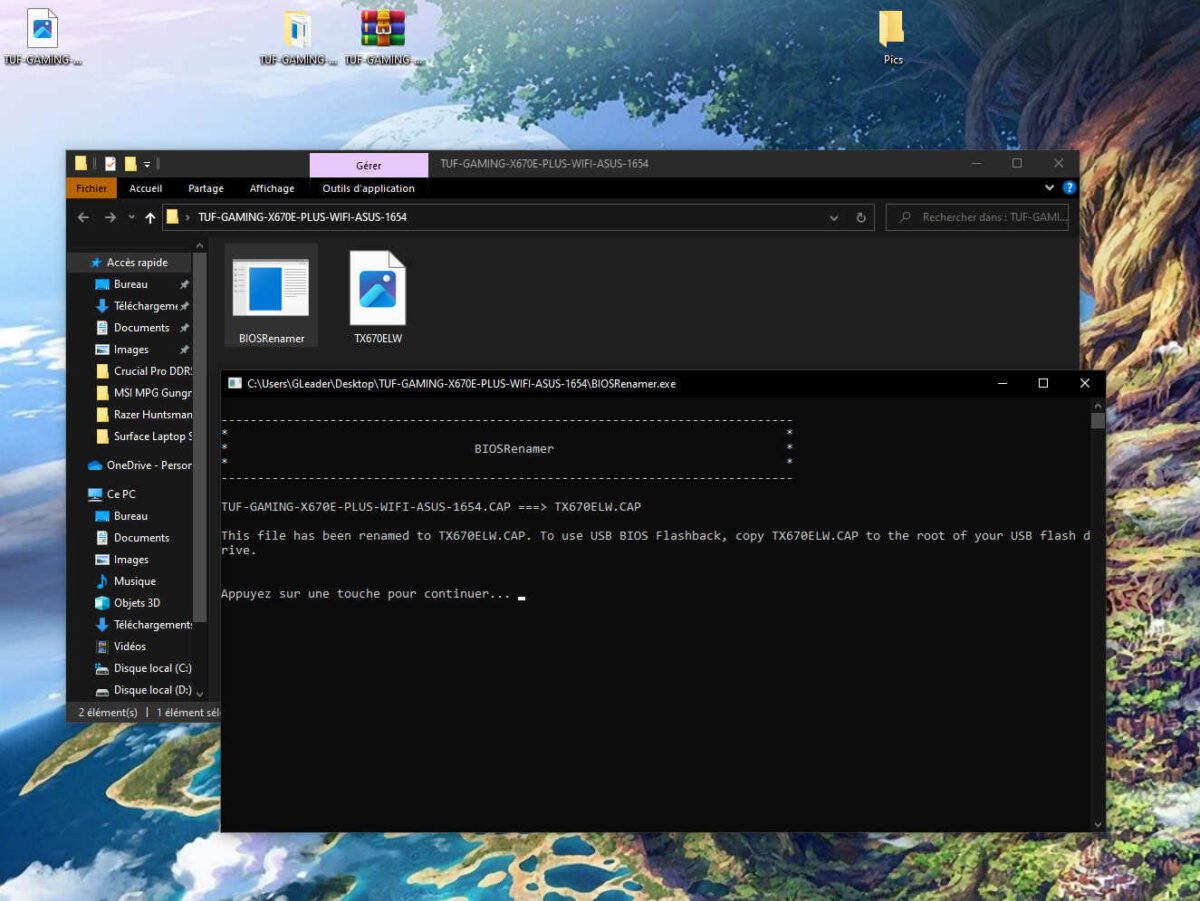
Extract the files into a folder if needed, then open that folder. Here you should find two files, the BIOS ‘.CAP’ file plus a renamer ‘.exe’ – other manufacturers like ASRock may only have one file. If you have a BIOSRenamer.exe, launch it and press enter inside the command prompt to confirm. Now the BIOS file should be renamed, in our case to ‘TX670ELW’. Note that this step is mainly necessary when using the BIOS Flashback feature.
Copy this BIOS file to a USB flash drive or somewhere easy to find – the flash drive may need to be formatted in FAT32 or exFAT for the BIOS to recognise it.
You’ll also want to make sure BitLocker is disabled, as this encryption feature makes updating the BIOS a right pain. It’s off by default on most systems, so chances are you’re already good to go, but it’s better to be safe than sorry. To check, open the software by typing BitLocker into Windows Search. If it’s active, you’ll want to switch it off, which may take some time. You can reactivate it once you’ve updated the BIOS if you choose.
Entering BIOS
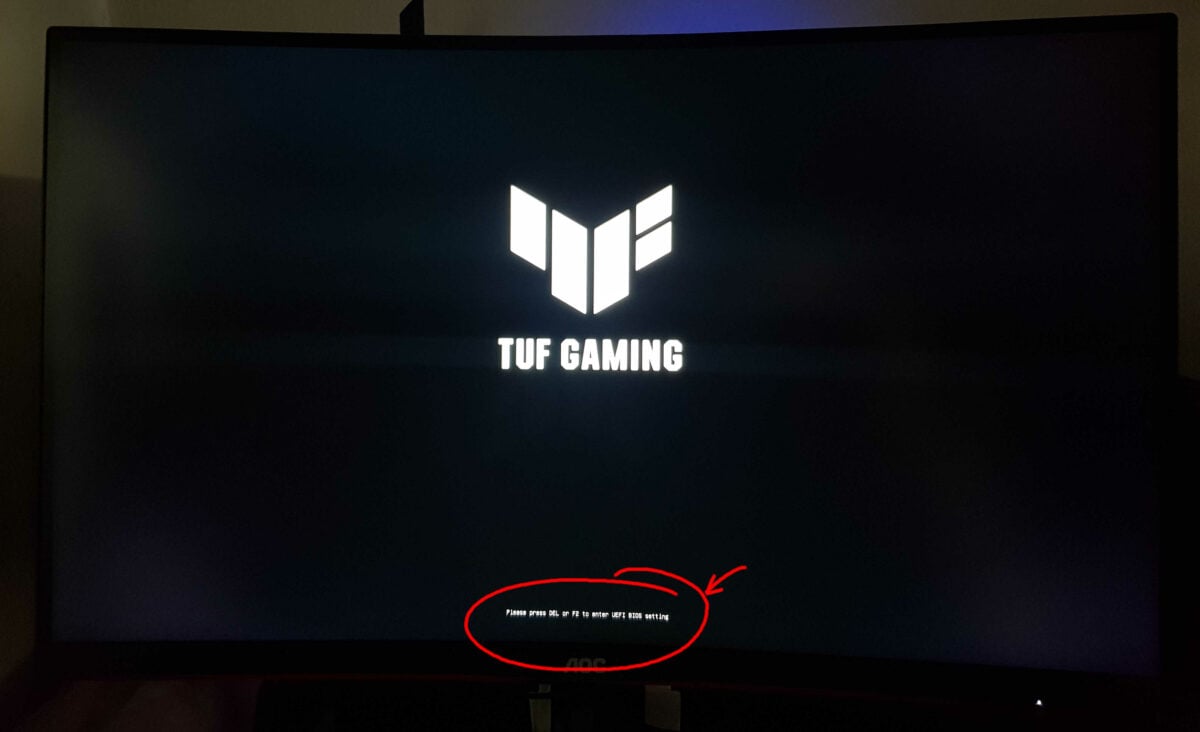
To enter BIOS, restart your computer and click on the ‘Delete’ or ‘F2’ key on your keyboard multiple times until BIOS opens – yes, we spam-click it, too. Some boards may use different keys, so look at the text during boot.
Before moving forward, manufacturers recommend loading default settings before proceeding with a BIOS update. Note that this will remove any manual tuning you have done inside your BIOS. Options like memory XMP/EXPO settings, overclocking or underclocking, fan speed curves, and even SSD/HDD boots orders will all be reverted to default.
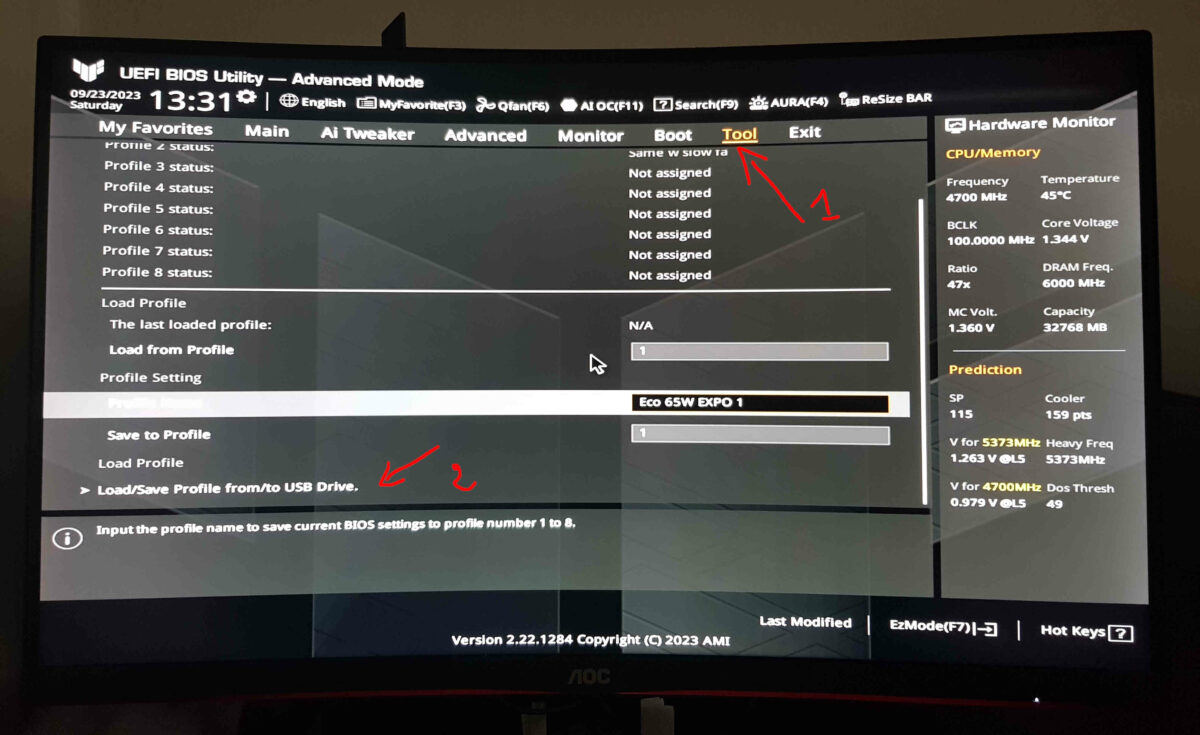
If you care about these, your board may have a backup option. For this Asus board, this is under the ‘Tool’ tab inside the ‘Asus User Profile’, called ‘Load/Save Profile from/to USB Drive’. Even the motherboard’s integrated profiles will be deleted when updating BIOS, so this is the only way to save your settings other than writing them down. After that, in the Asus BIOS you need to:
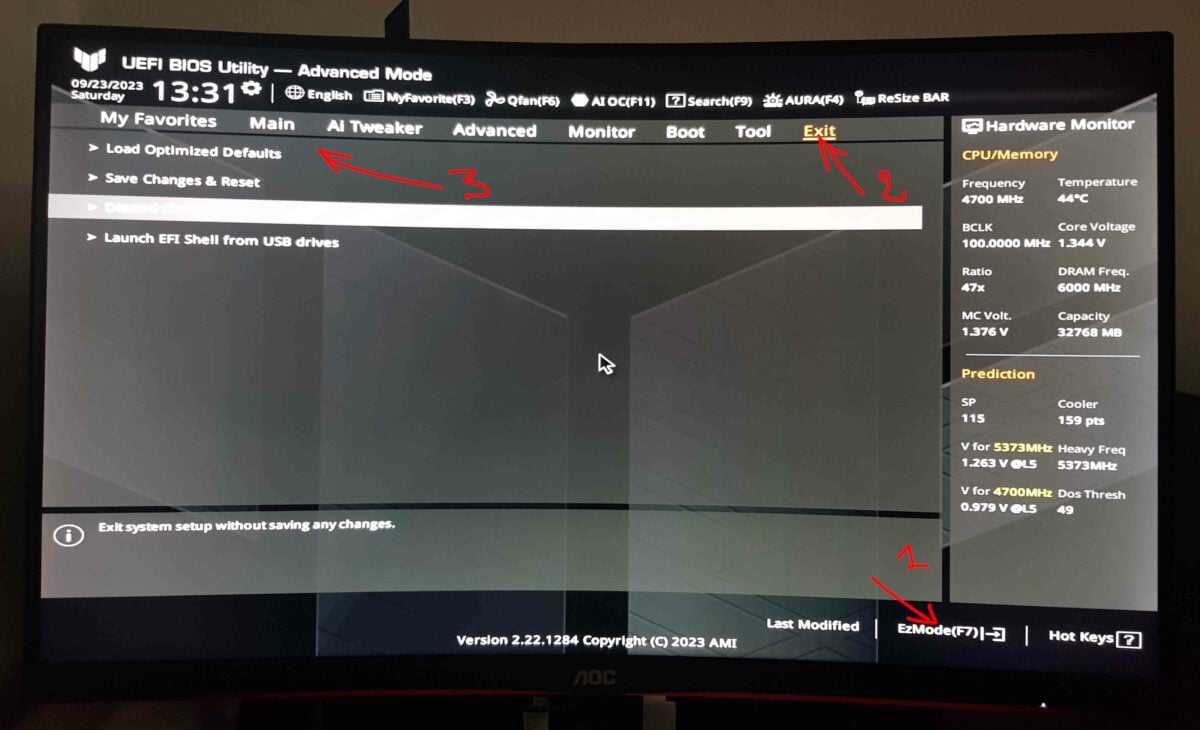
- Press F7 to enter advanced mode
- Select ‘Exit’ in the top right
- Click ‘Load Optimized Defaults’
- Select ‘Yes/OK’ if asked for confirmation
- Press F10 to save and restart your computer
- Select ‘Yes/OK’ to confirm the changes
- Spam the right key to re-enter your motherboard’s BIOS
Updating BIOS
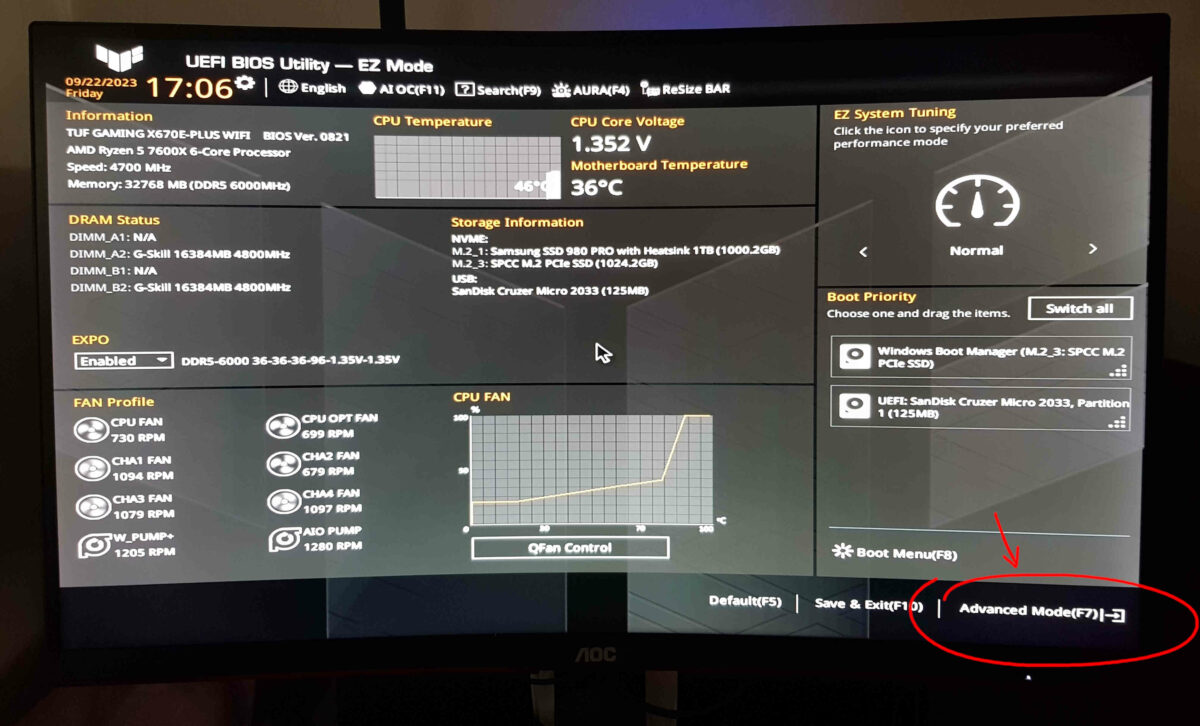
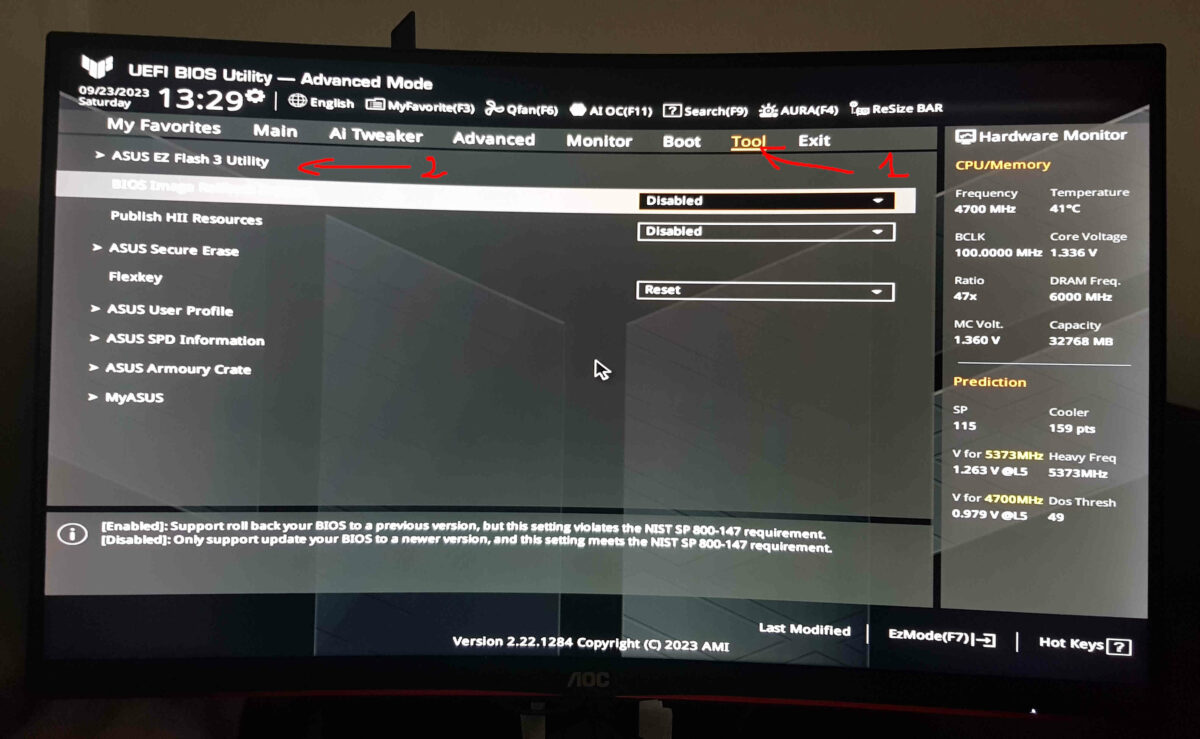
Now, with the files on hand and BIOS at default settings, we are ready to update. Start by pressing ‘F7’ or clicking ‘Advanced mode’ to view the advanced menu. Head to the ‘Tool’ menu, then click on ‘Asus EZ Flash 3 Utility’.
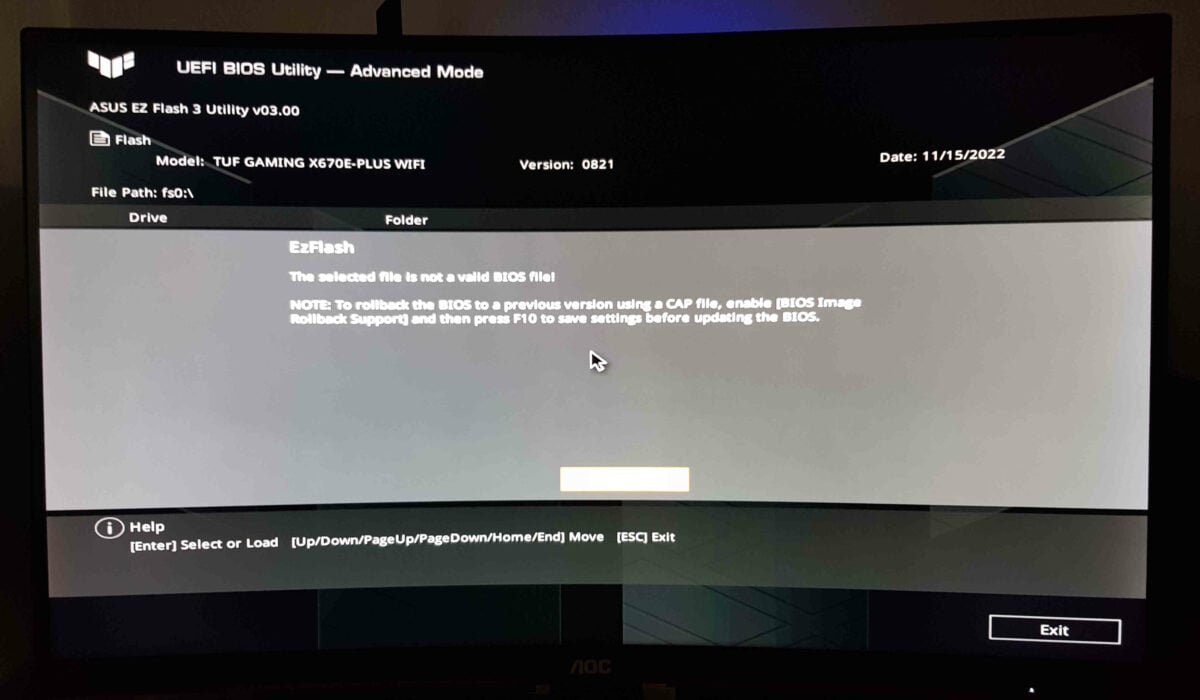
A new menu should open with the option to choose which drive or USB flash drive contains the BIOS file. In our example, it would be ‘fs0’ – a USB drive easily distinguishable by its smaller size (120MB). after selecting the file – ‘TX670EPL’ in this example, press enter to load it. Click Yes/OK to confirm if asked to.
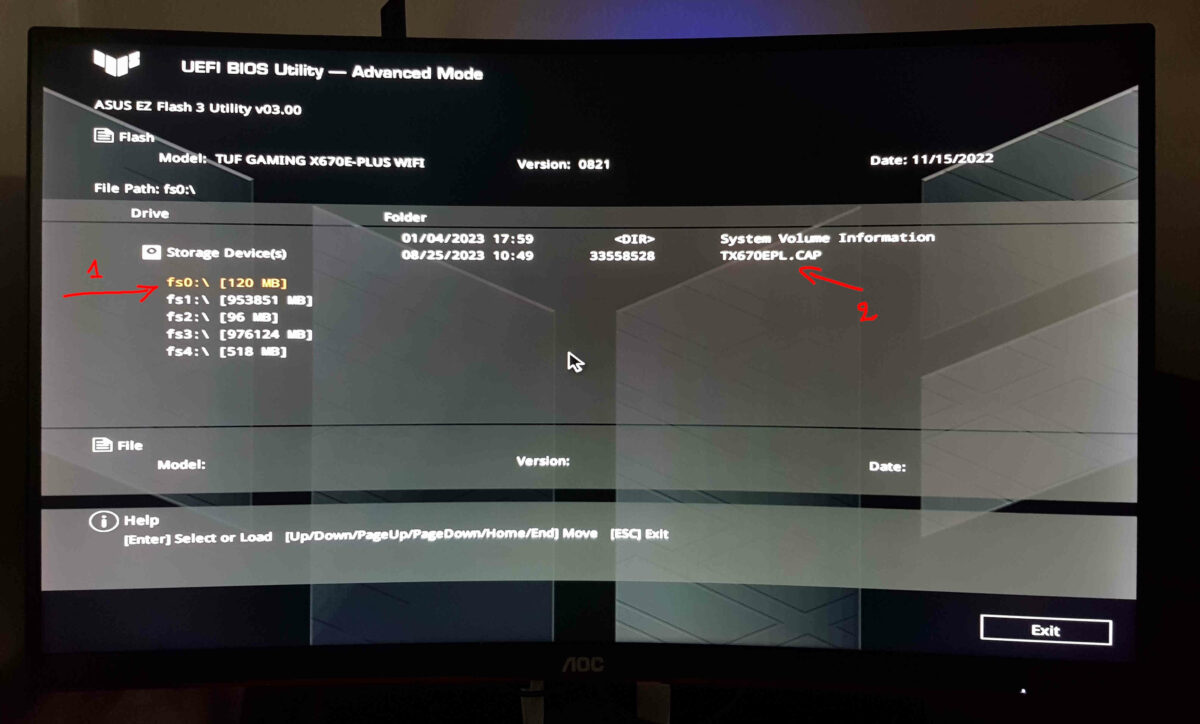
If you get a message that says “The selected file is not a valid BIOS file”, then double check you downloaded the correct BIOS for your motherboard. For example, I downloaded the ‘TUF Gaming X670E-Plus’ update file, which I have mistaken for a ‘TUF Gaming X670E-Plus WiFi’ patch. Yep, no one is safe from simple mistakes.
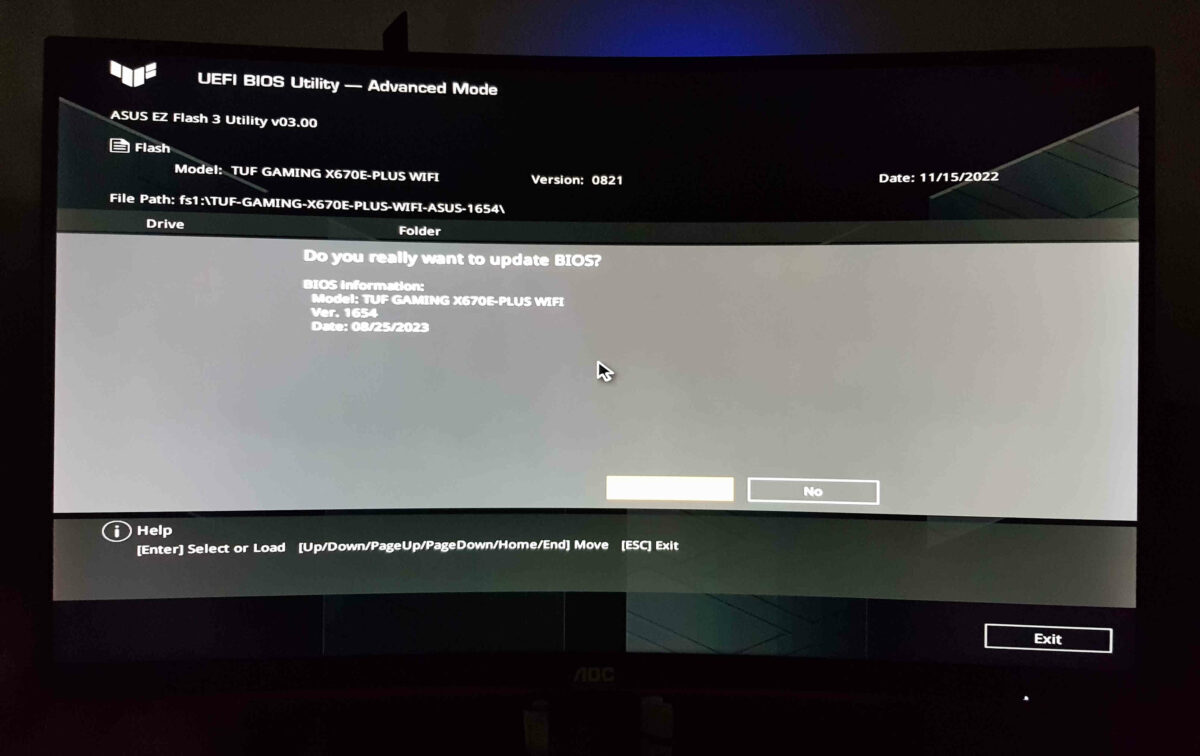
If your BIOS file is good, you will see a new window indicating the update’s version and date. If all seems OK, confirm by pressing Yes to start the installation.
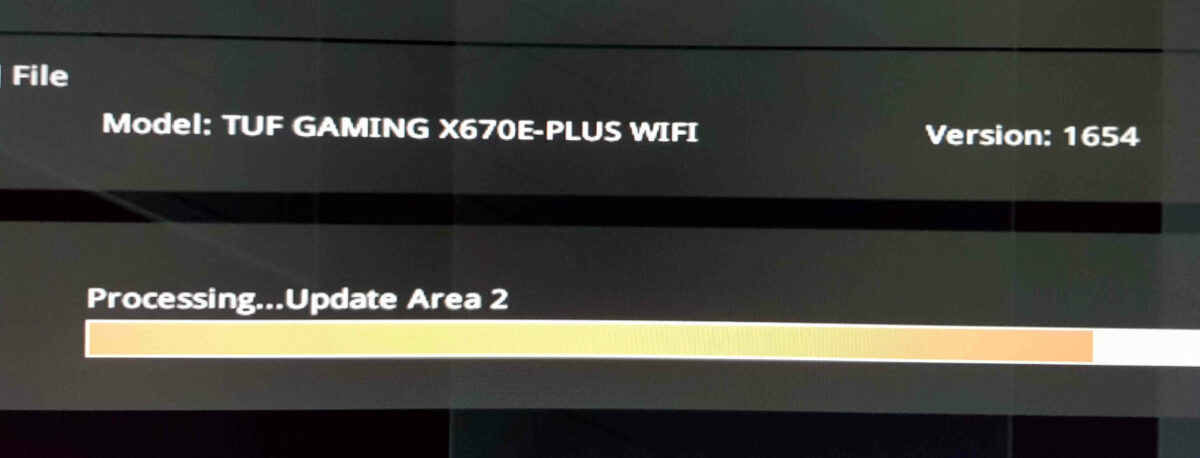
Wait for the installation to complete. It may take a couple of minutes. Try not to touch anything while the setup is running, and most importantly, do not turn off your computer.
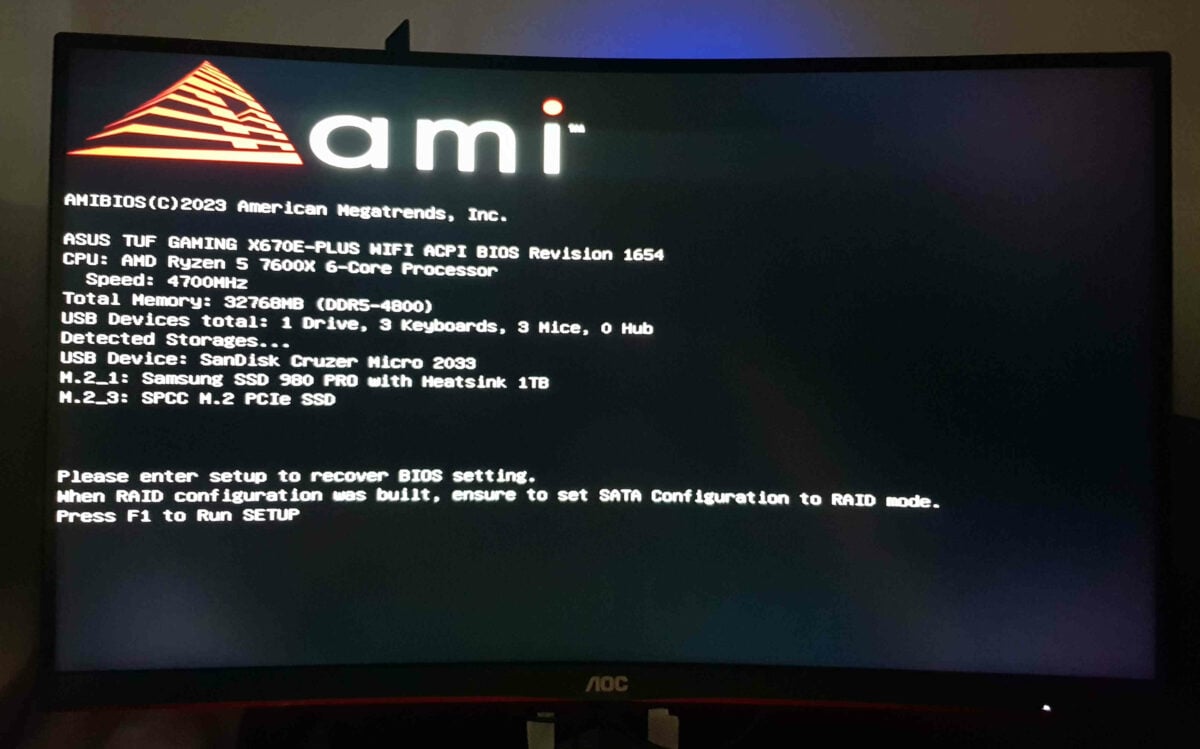
During or after installation, your computer may restart multiple times. Just leave it until Windows is loaded or until you are prompted to press ‘F1’ to run the setup. For the latter, clicking ‘F1’ will open the BIOS; press ‘F10’ to save and exit, and then Windows should load. Congrats, your motherboard is now running the latest BIOS update with all the benefits it brings.
You may want to go back into BIOS to enable XMP/EXPO memory profiles or tune back any setting you had prior to the BIOS update. If you have a backup, it’s time to load it by going to the same menu where you created it.
Here are some other vendors’ BIOS update procedures.
MSI
- Find your motherboard BIOS update files by searching on Google or going to the manufacturer’s website.
- Rename if needed, then transfer the file to a USB flash drive.
- Restart your computer and enter BIOS by hitting the ‘Delete’ key.
- Select ‘M-Flash’ on the bottom left and click Yes to reboot and enter flash mode.
- Select the file inside your flash drive and press Yes to confirm.
- Wait for the installation to complete.
- After finishing, the computer should restart automatically and enter Windows.
Gigabyte
- Find your motherboard BIOS update files by searching on Google or going to the manufacturer’s website.
- Rename if needed, then transfer the file to a USB flash drive.
- Restart your computer and enter BIOS by hitting the ‘Delete’ key.
- Select ‘Q-Flash’ on the bottom right – if you don’t see it hover your mouse on top of the arrow at the bottom or click F8 on your keyboard.
- Find your USB flash drive and select the update file.
- Click yes when asked for confirmation and wait for the installation to finish.
- The computer should restart automatically and enter Windows after finishing.
ASRock
- Find your motherboard BIOS update files by searching on Google or going to the manufacturer’s website.
- Rename if needed, then transfer the file to a USB flash drive.
- Restart your computer and enter BIOS by hitting the ‘Delete’ key.
- Go to the ‘Tool’ menu and select ‘Instant Flash’.
- Find the BIOS file you downloaded and select ‘Update’.
- Click ‘Yes’ if prompted to confirm and wait for the installation to complete.
- Again, your computer will ask you or will automatically restart and enter Windows after finishing.
Note that ASRock also has ‘Internet Flash’, which basically automatically finds the necessary file on ASRock’s servers and downloads it while inside BIOS. Neat.
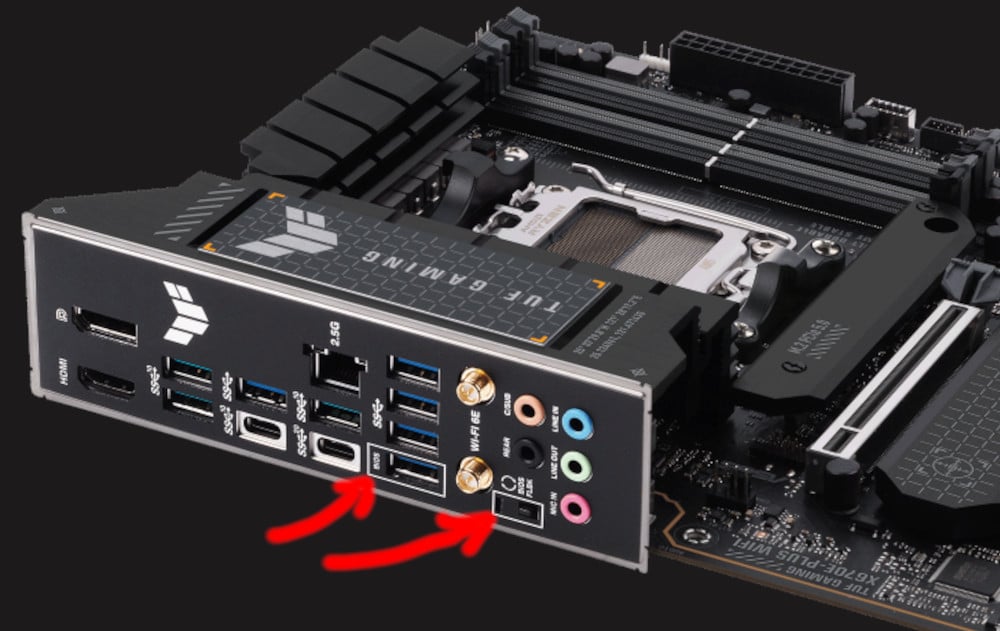
BIOS Flashback
Before wrapping things up, let’s talk about BIOS Flashback. This feature is available on some motherboards and allows you to flash BIOS from a USB drive without needing to boot or even have a CPU installed. Note that other brands may name it differently, for instance, Gigabyte calls it Q-Flash Plus.
If your motherboard can’t reach BIOS due to unsupported CPU/memory or due to a failed BIOS update, download the BIOS file using another machine, rename it as explained previously, then put it inside a USB drive – FAT32 recommended.
- Shut down your computer.
- Insert the USB drive into the dedicated USB port. Said port should have a marking indicating it’s for BIOS update.
- Press the BIOS Flashback button until the indicator LED starts blinking.
- Wait until the LED stops blinking to indicate installation completion. This can take multiple minutes.
- If your computer doesn’t start automatically after, turn it ON – it may restart multiple times while reconfiguring the new BIOS.
- After finishing, your machine should boot and prompt you to enter BIOS by pressing F1 – assuming CPU and RAM are installed.
Here you go; your machine is ready.