
Few things beat the excitement of putting together your own PC and seeing your creation spring to life for the first time. Shortly after comes the temptation to jump right into a game, and though that’s fine for pre-built PCs, where you can boot into Windows without checking anything, those who choose the DIY path ought to take a moment to ensure everything is configured optimally. There are several BIOS/UEFI settings you’ll need to optimise in order to unlock the full potential of your hardware.
Before we get into the details of my six top picks, it’s recommended to update your motherboard to the latest BIOS, preferably a non-beta version, as doing so later would wipe all the changes we’re about to suggest, potentially even those saved in profiles. It’s an important software update to keep on top of, as a new BIOS can improve CPU performance, RAM compatibility, and overall system stability, all while fixing potential security flaws and bugs. Also, make sure UEFI is enabled instead of CSM, as it’s a requirement for Windows 11 and Resizable BAR. While you’re at it, take the time to make sure your hardware is correctly detected, just in case a RAM module or storage drive isn’t properly configured, or the CPU is running hot. Your BIOS absolutely offers one of the best ways to identify any potential mishaps.
Before I start, note that I’m using examples from my own Asus AM5 motherboard, but you’ll typically find all these settings across different vendors, often under the same names. That said, some options may be locked or absent if you have an entry-level motherboard. Also, keep in mind that changes to BIOS carry inherent risk and may cause system instability and, worse still, an inability to boot. You can always reset by pressing the Clear CMOS button on your motherboard I/O panel – if available – or remove the battery located on the motherboard while the main AC power is unplugged, but it’s better to approach any setting changes armed with the requisite know-how. Let’s get started.
Enable memory profiles
Standing for Extended Profiles for Overclocking (EXPO) on AMD’s AM5 platforms, Direct Over Clock Profile (DOCP) on AM4 boards, and Extreme Memory Profile (XMP) on Intel systems, one or more of these profiles is contained within memory modules to provide predefined settings that unlock the full potential of your memory sticks with a single click. Each contains fine-tuned frequency, timings, and voltages, which the RAM manufacturer deemed achievable on that specific kit.
After installing new memory, your motherboard will automatically configure it at JEDEC standard 4,800MT/s speed, which is generally lower than the kit’s real capabilities, to ensure all systems can boot without issue. This helps circumvent instances where a memory kit or CPU memory controller can’t handle the rated speed of your RAM, especially for those exceeding the sweet spot of your CPU, i.e. 6,000MT/s on AMD Ryzen 7000. Simply enabling EXPO, DCOP, or XMP orders your BIOS to extract and apply the optimal settings saved within your RAM modules.

Enabling EXPO on my Asus motherboard BIOS entails navigating to AI Tweaker, selecting the Ai Overclock Tuner dropdown menu and choosing EXPO I or EXPO II. Yes, each kit can contain multiple profiles, and there’s no hard-and-fast rule for what differentiates them. Generally speaking, EXPO II contains full sub timings while EXPO I favours compatibility, but the onus is on you to ensure you choose the profile you desire. When done, don’t forget to save (F10).
While my example focussed on Asus, the procedure is similar on most motherboards, be it Intel or AMD, and the procedure to set a memory profile will almost certainly be detailed in your motherboard manual. Overall, enabling EXPO / DCOP / XMP on your system can net a 5% to 15% performance boost, given software/game sensitivity to memory speed. Considering the ease of implementation, this is definitely an option worth activating.
Set CPU power limits or PBO
After memory profiles, the next best thing to boost performance and efficiency is CPU power. Why not the first, you may ask? Well, it’s mainly due to variation from CPU to CPU, meaning that one person’s gains may not be possible on your chip. However, if you get lucky and win the silicon lottery, tuning your CPU power limits and PBO can result in outstanding performance or efficiency gains.
As its name implies, CPU power limits define how much electrical power your CPU is allowed to consume. The higher this limit is, the faster the CPU can get, albeit at the cost of increased temperature. Power limits are especially potent on Intel CPUs as they provide ample headroom for the cores to maintain their boost frequencies. On the AMD platforms, lowering these limits can lead to great efficiency improvements with little performance hit.
CPU power limits go hand in hand with PBO (Precision Boost Overdrive) on AMD CPUs, allowing the CPU to run at a higher frequency, especially when using a decent cooler. PBO is a semi-automatic overclocking feature that dynamically adjusts CPU voltage, frequency, and power draw, based on temperature, motherboard VRM capabilities, and your defined power limits. On Intel platforms, the equivalent option is called Multicore Enhancement (MCE).
While PBO doesn’t fully replace manual overclocking, it offers a nice balance between ease of use and performance gains, reaching 10% or higher in some cases. Tweaking power limits can also be a handy option if you don’t like your Ryzen CPU to run at 95°C.
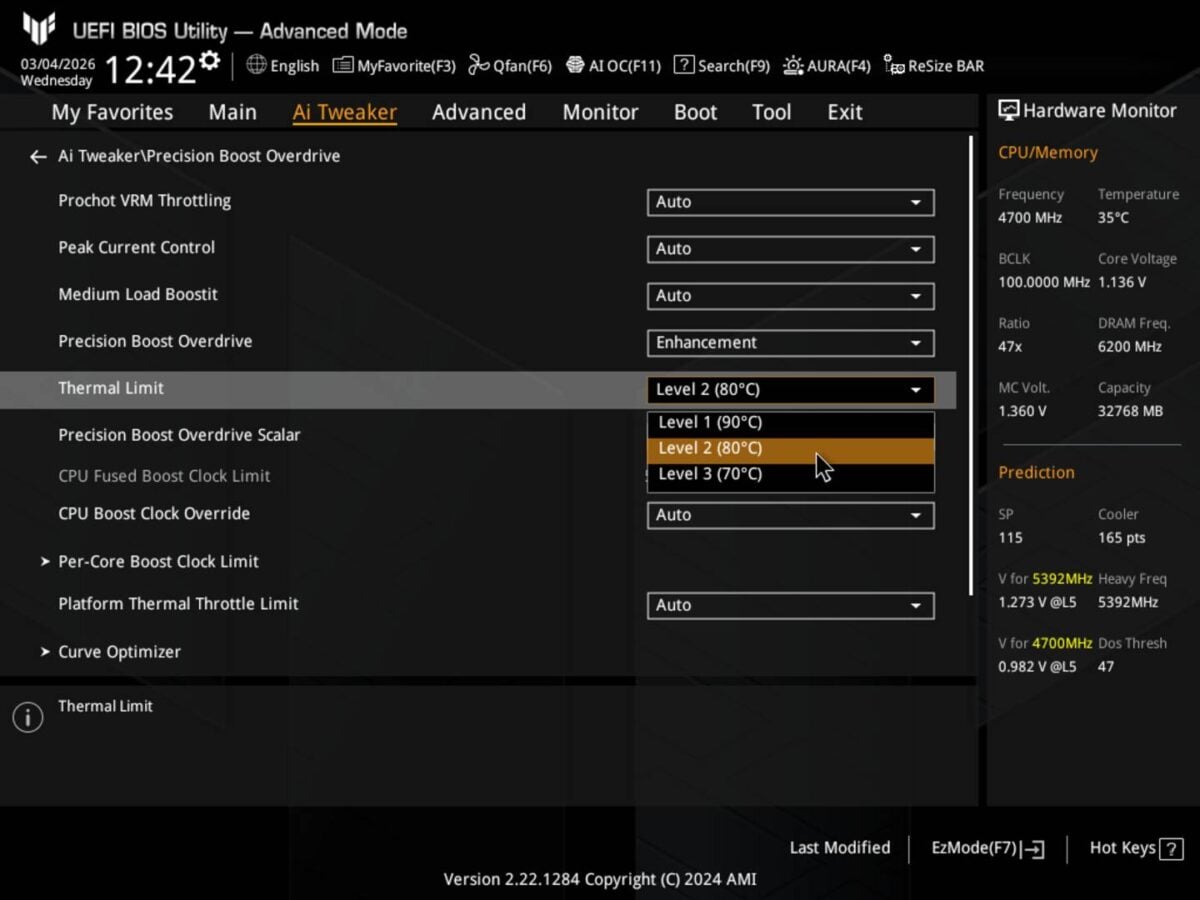
Configuring PBO or power limits on my Asus AM5 motherboard entails entering BIOS (Del / F2), switching to Advanced Mode (F7), heading to the Ai Tweaker tab and then to Precision Boost Overdrive. If you see a warning about the risks of overclocking, press OK. Click on the drop-down menu labelled Precision Boost Overdrive and select the option you like:
- Enhancement – Allows you to choose a maximum temperature target which the CPU will have to adhere to, but could result in performance loss if set too low.
- AMD Eco Mode – Allows you to limit the maximum power going into the CPU, which also lowers the temperatures and performance slightly.
- Manual – Allows you to select exact maximum power and current values for the CPU, i.e. the aforementioned power limits.
There is also an option I like a lot, called Curve Optimiser, though this requires additional testing to ensure your system is stable for 24/7 operation, and I’ll cover that in more detail in an upcoming guide.
Customise fan speed curves
Now that your system is properly optimised, there is one last thing that can disrupt your flow: noise. Fortunately, it’s easy to customise your case and cooler fan speeds to strike the best balance between heat extraction and noise.
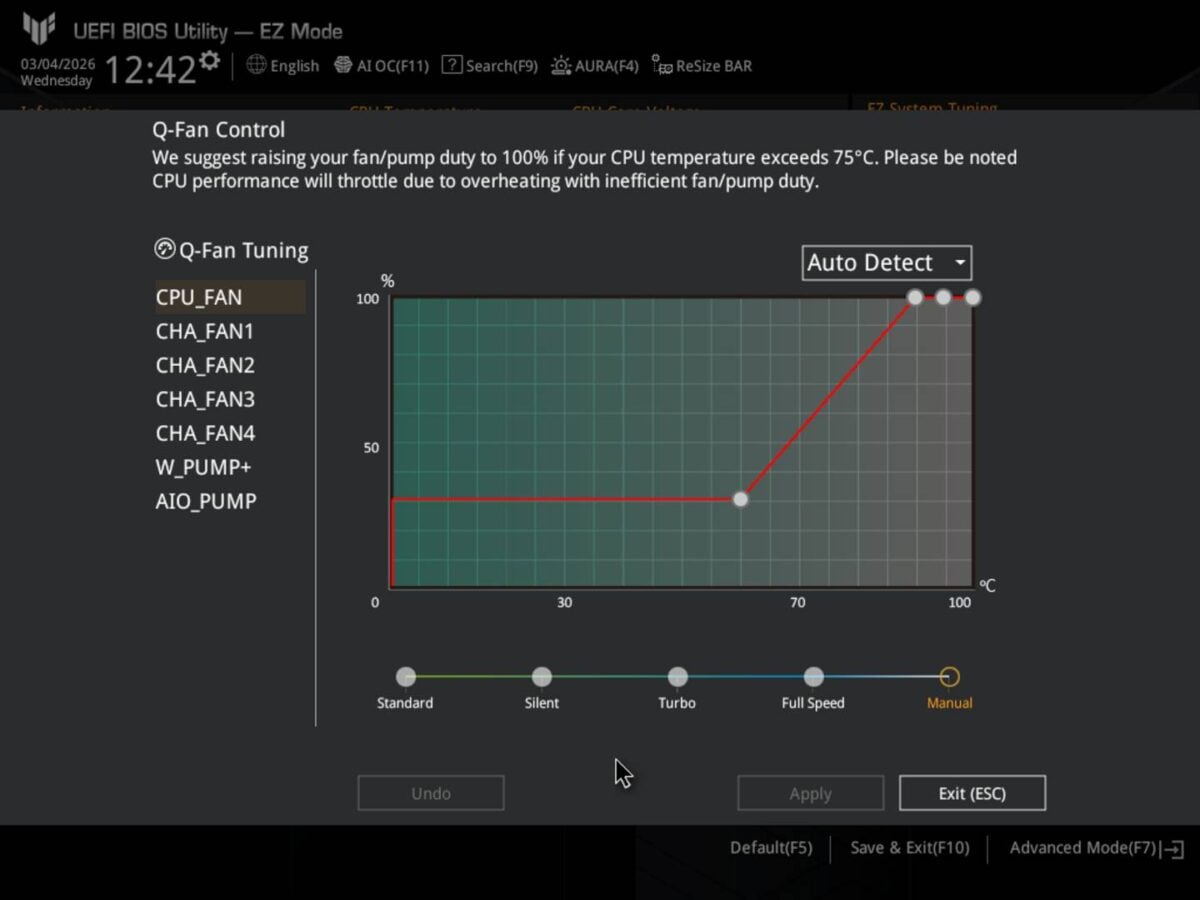
Not gonna lie, customising fan curves is fun and strangely addictive. Each motherboard vendor does it differently, but the end goal is the same; finding an optimal balance between fan speed and fan noise. My Asus board gives me a choice of standard, silent, turbo or full-speed profiles, as well as a manual setting that allows me to configure the fan curve to hit certain speeds based on core temperature. Personally, I prefer to keep all my fans around 30% until the system hits 50°C or 60°C.
Boost gaming with ReBAR
ReBAR (Resizable Base Address Register), also called Smart Access Memory by AMD, is a feature of modern PCs that can improve performance in certain workloads by changing how the CPU interacts with GPU memory. It allows the CPU to access the entire GPU frame buffer (VRAM) – via PCIe – at once, instead of in small 256MB chunks, reducing repeated memory requests and improving data transfer efficiency. Enabling Resizable BAR is known to net performance gains in gaming workloads, especially on AMD Radeon GPUs.
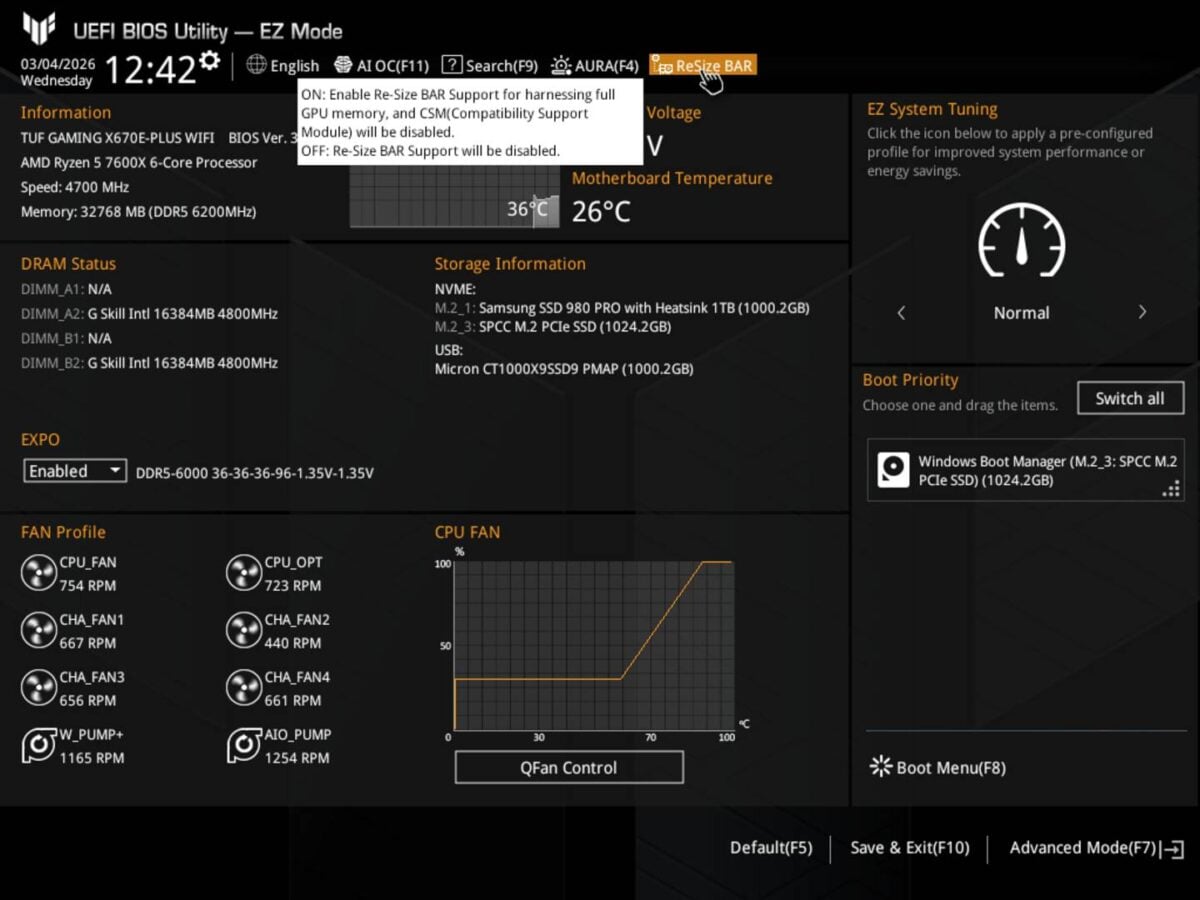
Often one of the simplest BIOS changes available, ReBAR is typically a one-click toggle. On my Asus board, it’s right there on the homepage, where I simply click the drop-down menu and change Resize BAR to ON. To verify that ReBAR is active on Radeon GPUs, head to the Performance section of the Adrenalin driver, and under the Tuning tab you should see that AMD Smart Access Memory is enabled. Tests have found that ReBAR can boost frame rates in compatible games by more than 10%, depending on settings and system specs.
Enable TPM and Secure Boot
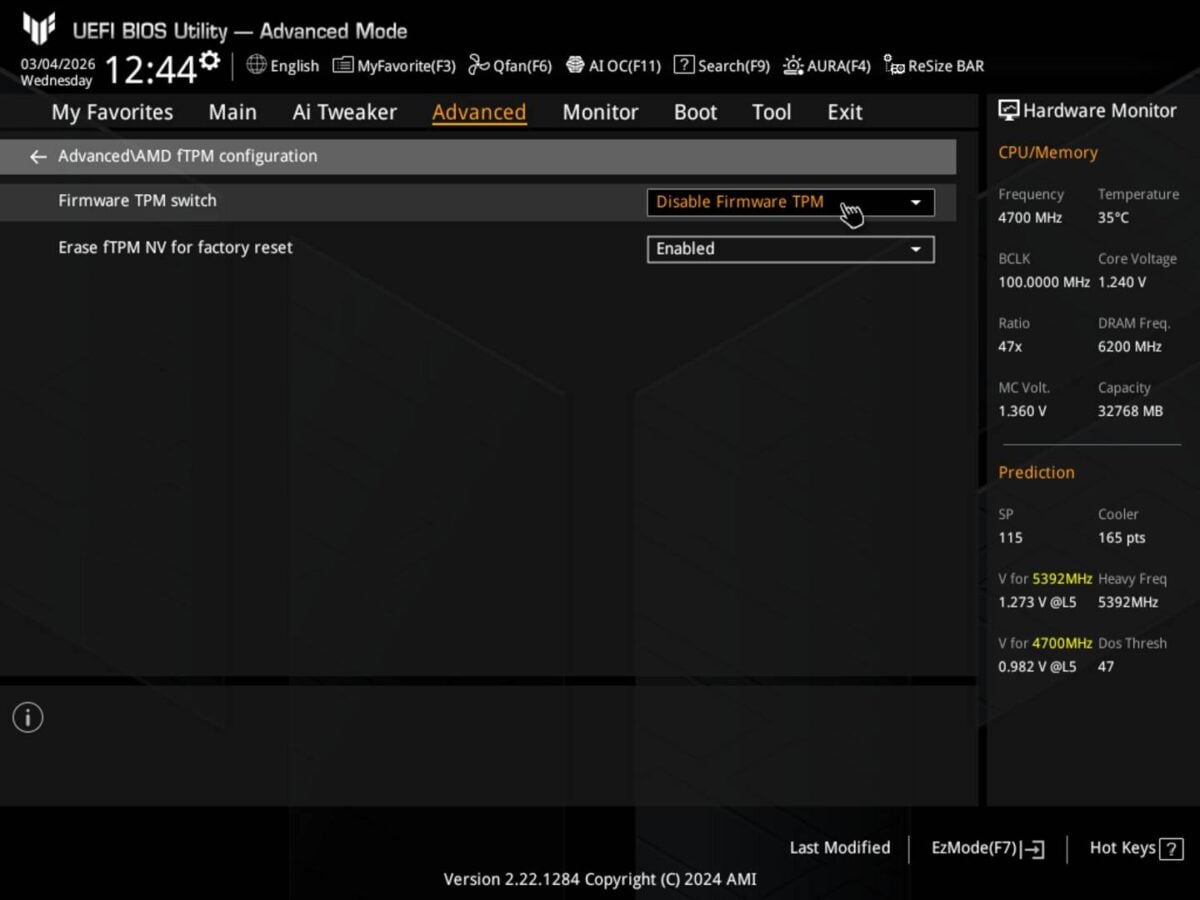
TPM (Trusted Platform Module), also called fTPM on AMD systems, is a security feature where a cryptographic key is stored at the hardware level to provide a root of trust for platform security. TPM is used to verify that your system hasn’t been tampered with. As such, it’s an integral part of sensitive data protection and a requisite for BitLocker disk encryption. It is also required by Windows 11 and some modern game anti-cheat systems.
To enable it on most Asus motherboards, enter the BIOS (Del / F2), then switch to Advanced Mode (F7), go to the Advanced tab, click on AMD fTPM configuration, here you should find an option called TPM device selection, select it and choose Firmware TPM. You may see a pop-up with further information about TPM, press OK. On Intel systems, this option is named PTT and can be found under PCH-FW Configuration. Save and reboot.
Note that if you already have an operating system (OS) installed, you will need to set your boot drive to a GPT partition instead of MBR. We won’t cover this aspect here since we are focusing on newly built systems, but you can easily find guides online.
As for Secure Boot, it’s a UEFI firmware feature meant to prevent malware/unsigned code from loading before the OS during system startup. It is a part of Windows 11’s minimum requirements when paired with TPM 2.0.
To enable Secure Boot, head into the BIOS (Del / F2), then enter Advanced Mode (F7), navigate to the Boot section, go to Secure Boot, then enable Secure Boot state and select your OS in the OS Type section.

Note that Secure Boot may stop custom OS versions from loading, such as those with disabled Windows 11 telemetry, or some Linux distributions. If you find yourself in this situation, you can disable it. Again, press F10 to save your changes.
Disable software auto install
Many modern motherboards come with auto-deploying software utility suites that prompt you for installation following the first boot of Windows or after major updates. While these apps can be useful for updating your drivers or controlling RGB, their prompts for your authorisation to install can be annoying. If, like me, you prefer a clean system with minimal apps running unnecessarily in the background, such suites make little sense as their usefulness tends to be limited or temporary. Having a pop-up reminder is unnecessary and potentially annoying.
There is a potential security concern, too. In the case of Asus’ Armoury Crate, there was a case of a security vulnerability in the way the installer was implemented, opening an attack vector for malicious actors to inject code into user systems. Such vulnerabilities can happen, but if you aren’t planning to use the software, or prefer to choose what you install, it’s better to have this feature disabled just to be safe.
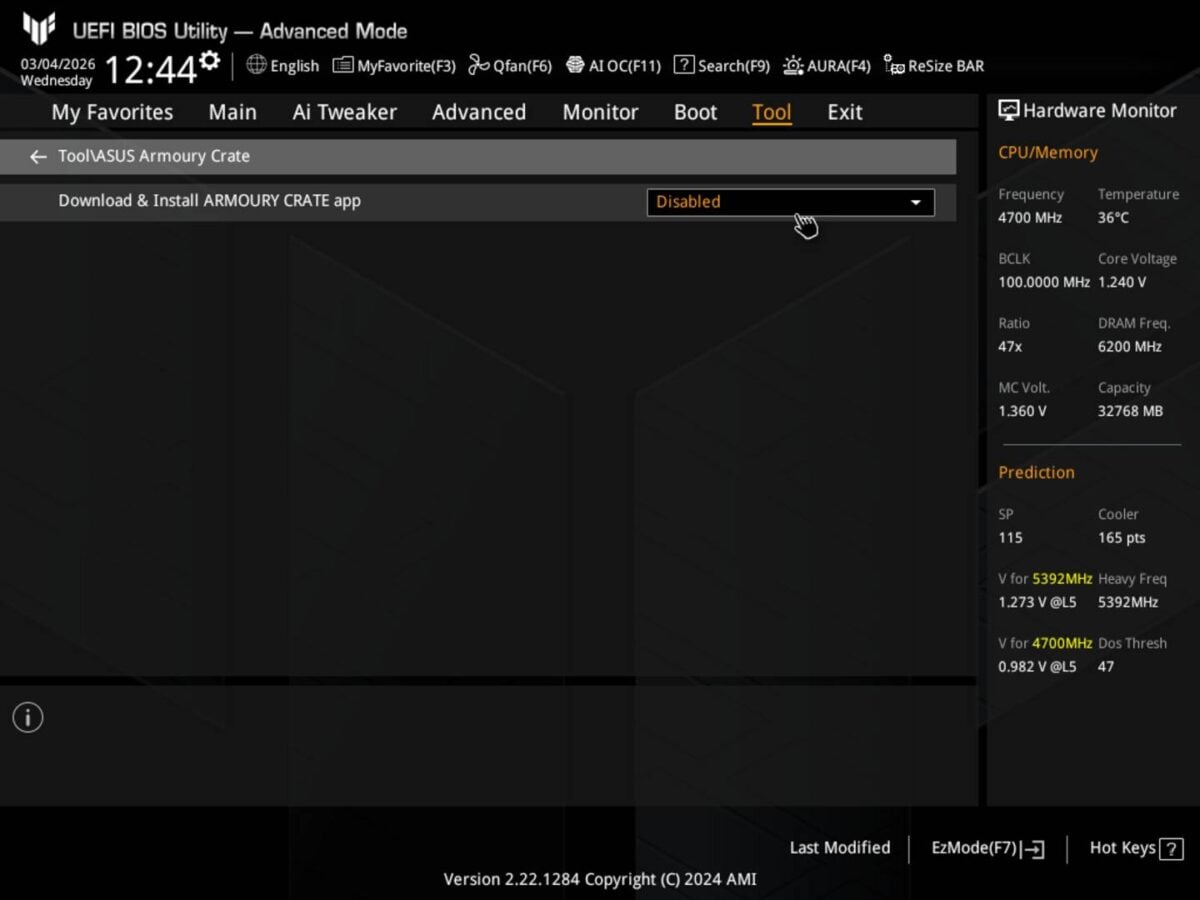
Another simple tweak, simply head over to Advanced → Tools → Asus Armoury Crate, then set Download & Install Armoury Crate app to Disabled. Once again these steps may vary slightly depending on your BIOS version and motherboard brand, but the terminology is often similar.
There are, of course, many more important BIOS settings to pore over. As a starting point, the above half-dozen will set you well on the way toward extracting optimal results from your beloved build.