
New games launch all the time, and if you want to get the most out of Baldur’s Gate 3, Starfield, or Assassin’s Creed Mirage, you’ll want to update your GPU drivers. Nvidia, AMD, and Intel regularly publish new drivers to, well, drive your graphics card in the right direction, letting you take full advantage of features and optimisations. On the flip side, if you’re experiencing graphics issues, you might want to consider rolling your driver back to a previous one as a potential fix. Either way, we have you covered step-by-step.
For those unaware, driver updates can deliver impressive frame rate improvements. Starfield got a 16 per cent jump with AMD’s Software Adrenalin 23.8.2 and Assassin’s Creed Unity managed a whopping 313 per cent increase with Intel’s Arc and Iris Graphics Driver 31.0.101.4514. Sometimes, they also bring handy features, like RTX Video Super Resolution with GeForce Game Ready Drivers 531.18
1. Download your GPU driver
Starting with the easiest part, getting the installer. For this, you need to enter the website of your GPU maker – we’re talking about Nvidia, AMD, and Intel, not AIBs like Asus, Gigabyte, and MSI.
Nvidia
Nvidia owners have the option of downloading GeForce Experience to automate the process, but this comes with the bulk of software. If you want further game optimisations, another launcher, and a game capture overlay, then this might be a better way for you. Otherwise, you’ll want to go the manual route by simply heading to www.nvidia.com and selecting ‘Drivers’ on the top right side.
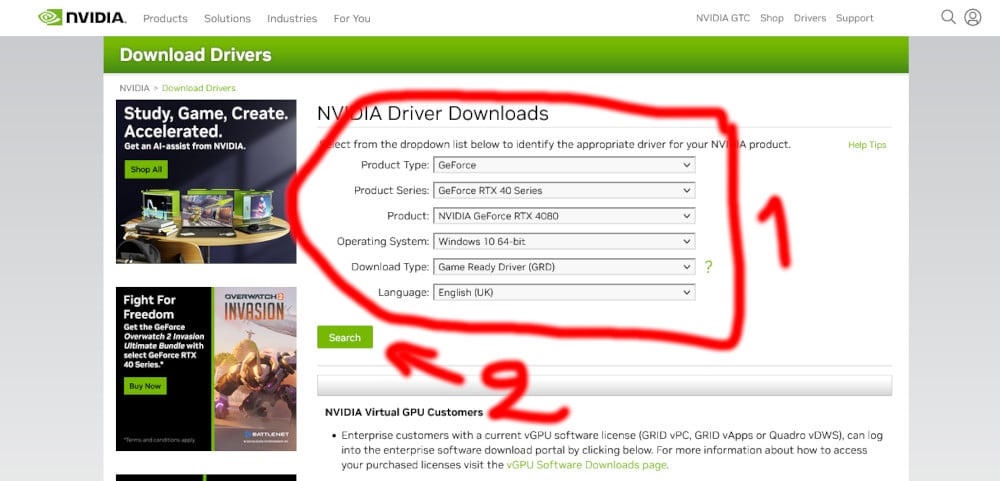
Find your graphics card model by filling in each category from top to bottom. For example, you can find an RTX 4080 by selecting:
- Product Type: GeForce
- Product series: RTX 40 Series
- Product: Nvidia GeForce RTX 4080
- Operating system: Windows 10
- Download Type: Game Ready Driver
Selecting GeForce opens up the gaming range of graphics cards. Don’t be confused by the Nvidia RTX / Quadro option, as this is reserved more for workstation GPUs. Generally, it doesn’t matter too much what card you choose as an RTX 4080 driver is compatible with an RTX 4070, and so on, but it can’t hurt to select the correct one just in case. Besides, the installation will be prevented if you download the wrong one, so your PC won’t go boom if you make a mistake. This goes for Intel and AMD, too.
It’s more important to select the correct type of driver for you. Game Ready Drivers are better for the latest patches for games and DLC, but you might want to change this to Studio Drivers if you prioritise video editing, livestreaming, or other creative workflows.
After selecting your parameters, click on ‘Search’.
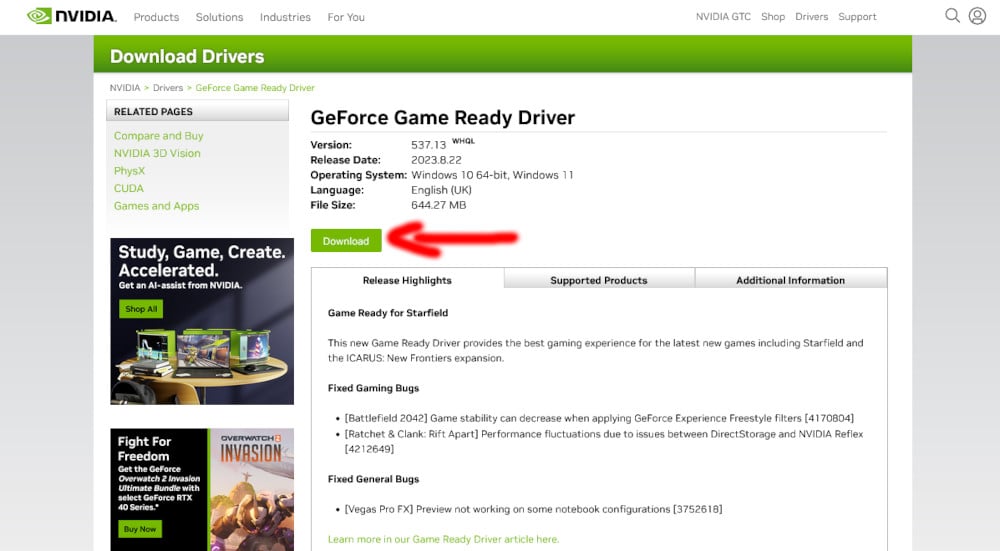
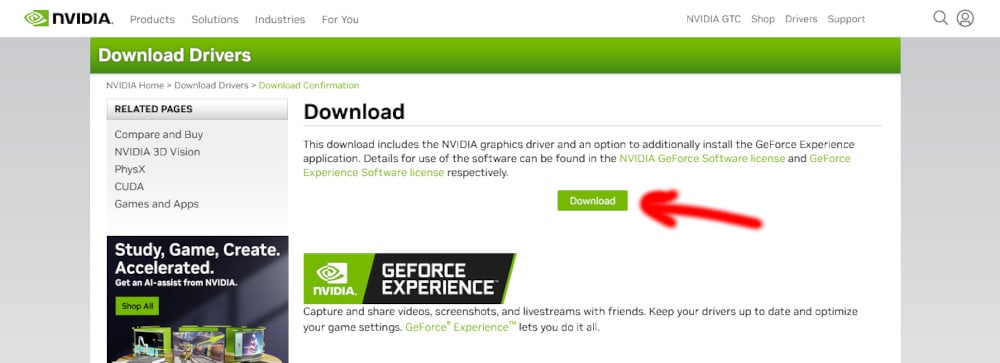
A new page will load, click on ‘Download’, then press again on ‘Download’ on the next page to get the installer file. Wait for the download to complete and move to the next step.
If, for some reason, you want to download a historical driver, you need to use the Nvidia advanced driver search. Here, you select all the same things you would above but are presented with a list of drivers with a release date. We generally recommend reverting back to the next-latest driver you didn’t have issues with if you’re troubleshooting, as you don’t want to lose support for anything.
AMD
AMD Software Adrenaline Edition can handle driver updates for you, but this comes with game stats, performance reports, and a whole host of other things you may or may not want. Going the manual route, you need to head over to www.amd.com – shocking, right? Click ‘Resources & Support’ on the page’s top, then ‘Download’. Under ‘Radeon Graphics & AMD Chipsets’, select ‘Drivers’.
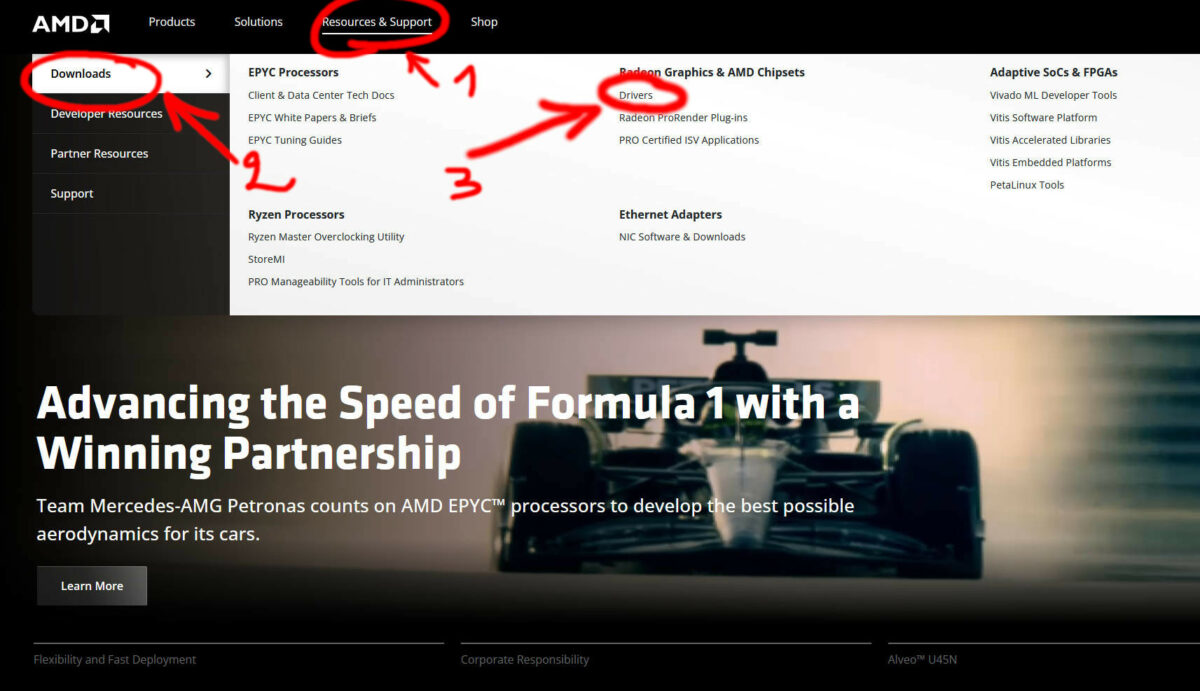
A new page should load where you will find a selection menu. Fill it according to your product, for example, an RX 7900 XT would be;
- Graphics
- AMD Radeon RX 7000 Series
- AMD Radeon RX 7900 Series
- AMD Radeon RX 7900 XT
You can also use the ‘Search for your product’ bar if you get lost in these menus. After choosing the exact GPU model, click on ‘Submit’
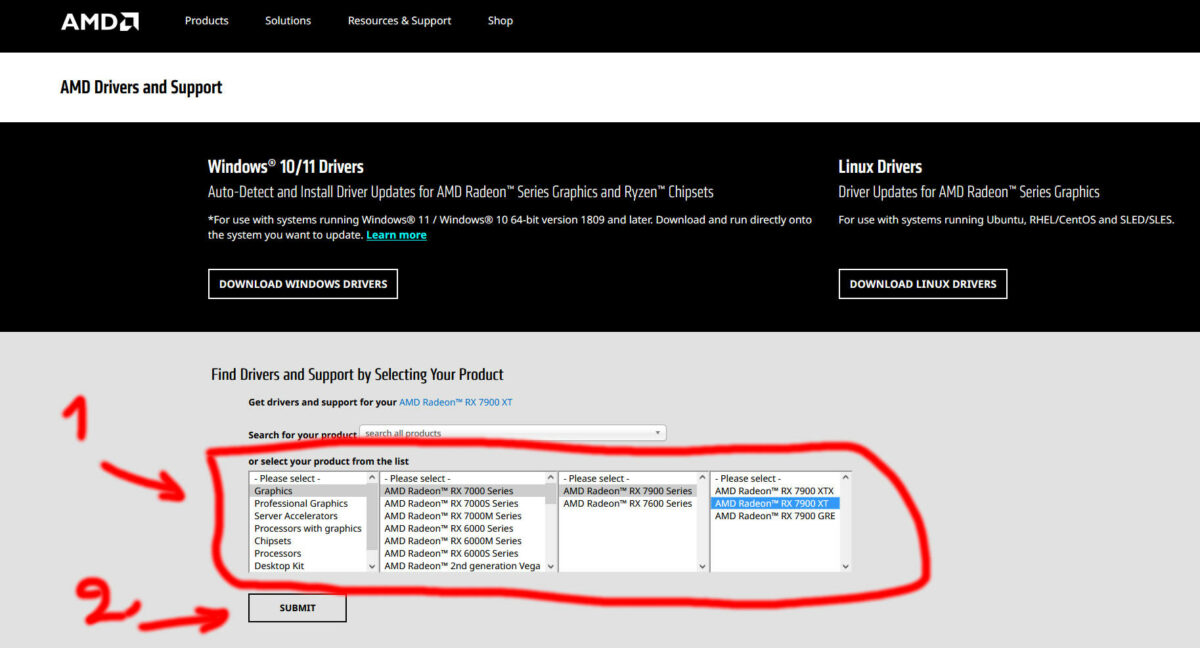
Now all that’s left is to pick your operating system by clicking on the plus (+) sign and pressing ‘Download’ under ‘AMD Software: Adrenalin Edition’.
There’s also the option to get the ‘Auto-Detect and Install’ that can automatically find your GPU model if you have no idea about what’s inside your computer.
Wait for the download to complete and move to the next step.
AMD makes it a little trickier to rollback your drivers if you experience any issues, as it doesn’t show any on its website. Fortunately, Guru3D has a list of all the previous drivers for you to download so you can revert if needed.
Intel
Go here and click on ‘Download here’ under ‘Latest WHQL Certified Game On Drivers’.
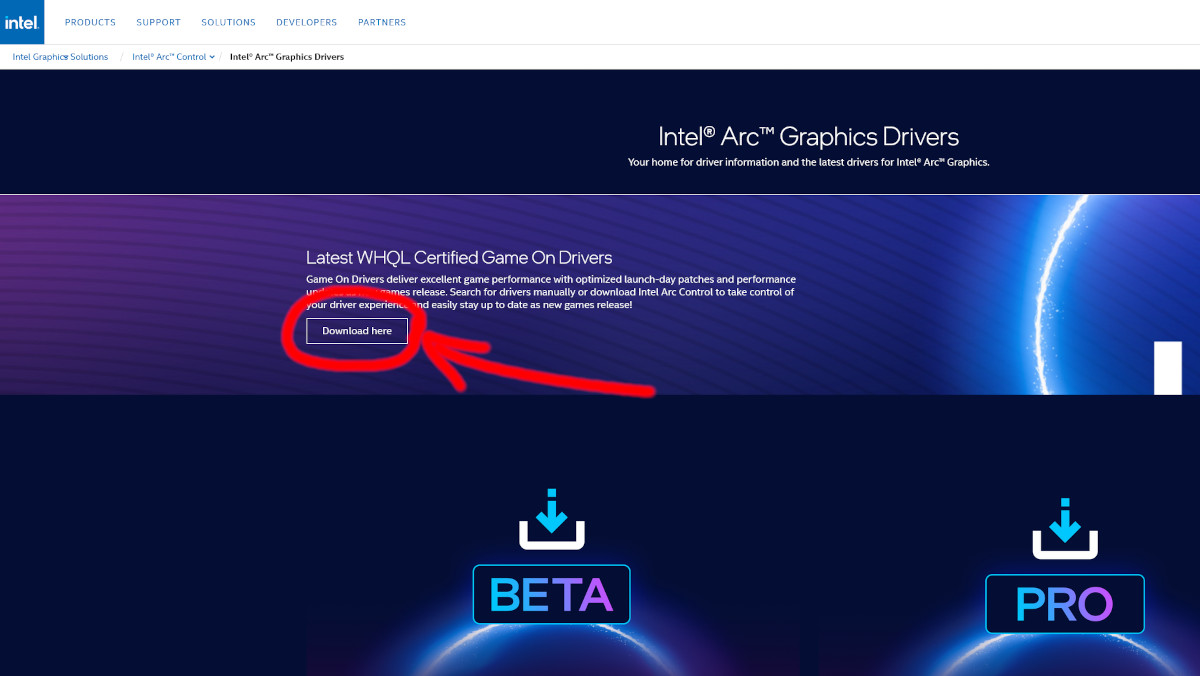
The latest version should automatically select for you, but you can change it if you want another one for some reason. Click on ‘Download’ when you are ready.

At the bottom of the page, you can also find a list of compatible products if you want to be extra sure. Or you can use Intel’s Driver and Support Assistant to detect your GPU model automatically – you don’t need this with our guide.
Wait for the download to complete and move to the next step.
If you want to revert back to an older driver because you’re experiencing issues, it’s as simple as searching for your graphics card model here and selecting which driver you want to download from the dropdown menu.
2. Cleaning any residue from older drivers
This step is not mandatory, but everyone likes a clean house, and it can potentially avoid issues from the leftover drivers you no longer need. We recommend you follow these steps if, let’s say, an installation failed due to a computer crash or a power outage, but most importantly if you are changing from one GPU brand to another.
For those choosing a clean install, note that all three brands’ drivers also include an option to clean any previous files, but the solution we opted for can delete any GPU driver regardless of the brand.
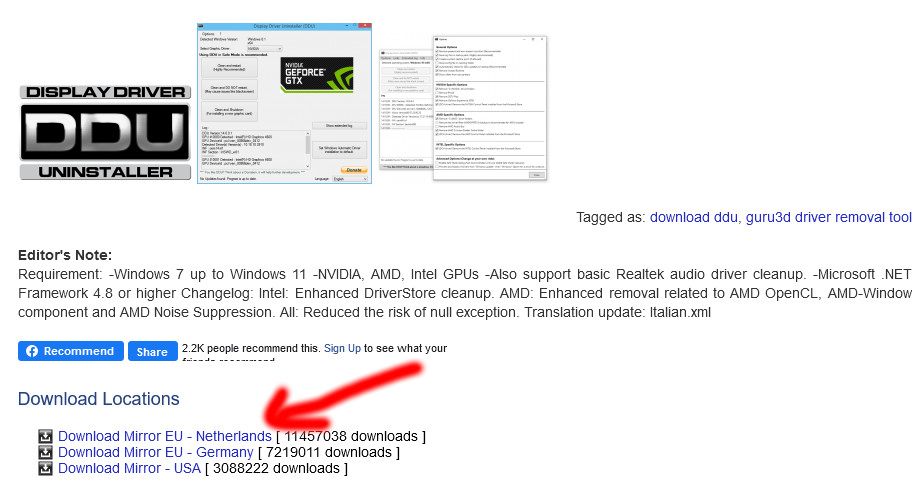
To do so, go here and click on ‘Download Mirror’ near the bottom of the page, and wait a bit for the download to complete.
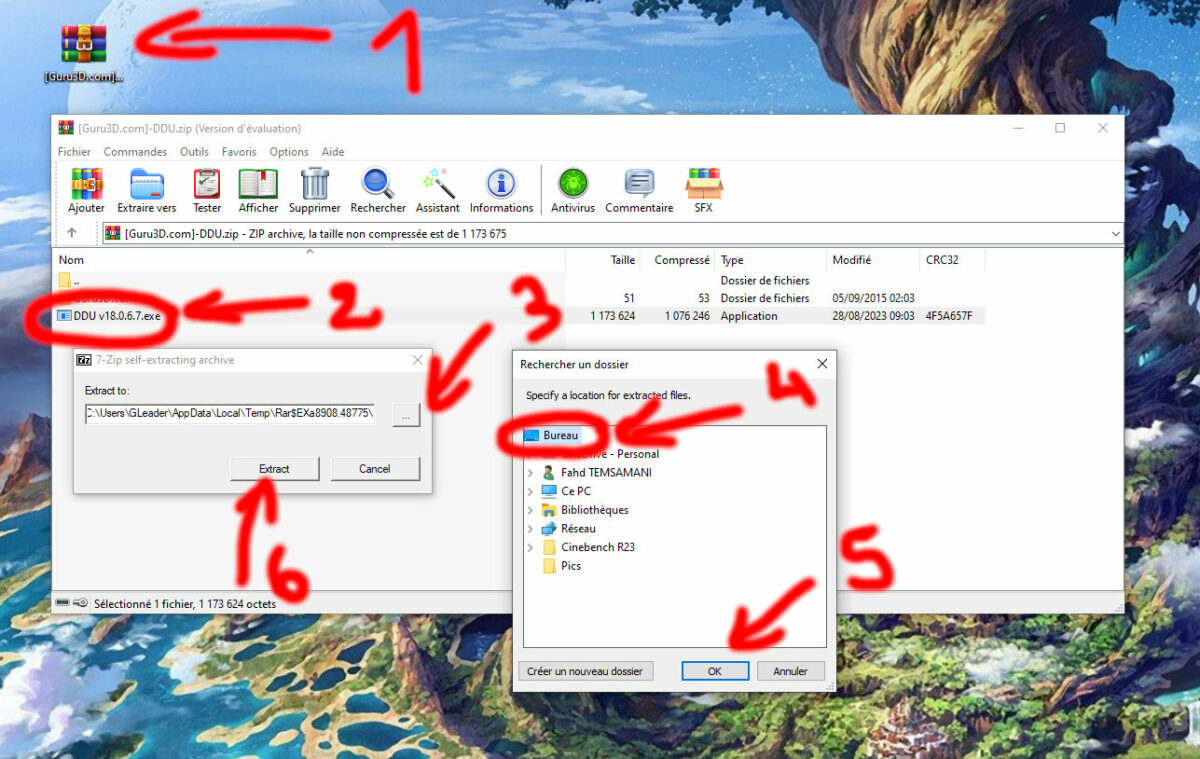
Open the zip file or extract it however you like, run the DDU executable and choose a target location to put files in by clicking on those three dots – we choose Desktop. Press Extract.
Before proceeding, you may want to unplug or disconnect your machine from the internet to avoid Windows automatically reinstalling your drivers.
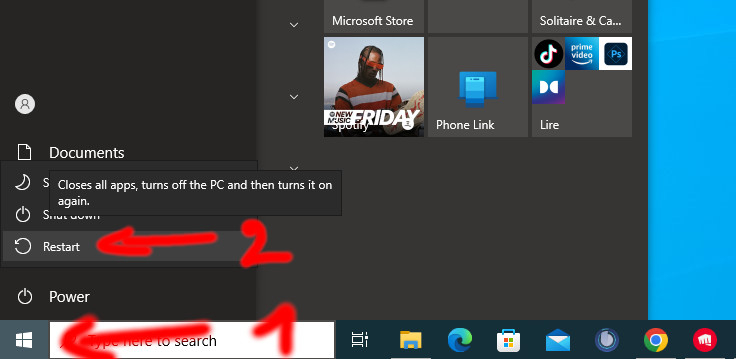
After that, save any ongoing work or what have you, and click on Windows Start Menu. Hold the ‘Shift’ key on your keyboard while pressing restart.
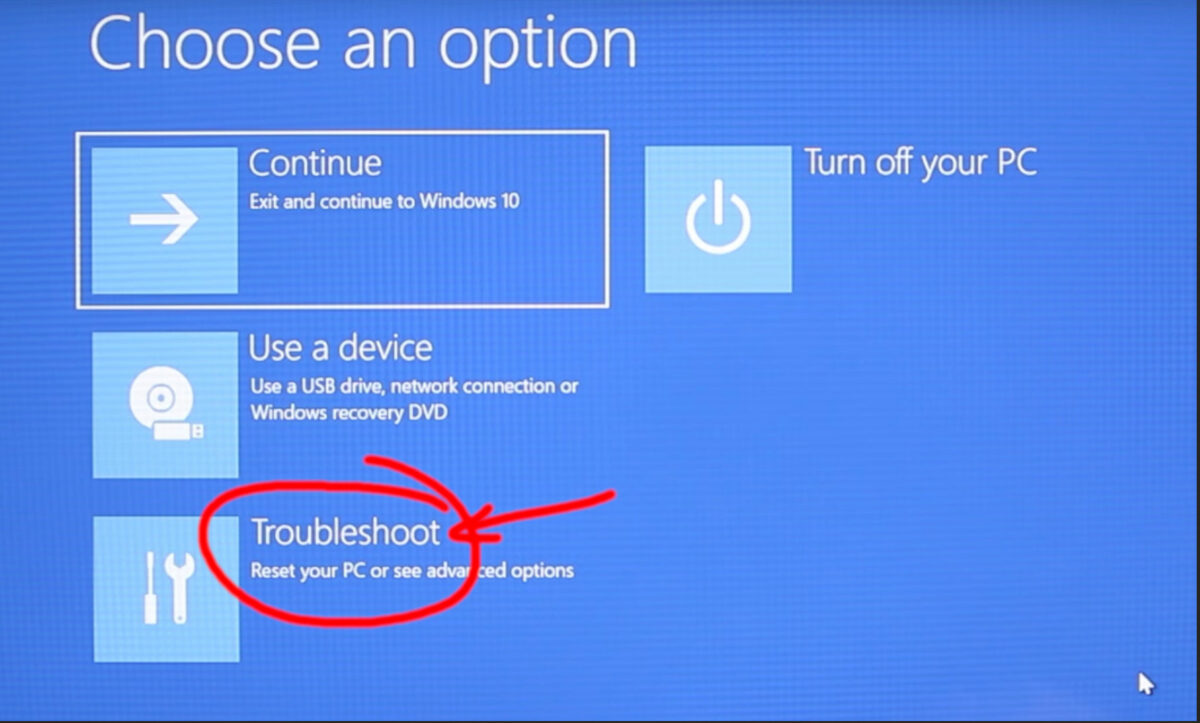
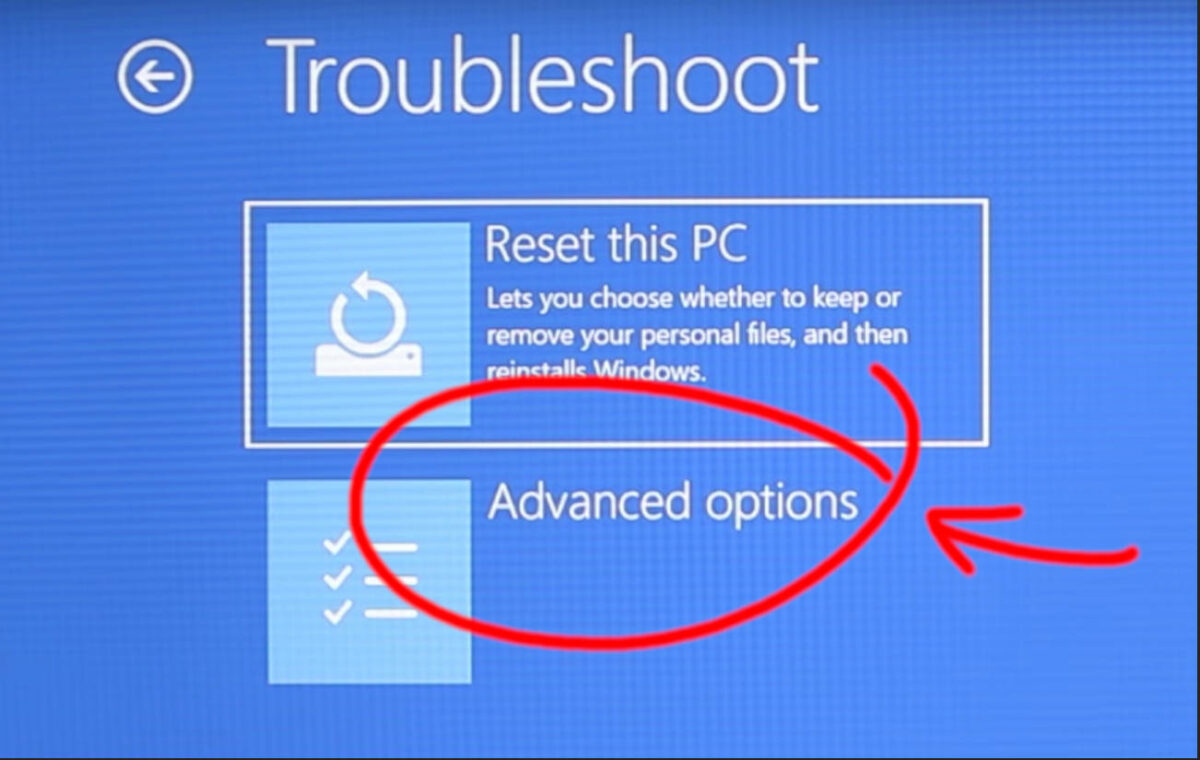
Now you should have a blue menu in front of you. Select ‘Troubleshoot’.
Choose ‘Advanced Options’.
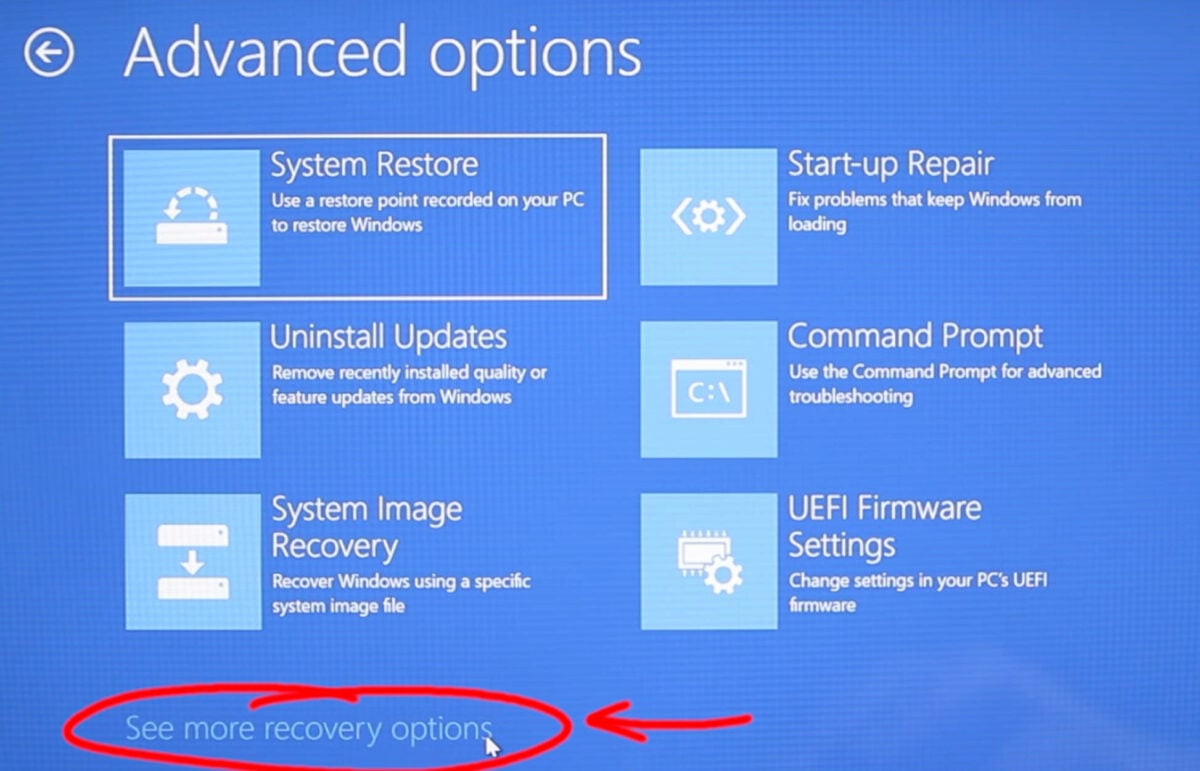
On the next screen, choose ‘See more recovery options’.
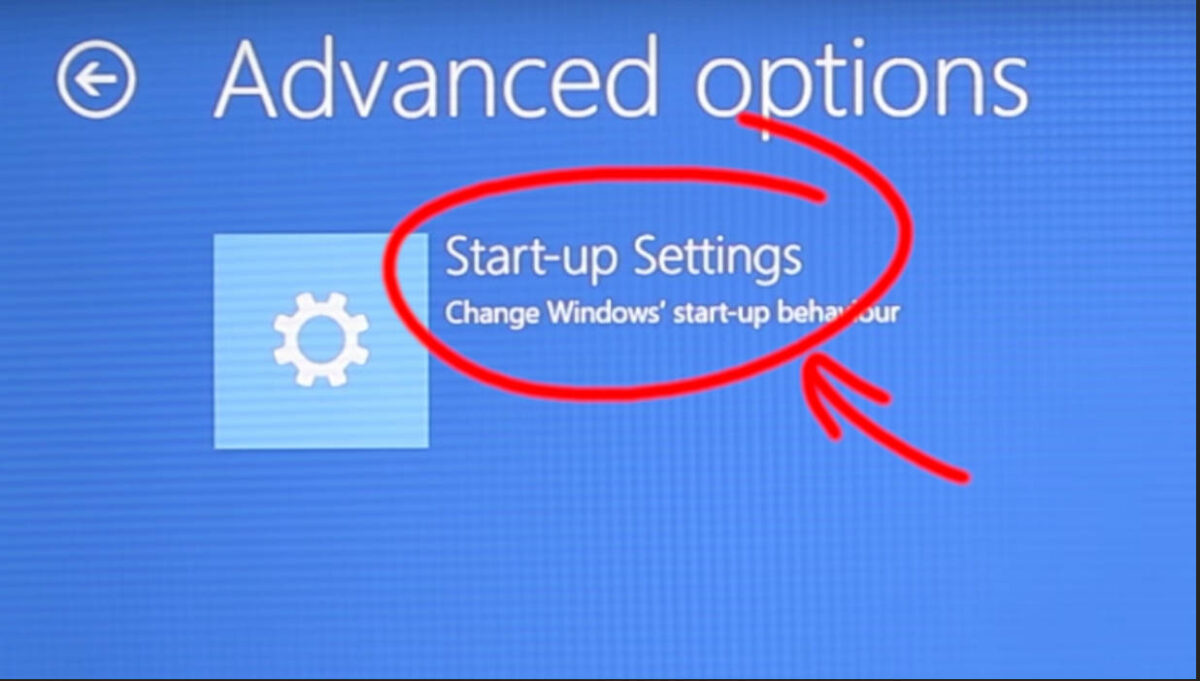
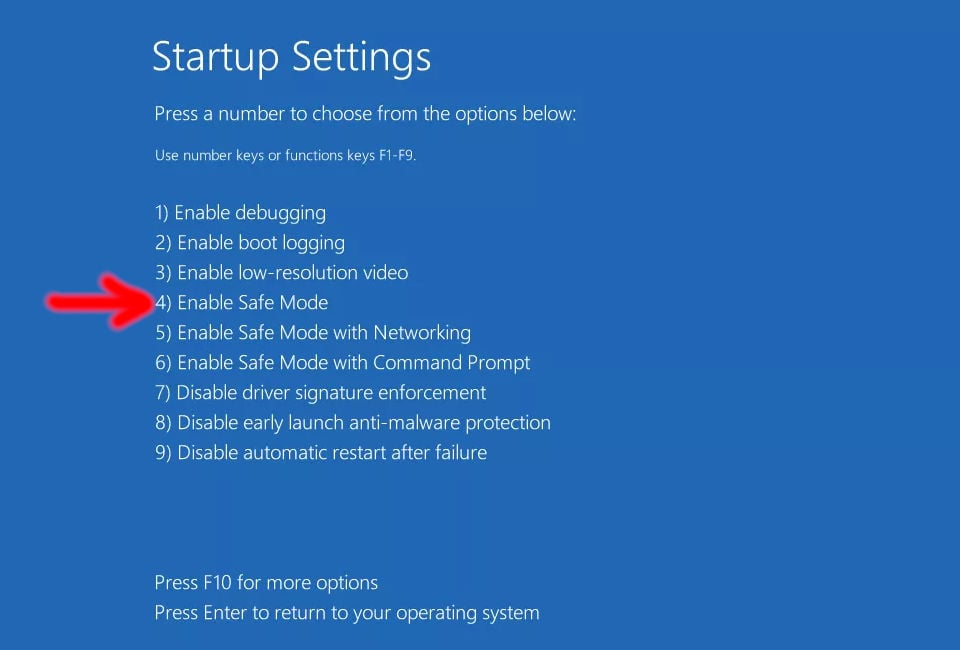
Click ‘Start-up Settings’.
Now select ‘Restart’.
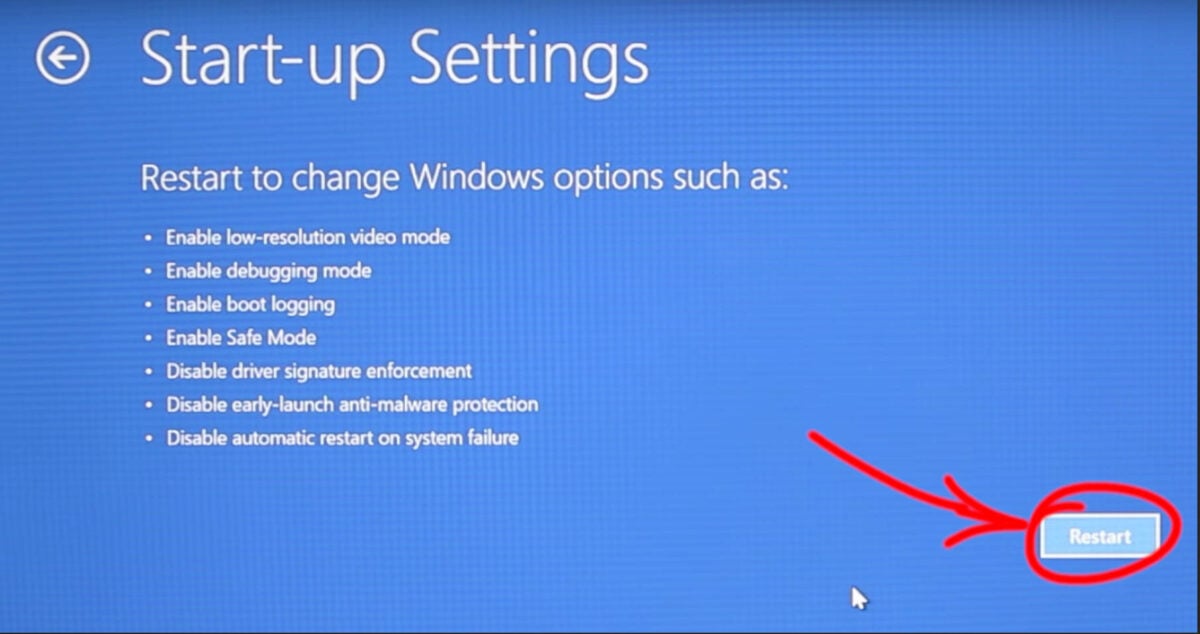
When the Startup Settings screen shows up, choose ‘Enable Safe Mode’ by pressing ‘F4’ or function plus number ‘4’ on your keyboard and wait for safe mode to load.
Now go where you previously left the DDU folder – in our example, it was Desktop – and run ‘Display Driver Uninstaller’. If asked for admin privileges, accept and run.

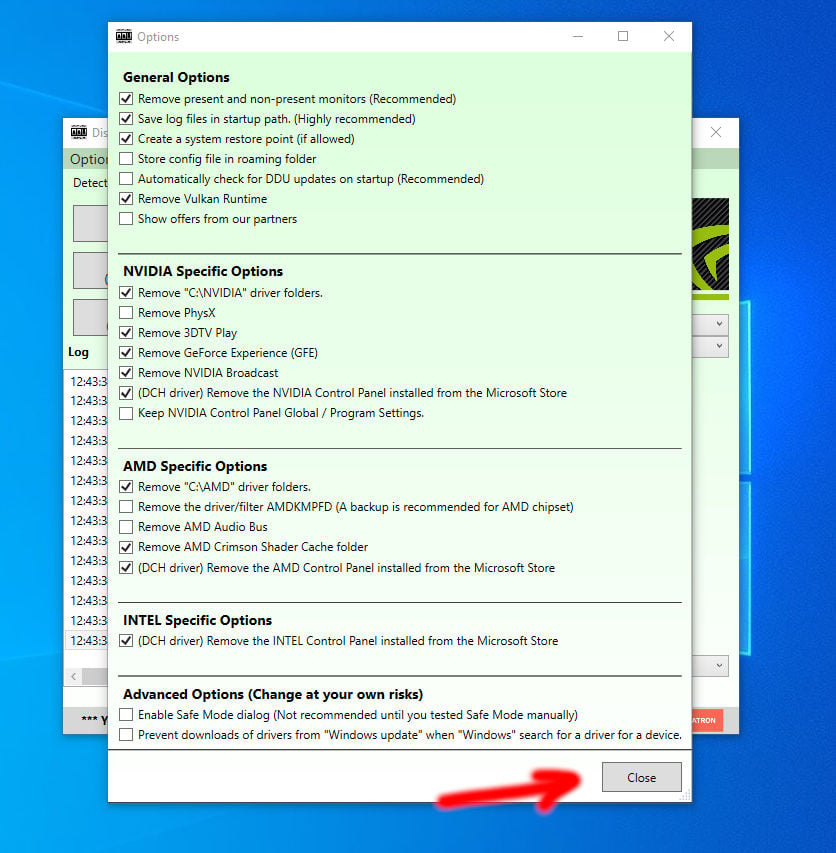
Following the app’s first launch, you may face an Options menu. If not, select it on the top left side of DDU’s main page.
Here you will have a bunch of handy features, such as removing or keeping Nvidia’s PhysX. The setting we are interested in is the last one, ‘Prevent downloads of drivers’. If you have disconnected your machine from the internet, then uncheck it. If not, you may want to check to block Windows from updating your drivers. For the remaining settings, you can simply copy what you see in the image below, then click ‘Close’.
Now you should be back on the main page. On the left side, choose ‘GPU’, then your brand and press ‘Clean and restart’.

The software will do its magic and restart your computer after finishing. After booting back to Windows, it’s time for the final step.
3. Installing drivers
Nvidia
Find the driver file you downloaded in the first step and run it – accept when asked for admin privileges.
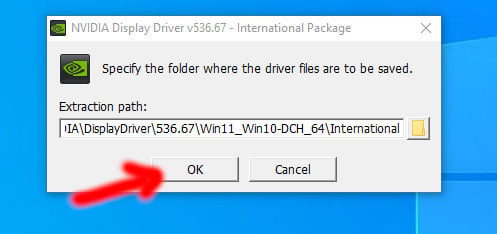
A small window should pop up asking for a location to extract the installation files, you can choose one if you like or leave it as is. Click on OK to proceed.
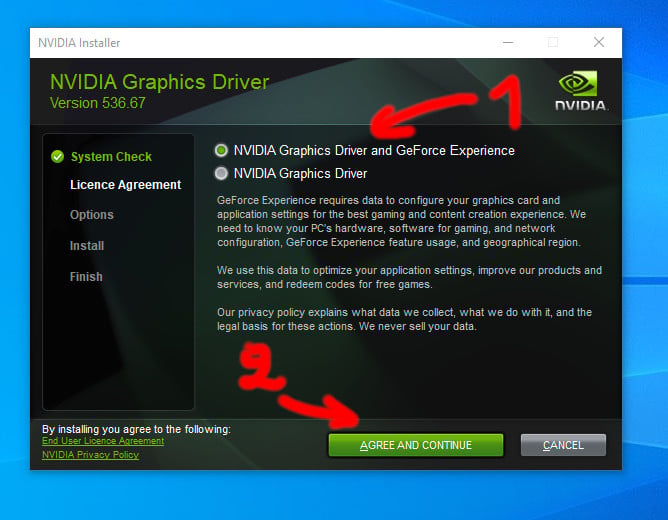
After finishing extraction, the installer will launch and begin checking for compatible hardware, i.e. your graphics card. After detecting a compatible GPU, you will be prompted to choose whether you only want the complete package, which includes the drivers plus Nvidia’s GeForce Experience or the drivers alone. We went with the former since GeForce Experience can be handy for game-settings optimisation. Click ‘Agree and Continue’.
Next, you can choose an ‘Express’ or a ‘Custom’ installation. Either way is good, though we choose ‘Custom’ to show you this section in case you don’t want to install the Audio drivers.
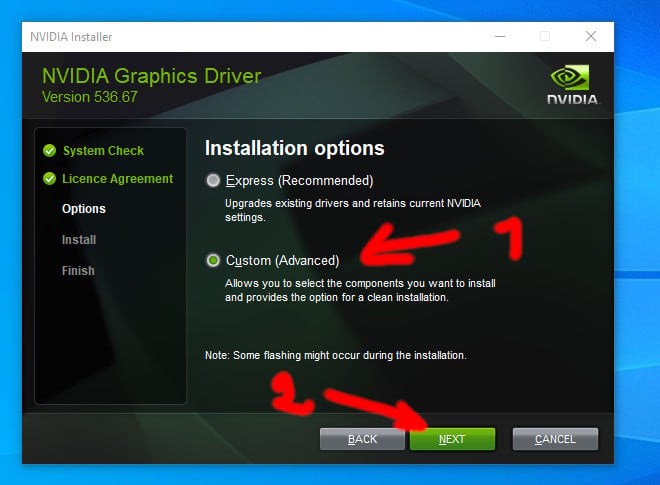
Here you can also see the clean install option we told you about earlier, but since we already cleaned the system, we don’t need to select it this time. Don’t select it, and don’t run DDU if you want to keep your settings from previous drivers.
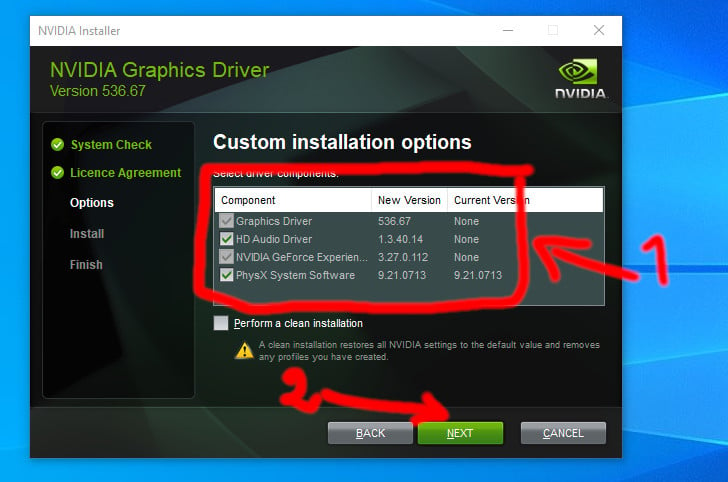
Check or uncheck the components as you wish, though all of them are useful, so we kept them all. When ready, click ‘Next’ and wait for the installation to complete.
During installation, your display may start blinking, turning black, or even displaying solid colours like green. This is normal, especially on older and slower machines. Let the installation do its work; it may take a couple of minutes or more, depending on your computer’s speed.
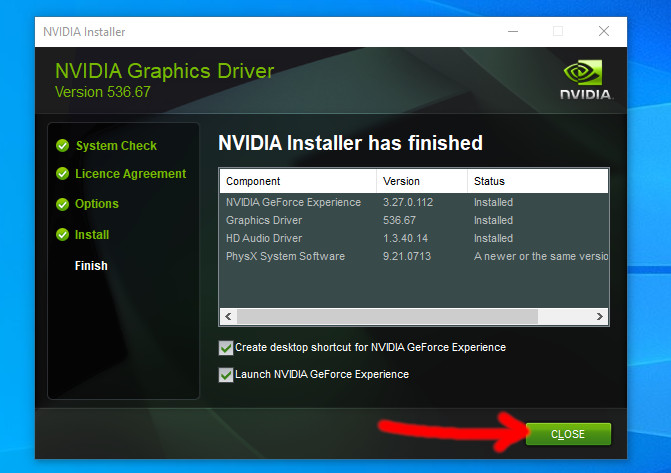
When it finishes, just press ‘Close’ and you are good to go. Your drivers are now up to date.
AMD
Find the driver file you downloaded and run it – accept when asked for admin privileges.
Note that previous Radeon drivers had a step for file extraction like Nvidia, but this is no longer the case.
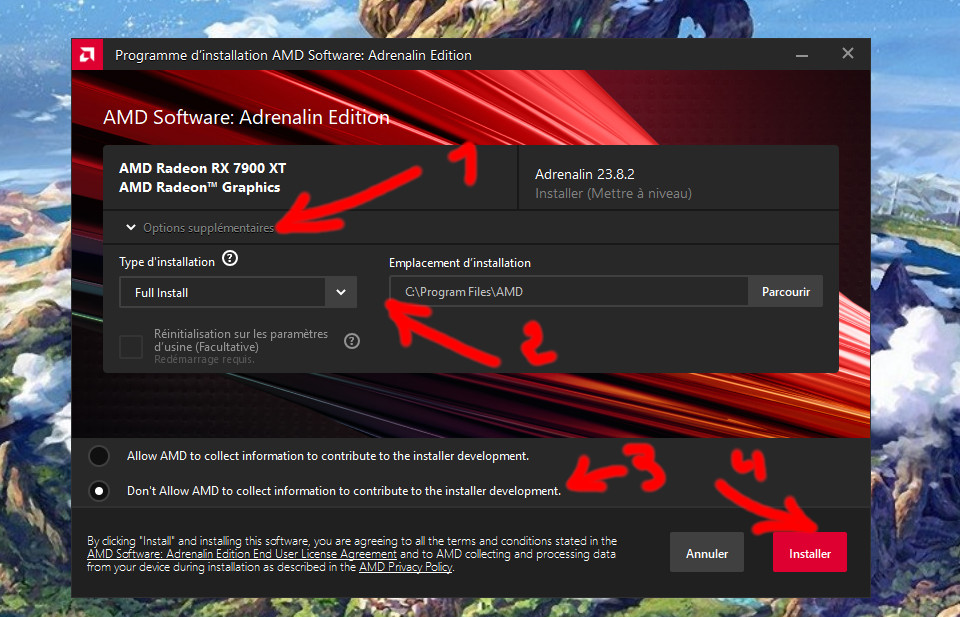
After that, the installer will show up. Click on ‘Additional Options’ if you want to select ‘Factory Reset’ – i.e. clean install – but since we already did that using DDU, there is no need. If you care about keeping your driver settings from the previous version, don’t check this and don’t run DDU.
Allow or not AMD to collect information and press ‘Install’. If the display starts blinking or turning black, it’s normal don’t worry, let the installation finish.
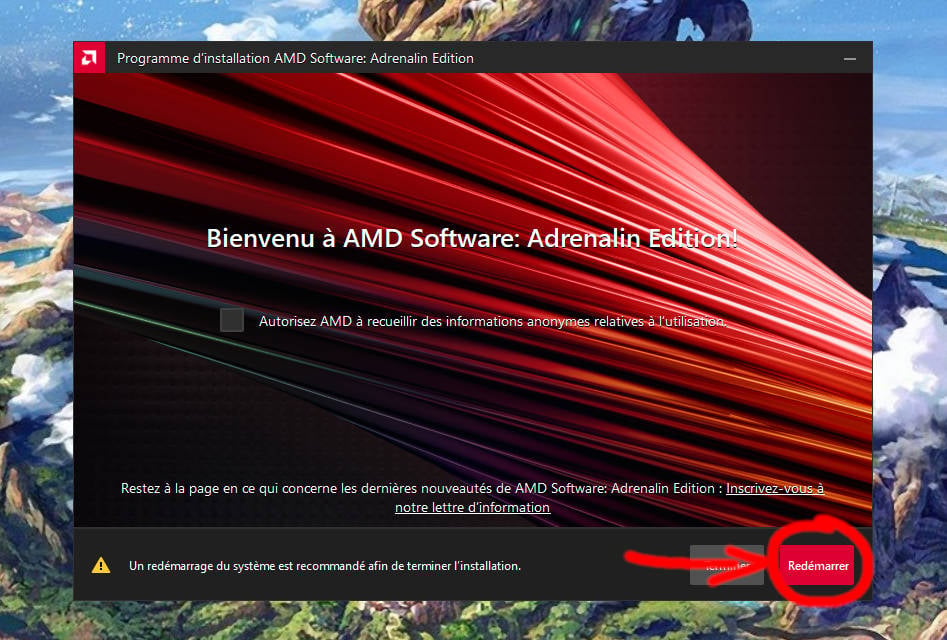
Wait for completion, then click on ‘Restart’ to reboot your computer, though you can simply press ‘Finish’ and restart manually later.
And… It’s done; your drivers are up to date.
Intel
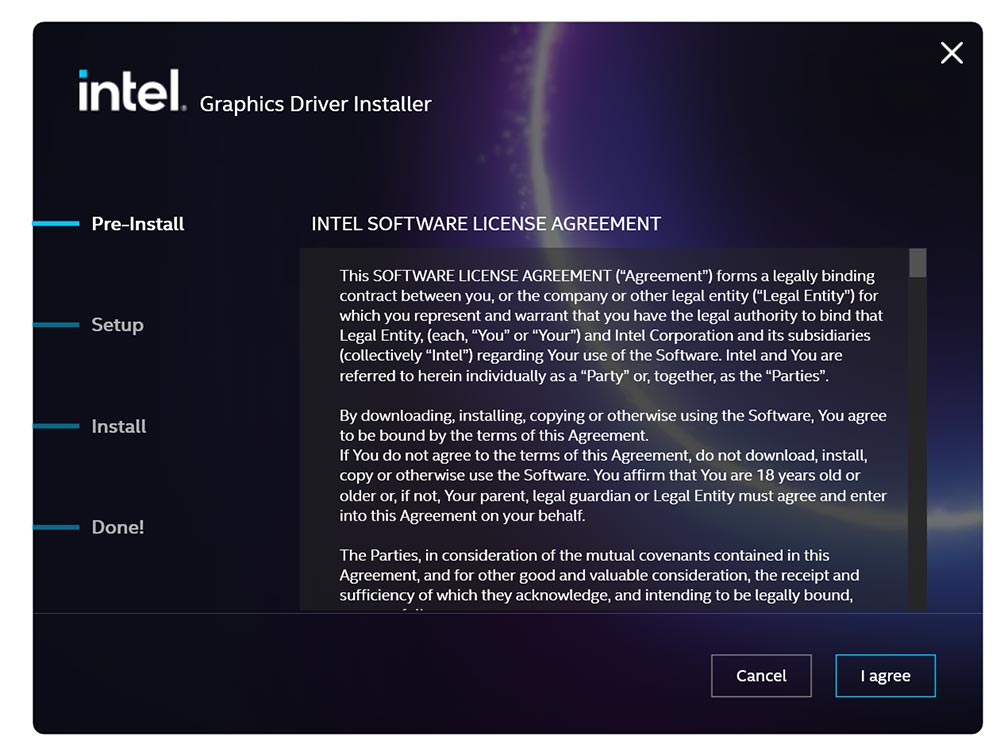
Find the driver file you downloaded and run it – accept when asked for admin privileges.
Intel Installer doesn’t seem to pass by an extraction step, so just click ‘Begin installation’ when it launches.
Accept the license agreements.
Then choose ‘Customise’ or ‘Start’. The former, as usual, will allow you only to install the components you care about. Also, here is where you find Intel’s setting for a clean install.
After making your choices click ‘Start’ and wait for installation to finish. Like with Nvidia and AMD, installation may cause your monitor to blink or turn black, this is a completely normal phenomenon – and not the radioactive kind.
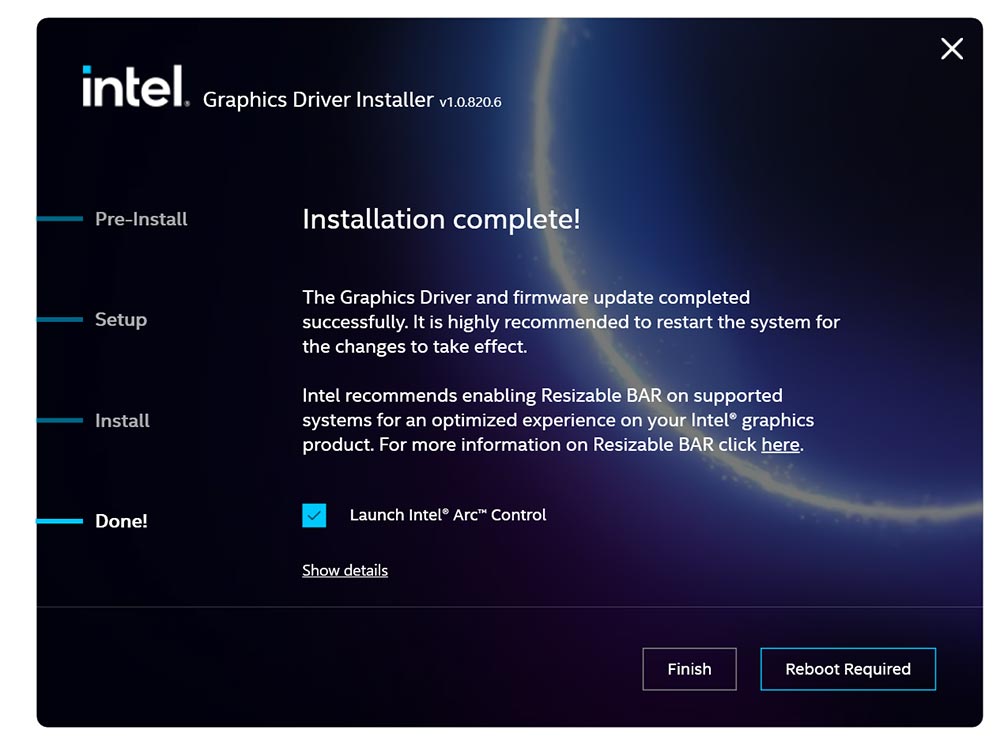
And it’s done. Your Intel GPU has the latest optimisations. you can click ‘Reboot Now’ to restart the machine or ‘Finish’ to do so manually later.
Note
One last note. While many would argue that it’s important to keep your system and drivers up to date, I would say from experience, when it comes to drivers, only upgrade if you need the improvements brought by the newer version. The reason is that sometimes newer versions come with unwanted bugs that were not present previously. Additionally, installing a new driver purges any pre-compiled shader cache, meaning that some of your games will rerun the shader optimisations on their next launch, and we all know how long it can be. I personally only update drivers when an important bug is fixed or when a game I own gets optimised.