

In this guide, I’ll take you through the process of overclocking an AMD GPU. Overclocking offers a proven way to boost your graphics card’s performance and, as a consequence, your gaming frame rate (fps). It allows you to get the most out of your existing hardware, whether it’s a cheap entry-level machine or a top-of-the-line enthusiast build. While overclocking has been going out of fashion recently, as manufacturers have become better at using boost clocks to extract the maximum performance from their products out of the box, there are still some nifty gains to be had for those willing to give it a try.
Depending on your GPU’s silicon quality and your card’s cooling capacity, you can often unlock 5-10% more performance without much trouble. The process is actually pretty simple, especially once you understand the basics, although it remains a somewhat time-consuming process due to its trial-and-error nature. Still, compared to old-fashioned BIOS CPU overclocking, these GPU tweaks are pretty simple, especially as they can be entirely implemented from within the comfort of Windows, with no reboots required.
In this guide, I’ll show you the overclocking process using AMD’s Radeon Adrenalin Software, which installs alongside your graphics card drivers, but third-party apps like MSI Afterburner can do the same job. I tend to prefer AMD’s built-in overclocking system, as it doesn’t require any additional software installation. Note that, depending on your system configuration, some options and settings may not be available to you. This guide is based on overclocking a Radeon RX 7900 XT, but the overall procedure should be similar on most modern AMD GPUs, regardless of your model.
Before we begin, I recommend measuring your GPU’s default performance using benchmarks like 3DMark or your favourite game. The more the better, as this will help you identify whether the tuning is netting any gains or not. In fact, pushing your hardware too far can degrade performance; this is why we will proceed slowly but surely. While you’re at it, you may also want to measure your GPU’s power draw and temperature, so you can compare before and after results.
Lastly, a quick Google search about your specific GPU’s overclocking limits can give you an idea about what to expect. You can then avoid pushing it too far and wasting your time chasing the last bit of performance.
AMD Software: Adrenalin Edition
AMD Software: Adrenalin Edition, the package that comes bundled with your Radeon GPU driver, has all the features you need to overclock your graphics card. Better yet, your tuned parameters can be configured globally or customised for individual games, allowing you to maintain efficiency in less demanding titles. Overclocking pushes your GPU’s clock frequency higher, which requires more power while producing more heat. In addition to tuning frequency and voltages for both your GPU and VRAM (memory), AMD’s software also allows fan control and GPU monitoring. For me, the cherry on the cake is that it has a great modern UI that’s easily navigable.
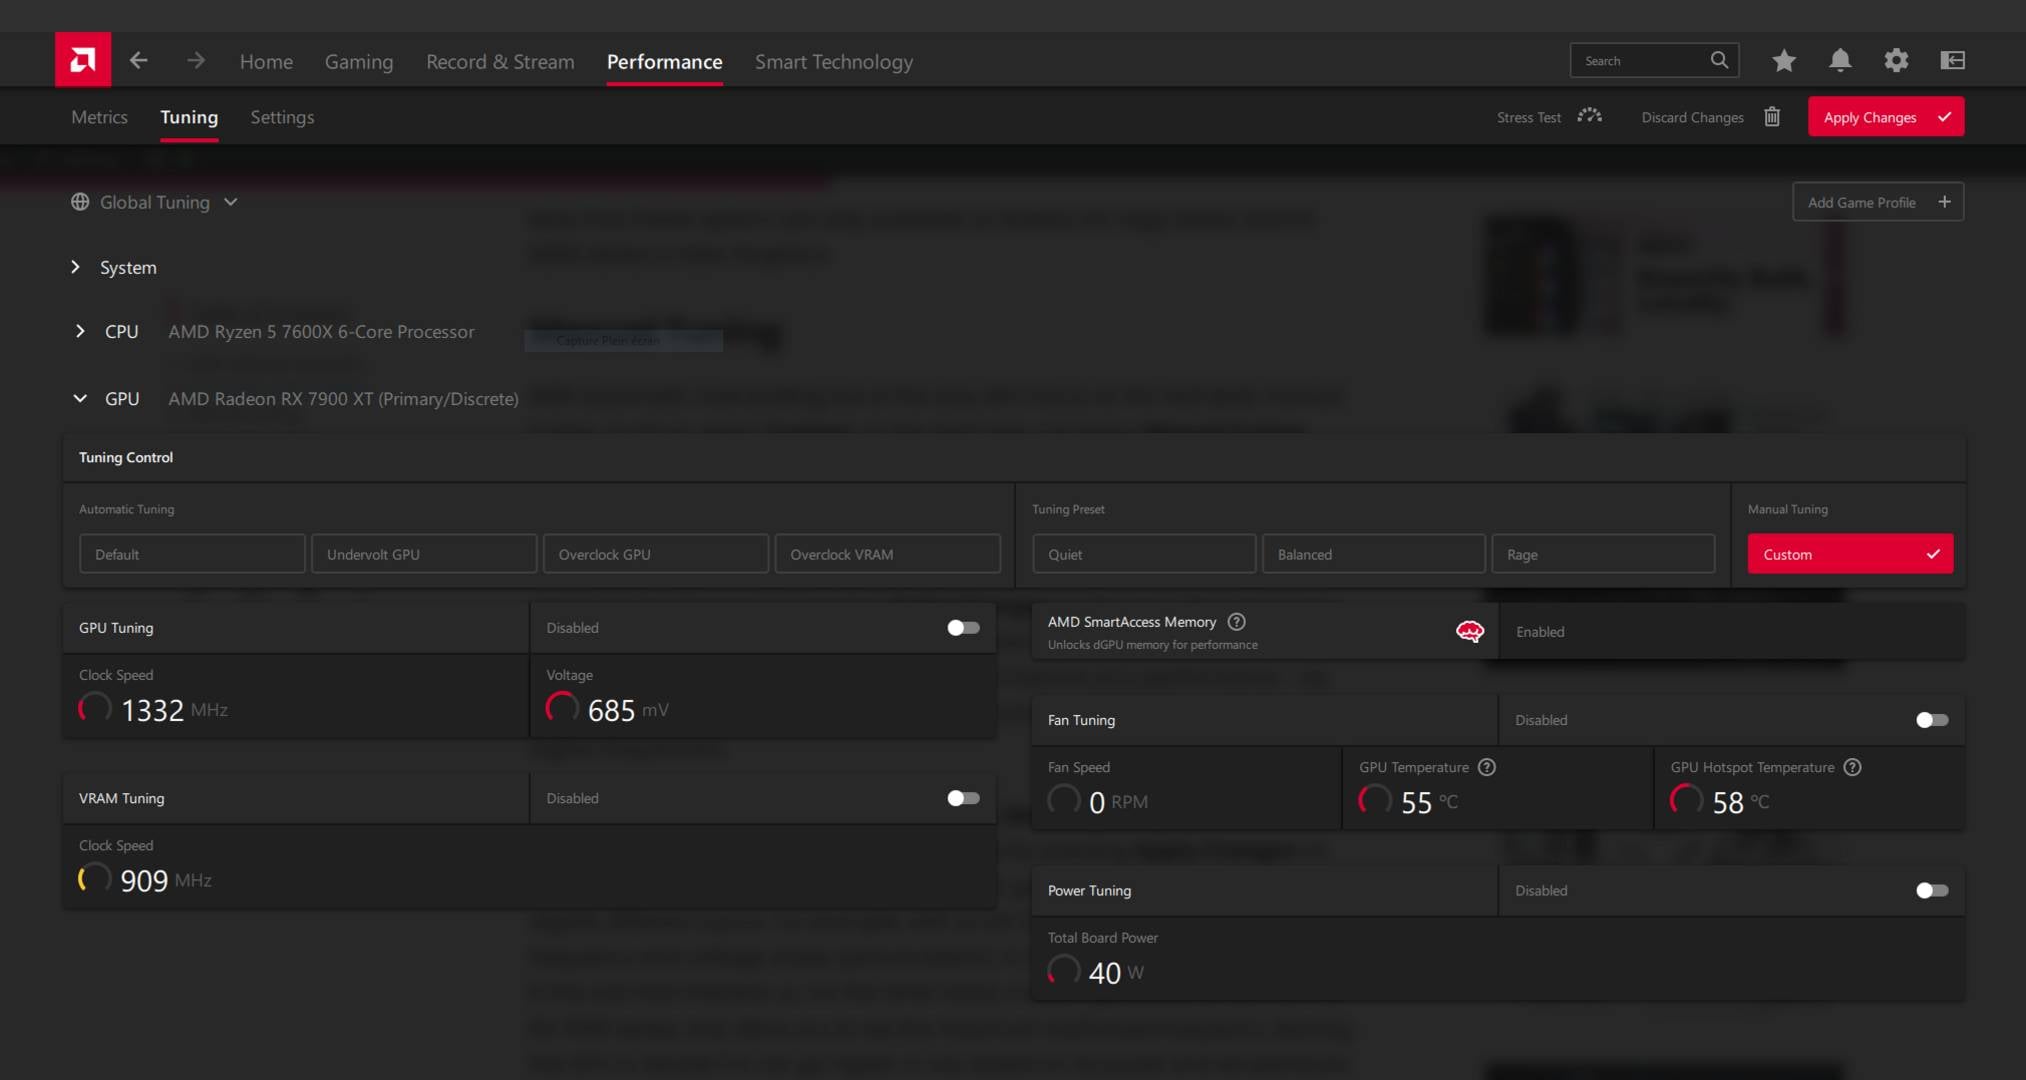
To start overclocking your GPU, open AMD Adrenalin, navigate to the Performance tab on the top row, then select Tuning. Here you will find multiple sub-sections, depending on whether you own an AMD CPU or not. Expand the GPU section to see all available parameters. Here you will find multiple automated tuning options, which provide smaller gains compared to manual overclocking. For this reason, I’m not going to focus on these tweaks in the guide, but I will briefly explain the settings for them in the section below.
Automatic overclocking
Automatic tuning
- Default: Applies default settings.
- Undervolt GPU: Reduces voltage and maintains clock speeds to improve performance per watt.
- Overclock GPU: Uses a predefined overclocking algorithm to improve GPU performance, but tends to be conservative compared to manual tuning.
- Overclock VRAM: Uses a predefined overclocking algorithm to improve memory performance, but since VRAM overclocking provides fewer gains compared to GPU overclocking, I wouldn’t use this feature.
Tuning preset
- Quiet: Reduces noise by using less power and lowering fan speeds.
- Balanced: Tries to strike a balance between performance, power consumption, and fan speed/noise.
- Rage: Sets a higher power limit to allow more headroom for your GPU to boost, which can result in better performance.
Note that these preset options are only available on Radeon RX Vega Series or later graphics.
Manual overclocking
With automatic overclocking out of the way, let’s focus on the real deal, which is manual overclocking, or tuning as it’s called in AMD’s software. To find these settings, select Custom, on the right side, just below Manual Tuning. Enable all the available settings by toggling their dedicated buttons. Your app should look something like the screenshot below.
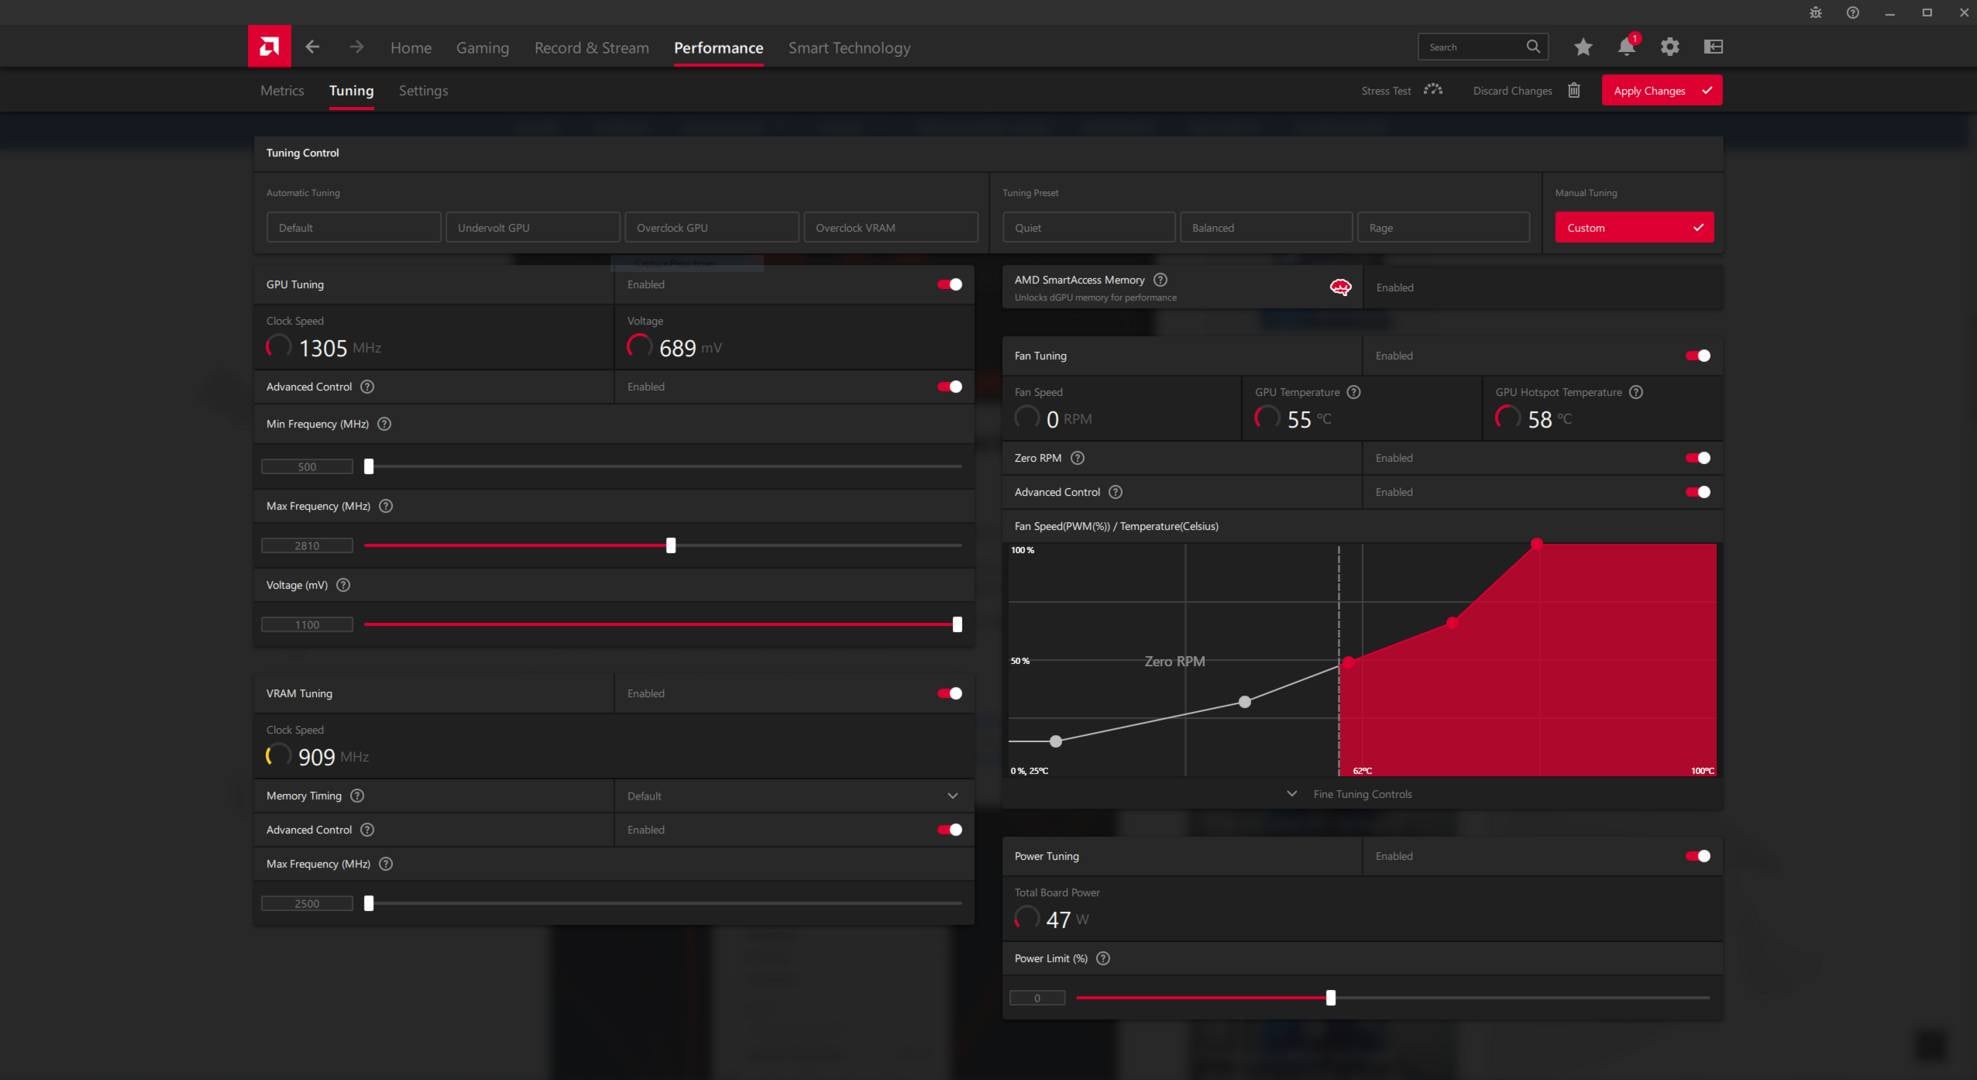
Start by pushing the Power Limit slider all the way to the max, 15% in my case, and save the changes by pressing Apply Changes on the top right. Don’t worry, this only authorises your GPU to take more power if and when it’s needed; nothing changes during idle operation. This setting alone can improve your performance – by 6% in my case – as the GPU can use that extra power headroom to sustain higher frequencies.
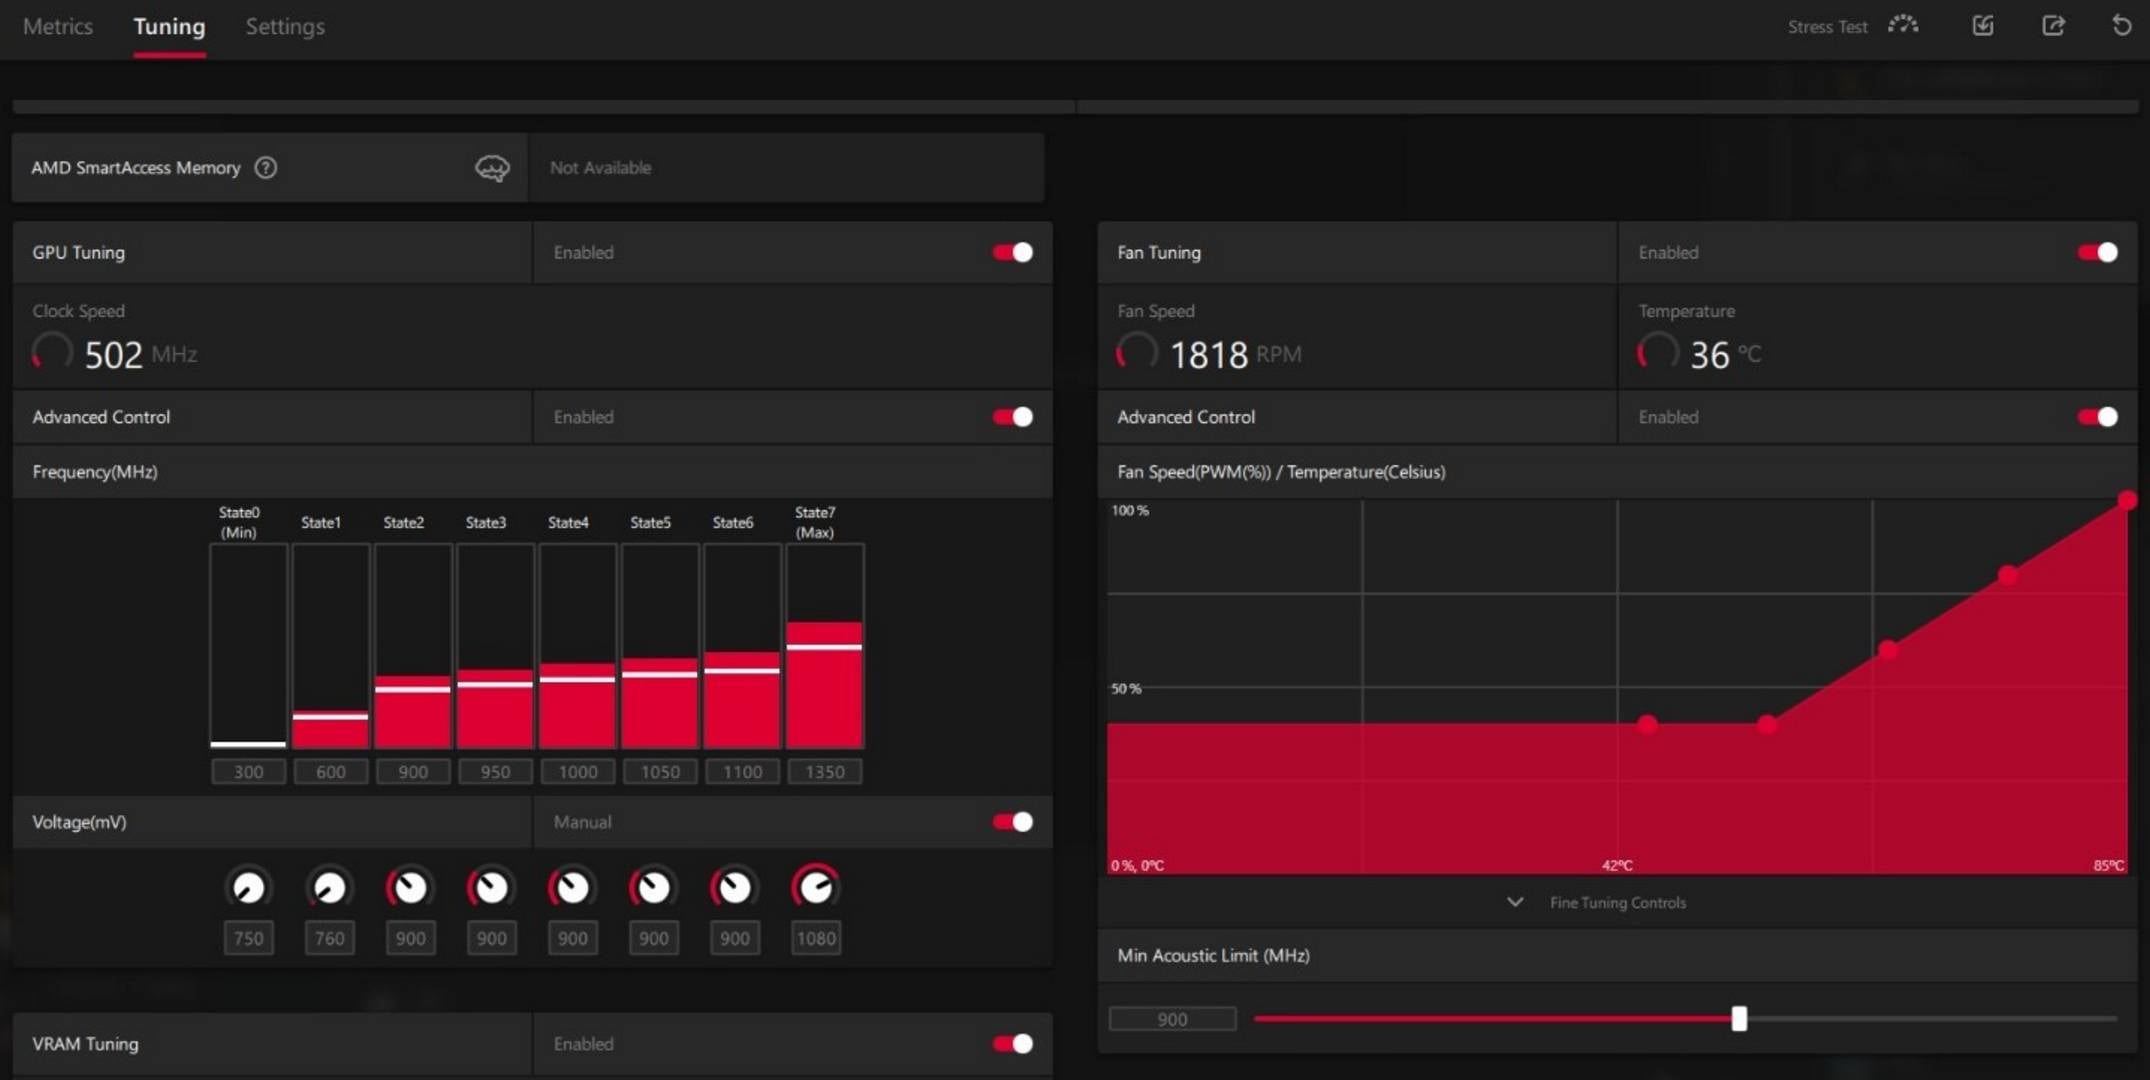
Next, under the GPU Tuning section, bump the Max Frequency by 25MHz, and once more, save the changes by pressing Apply Changes on the top right. Note that, depending on your GPU generation, you may see a slightly different layout. For example, with a Radeon RX 570, you will see multiple frequency and voltage states (as in the picture below). In this case, the last one (State 7) is the one that interests us. On the other hand, modern-generation GPUs, such as the RX 7000 series, only allow you to set the maximum authorised frequency, leaving the GPU to decide if it can go higher or not, based on its power and temperature conditions.
Now that you have bumped frequency and power limits, test your system for stability using tools such as 3DMark or Unigine’s Heaven Benchmark, and measure if there are any performance gains so far. Watch the benchmark for any signs of stuttering, or visual artefacts, as that means your system is becoming unstable. Even the slightest improvement is a good sign.
If the system remains stable, push up the frequency by another 25MHz, and retest for stability and performance improvements. When you reach an unstable frequency, dial back the clock speed to the last stable state. As I mentioned before, modern GPUs will let you input a frequency even if it can’t be achieved. As such, it’s better to monitor the effective frequency using AMD Adrenalin’s built-in overlay, or third-party software such as HWInfo.
After reaching the effective frequency ceiling, to allow your GPU to boost further, you will need to tune your GPU’s voltage. In simple terms, applying more power to your GPU can enable it to hit higher clock frequencies, but it will also increase operating temperatures and power draw, so there’s a delicate balance to be struck.
To do this, enter the GPU Tuning section, and if the option is available, bump up the Voltage slightly by 10mV. Retest your GPU for stability, and if it’s fine, try upping the clock speed a bit again. If it doesn’t work, try increasing the voltage by another 10mV, retesting for stability, and again trying a bit more clock speed. You can keep going as far as your hardware will let you here, but don’t push the voltage more than 100mV above your GPU’s default, unless you’ve done your research and know that it’s safe to go beyond this figure. In my case, I couldn’t push my GPU any further than its default of 1,100mV anyway.
Even if you don’t manually increase the clock speed, on newer GPUs you may find that a voltage increase still gives you a bit more performance, as it’s able to maintain a higher boost clock for longer.
If you see a performance improvement from your voltage bump, good. If not, your GPU may be reaching its temperature or power limit. In this case, we can go the other way around and reduce the voltage slightly below its default state. While this may sound counterintuitive, as I mentioned earlier, lowering the voltage on modern GPUs helps them consume less power and run cooler, which provides more headroom for boost frequencies to rise.
As with increasing the voltage, just drop it in 10mV increments, and retest for stability and performance in between each change. When you hit a point where your GPU is unstable, or underperforming, dial the voltage back up to the last stable point.
After finding the best equilibrium, whether it’s a positive or negative voltage change, it’s time to tune your VRAM. Based on my experience with graphics card overclocking, the gains from memory tuning can be negligible, especially when factoring in the impact on stability. Unlike an unstable GPU overclock, which shows up rather quickly under stress testing, VRAM instability can remain hidden, suddenly showing up when you least expect it. However, if you want to extract the maximum performance out of your graphics card, it’s worth giving it a shot. In the worst case scenario, your game will crash, in which case you can dial down the clock speed to the last stable setting.
Head to VRAM Tuning in AMD Adrenalin, bump up the Max Frequency by 25MHz increments, and test for stability and performance changes. When you find a limit or instability, dial back to a stable frequency.
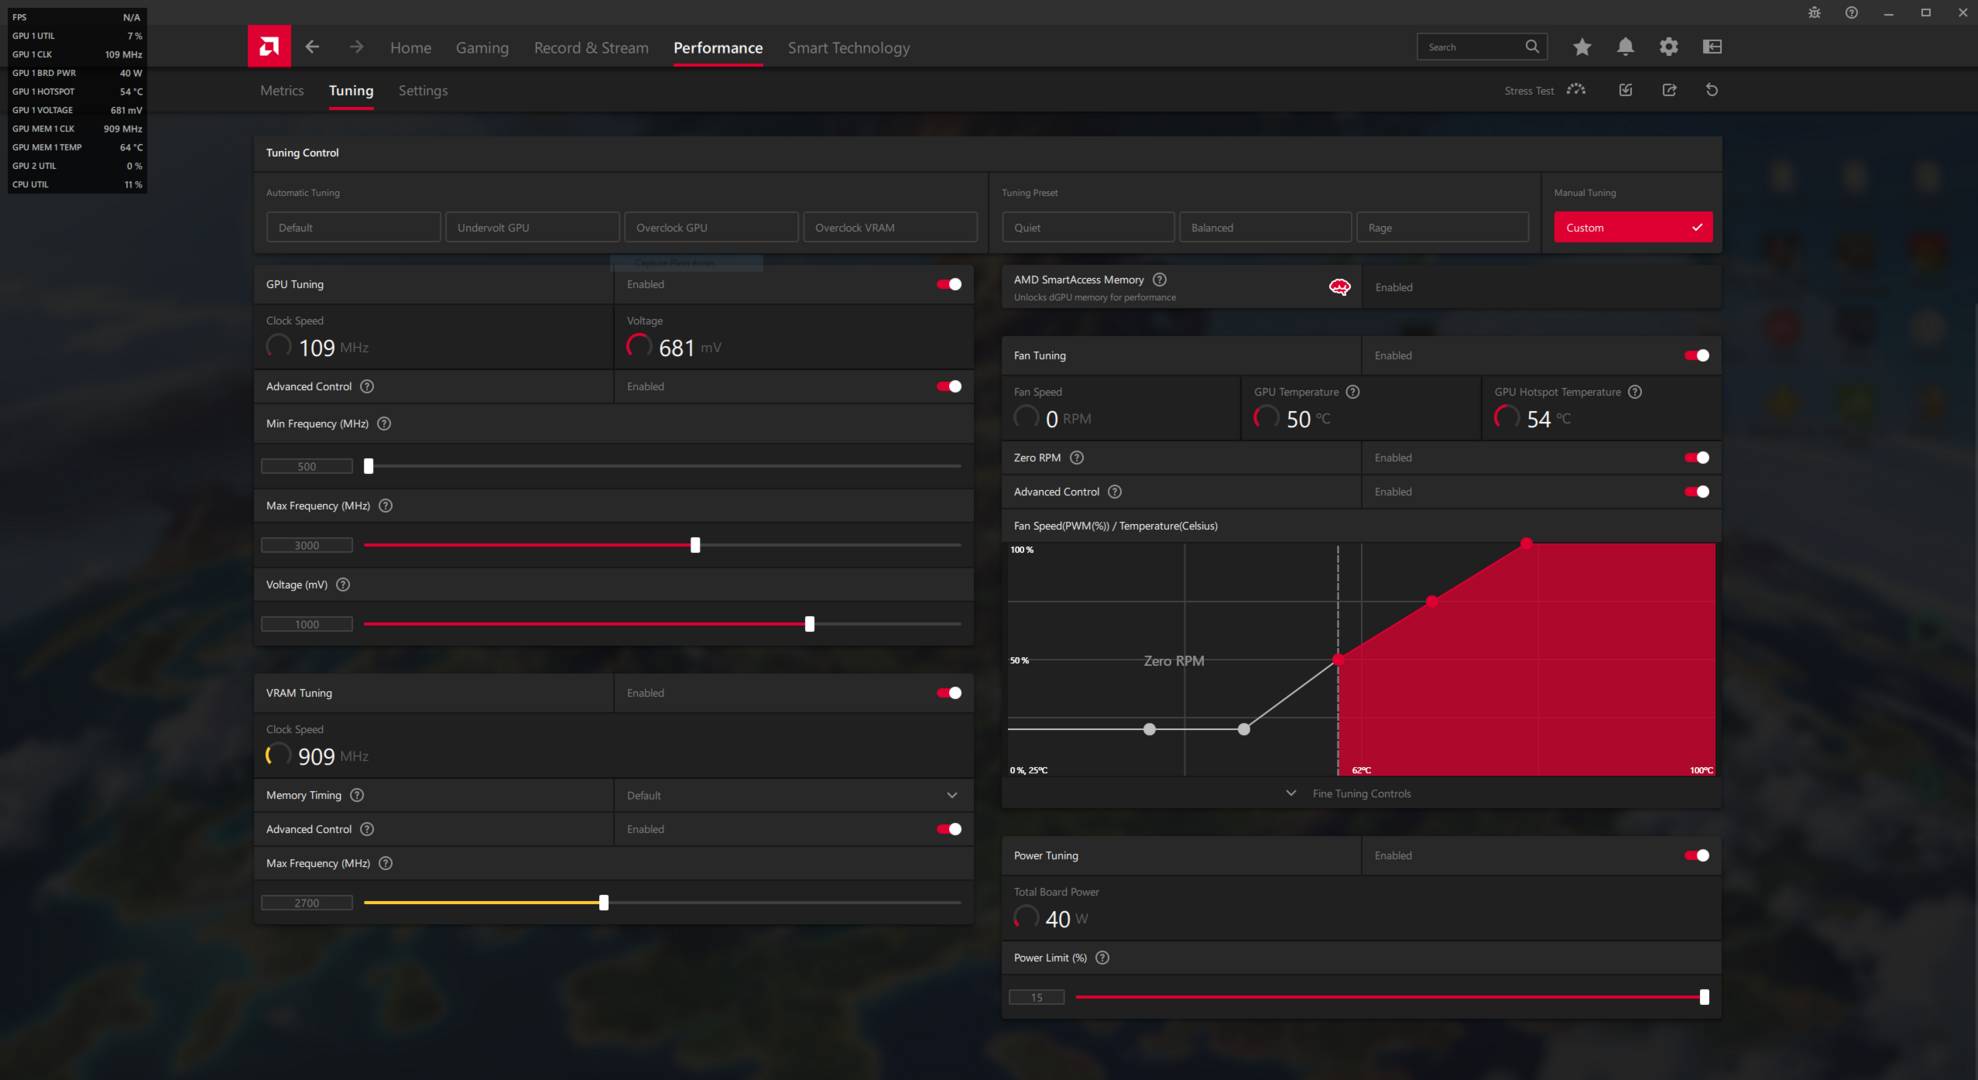
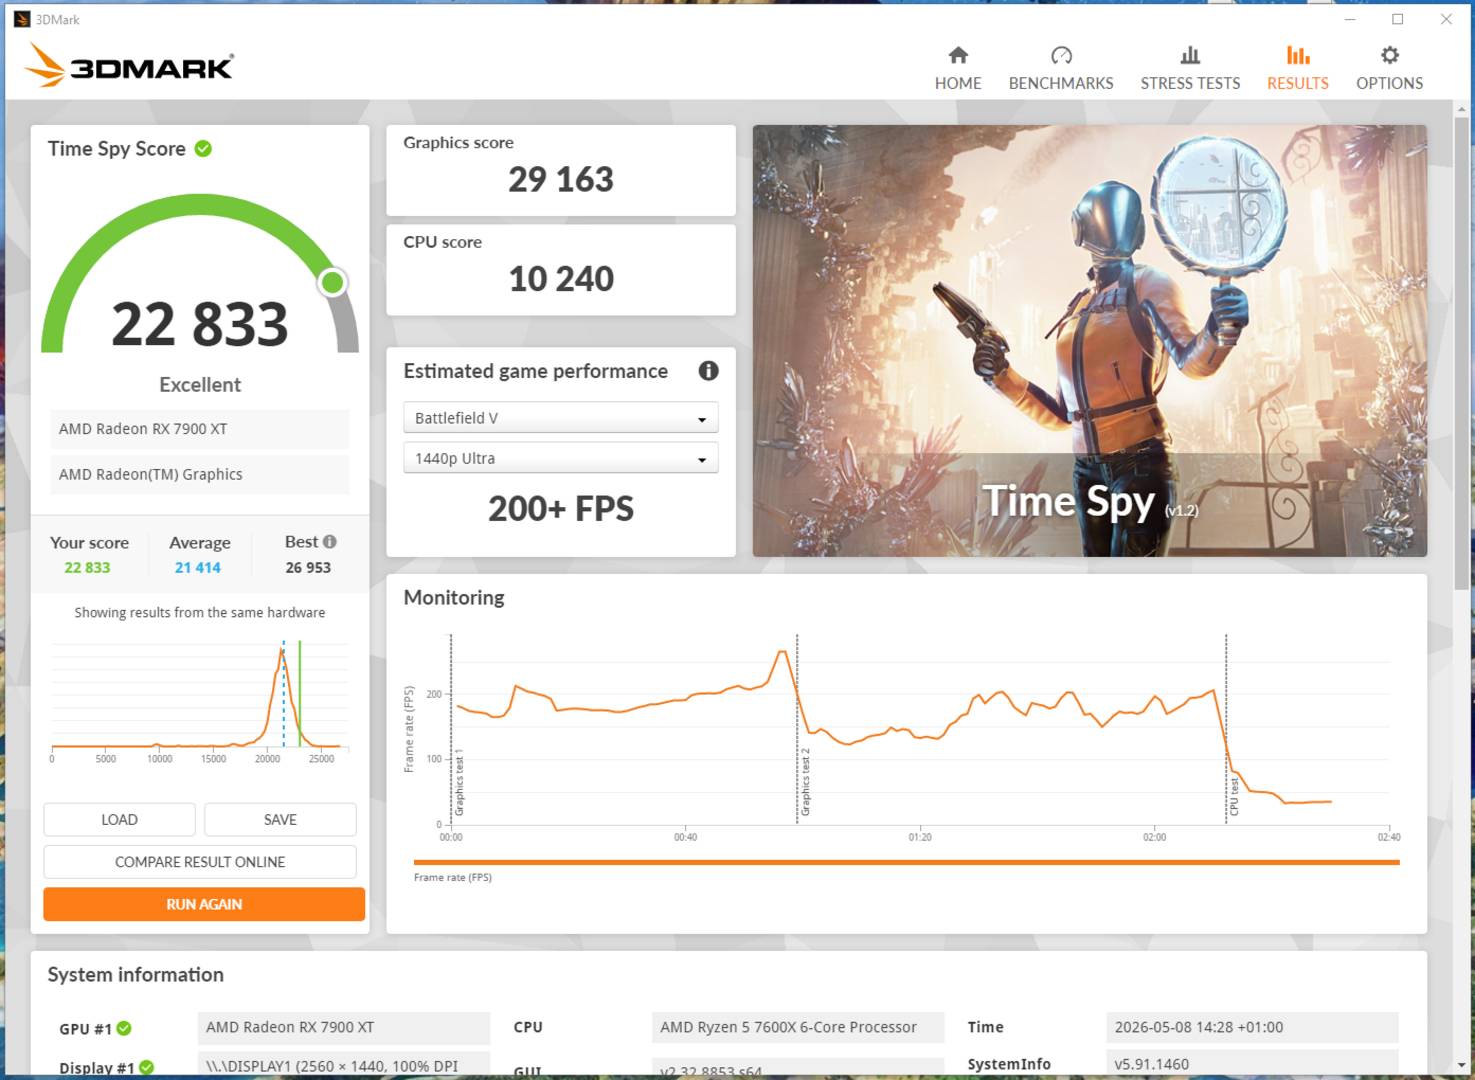
Following these steps, I first configured my Radeon RX 7900 XT with a +15% Power Limit, 2,700MHz VRAM max frequency, and 3,000MHz GPU max frequency. This boosted the effective GPU frequency to 2,619MHz in 3DMark TimeSpy, 2,905MHz in Red Dead Redemption 2, and 2,827MHz in Atomic Heart. These respectively represent a 13.8%, 11.7%, and 13% boost compared to stock conditions. Memory, on the other hand, remained stable at 2,686MHz, which equates to a 7.44% improvement. Lastly, the total card power consumption jumped from 304W to 366W, a 20% increase.
Now for the juicy part – how much real extra performance does this overclock unlock? Starting with 3DMark TimeSpy, my score improved by 9.6%, my Red Dead Redemption 2 frame rate then increased by 8%, followed by Atomic Heart with an 11% frame rate boost.
But that’s not all. As mentioned before, lowering the voltage can net better results, as the GPU finds more headroom to clock higher. Considering this, I kept all parameters as the same, but lowered the GPU voltage to 1,000mV, down from 1,100mV. This allowed my GPU frequency to go higher, hovering around 2,744MHz in 3DMark and 2,977MHz in Red Dead Redemption 2.
Interestingly, the total board power of my graphics card dropped then below the 366W allowable limit, hovering around 360W in Red Dead Redemption 2 and 343W in Atomic Heart. Translated into frame rates, this resulted in a 10.9% increase for Red Dead Redemption 2 and 14% for Atomic Heart compared to stock settings. In other words, undervolting provided the best performance yet, while saving a bit of power and running slightly cooler.
Funnily enough, this allowed me to break the 30,000 GPU score barrier in TimeSpy, which was high enough to unlock a Steam achievement for 3DMark.
Save settings
Now that you have found your best stable parameters, you can, and should, save them into a profile file that can be loaded with a single click. This is important since, whenever the driver detects a crash, whether it’s due to instability or a simple game bug, it tends to reload the default setting as a fail-safe. In this case, you only need to load your profile instead of entering each parameter manually. To save your tuned parameters, click on the Export Profile logo on the top right (near the reset logo), and select the location where you wish to save it.
That’s it, you are all set. Now enjoy your extra performance. And if at some point you encounter instability, you can always go back and dial down your parameters slightly.