

As enthusiasts, our focus on squeezing out gaming PC performance sometimes comes at the price of a few extra decibels. If you want the best of both worlds with great frame rates and palatable acoustics, you’ll need to deep dive into settings and bend some curves. Don’t worry; we’ve got you covered with a simple step-by-step guide on how to make your PC quieter, be it laptops, prebuilt desktops, or DIY systems.
If you’re running the best graphics card or certain PC fans, you could have an aggressive fan curve. This pushes fan speeds higher than needed to reduce your hardware temperatures. It’s a better-safe-than-sorry approach to keep the components nice and cool, showing the products at their very best. Sadly, this often comes with the detriment of higher noise production. Sure, your gaming headphones might block it out, but that doesn’t stop your teammates from hearing your helicopter-like PC down the microphone.
Fortunately, you can lower the fans’ rpm (revolutions per minute) to limit the noise created without degrading performance or temperatures. It’s a process we only recommend for well-ventilated PC cases, and as always, you’ll need to proceed with caution.
There are three methods we can pursue to hush your gaming PC: hardware, software, and BIOS settings.
Hardware
To get a quieter PC, first you need to know what causes noise on your machine. Aside from coil whine, which is not today’s subject, anything with a motor in it is the main culprit. This includes simple fans, hard drives (HDDs), or pumps on the best CPU cooler. Sometimes, sound can also come from the fan contacting the frame of your chassis. If your fan comes with rubber mounts, it could help a lot.

Noctua 4 pin low-noise adaptors
“Low-Noise Adaptors for reducing the running speed and noise emission of PC fans, thanks to Noctua.”
We earn a commission if you make a purchase, at no additional cost to you.
Keep in mind that you can’t control budget fans that connect via Molex through software. Your only solution here is to get a low-noise adaptor. They also exist for 3-pin fans if you want, though they’re not needed for this guide. Lastly, some recent fan models, like the Silent Wings Pro 4, include a dedicated speed switch on the fan itself.
Unfortunately, if the noise source is your PSU, we can’t do much via software or BIOS. Your only hope is to have a hybrid model that stops the fan at low loads (generally below 50%) or to change the problematic fan with a new silent one. Also, your chassis may be bundled with cheap fans, so swapping them for decent ones may solve your issue. Noctua and be quiet! are known for their stealthy, silent approach.

be quiet! Silent Wings 4 140mm
“The epitome of high-performance fans with first-class features optimised on every level, Silent Wings 4 series fans keep high-end PC builds quiet.”
We earn a commission if you make a purchase, at no additional cost to you.
Size also matters, with bigger fans pushing more air at a similar speed to their smaller counterparts. We prefer a few good 140mm fans running slower than more 120mm fans running faster. Both achieve similar airflow, but the larger, slower options help make your PC quieter. Just make sure they fit inside your PC case before you buy some.
If you’ve already tried upgrading and it hasn’t helped or fan upgrades aren’t on the cards, free solutions are hidden in software and BIOS.
Software and BIOS
Software and BIOS settings are fairly similar. We’ll show you how to configure your fan speed in software before moving your settings to BIOS. For either to work, however, you must ensure your fans are connected to your motherboard’s 3-pin/4-pin headers. If you use a third-party fan hub, you may be limited to using their dedicated software kits – Corsair iCUE, for example.
To control your fans, head to your motherboard or laptop manufacturer’s website and download the brand’s control software. Asus has Armoury Crate, Gigabyte uses Control Center on laptops and App Center (SIV) for desktops, and MSI has its Dragon Center, to name a few. They’re not the most cooperative pieces of software, so your mileage may vary. Here’s looking at you, Armoury Crate, with your menus within menus and endless update prompts.
With that out of the way, I’ll use Asus’s software and BIOS since it’s the motherboard I have on hand, but options should be fairly similar on other brands’ boards.
Step 1
- Start by launching your control software – Armoury Crate, in my case.
- Click on the keyboard-looking icon on the left side and select Fan Xpert. If you can’t find Fan Xpert in your Armoury Crate software, you might see it tucked away in AI Suite 3, which sits in your system tray. If you still can’t find the option, then your fans likely aren’t plugged into the right places. See, we told you it’d be fiddly.
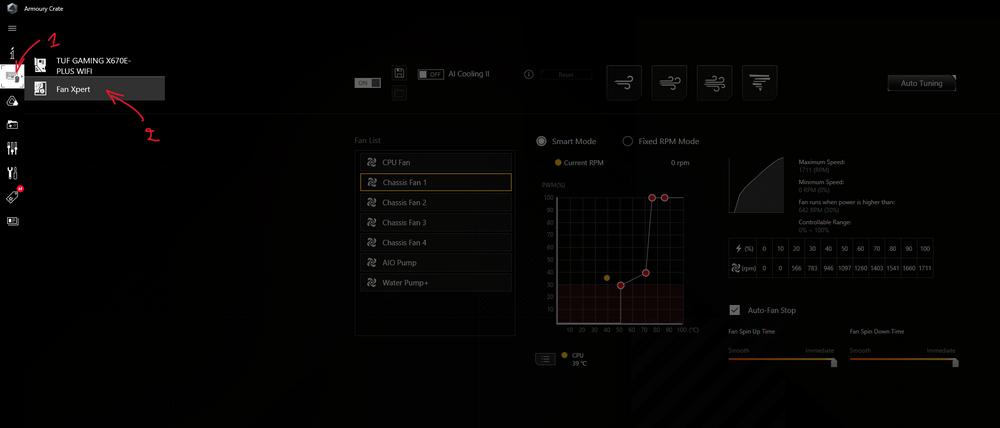
Here you’ll have multiple choices:
- Auto tuning: runs a test to detect and set an optimal speed curve.
- Silent preset: configures the fans to be silent as long as possible with a quick ramp in speed when the CPU gets hot.
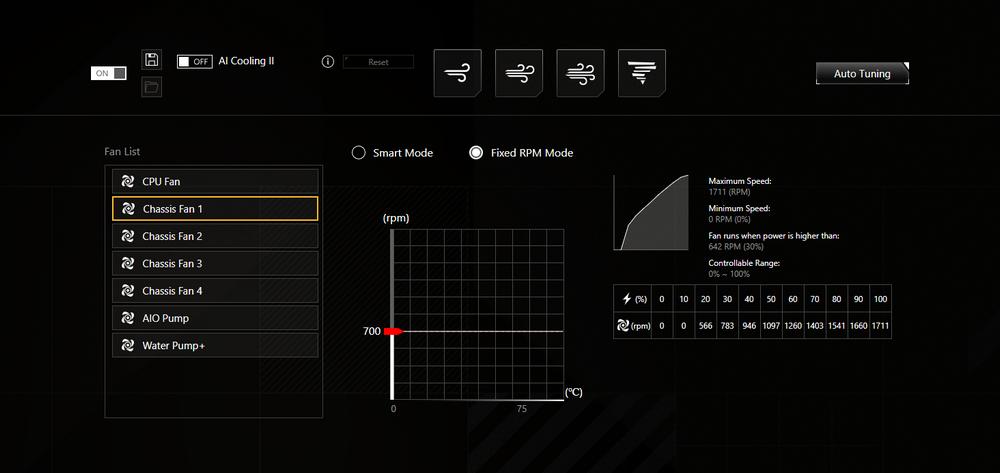
- Fixed rpm mode: an easy solution to lock the fan at one speed regardless of CPU temperature.
- Smart mode: lets you manually tweak the speed curve.
Other brands may have fewer or more options, but the idea is the same.
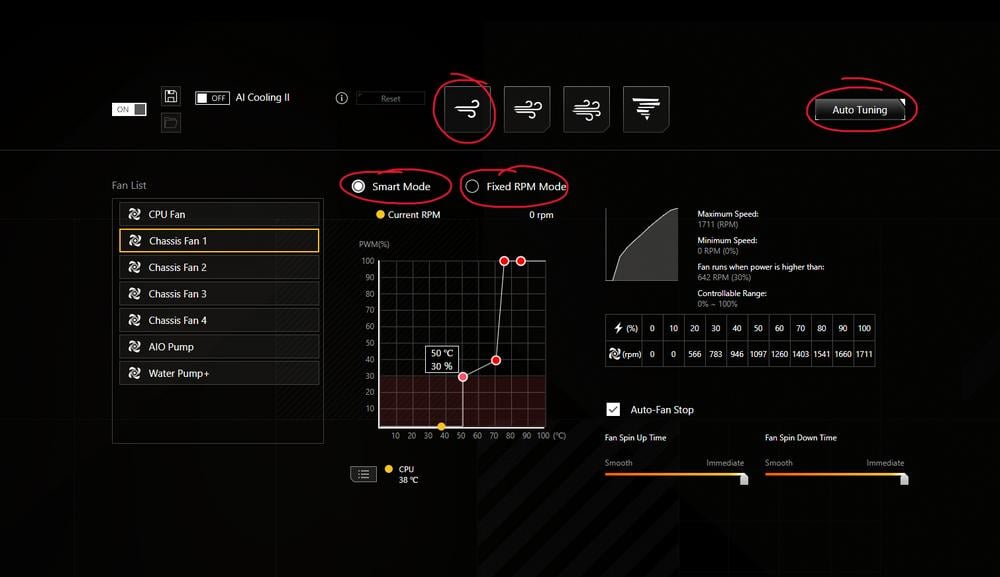
The Silent preset is quite good if you don’t want to bother with manual tuning, and the Fixed rpm mode is effective if you make sure your hardware doesn’t get hot using the selected speed. That said for this guide, we are going with the best solution, Smart mode.
Step 2
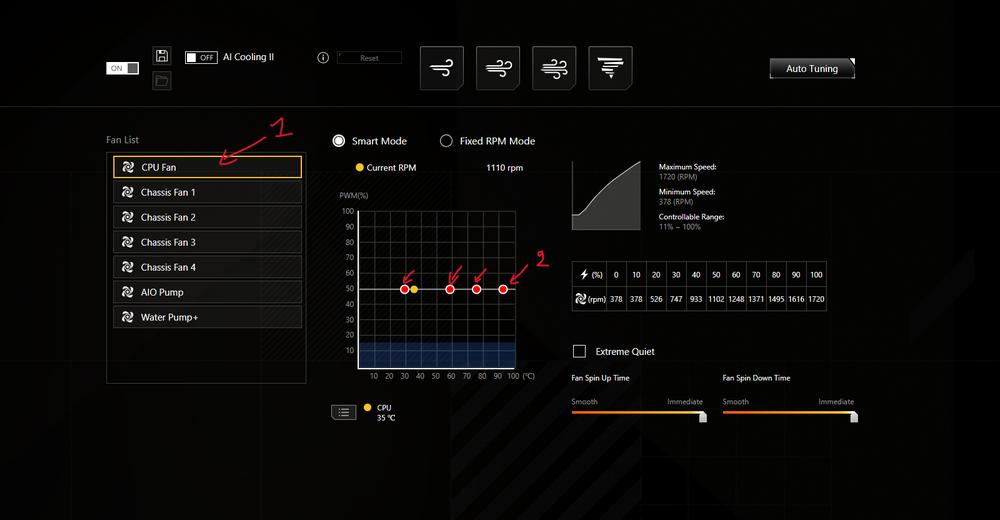
- Select Smart mode.
- Select all your fans one by one, then lower their speed to 30% or 40% by holding the red circles with your mouse and dragging them down, like in the picture below.
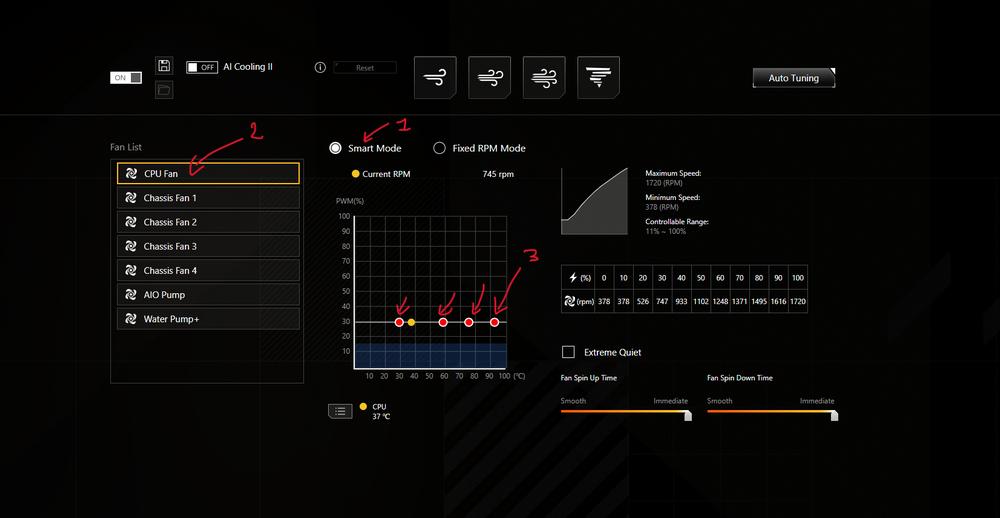
A quick tip: if you hold the far-right circle and drag it down, it takes all the other points down with it. This way you don’t waste time.
After lowering speed on all fans, your computer should be silent, if not, try to check where the noise is coming from. If it’s the GPU, then:
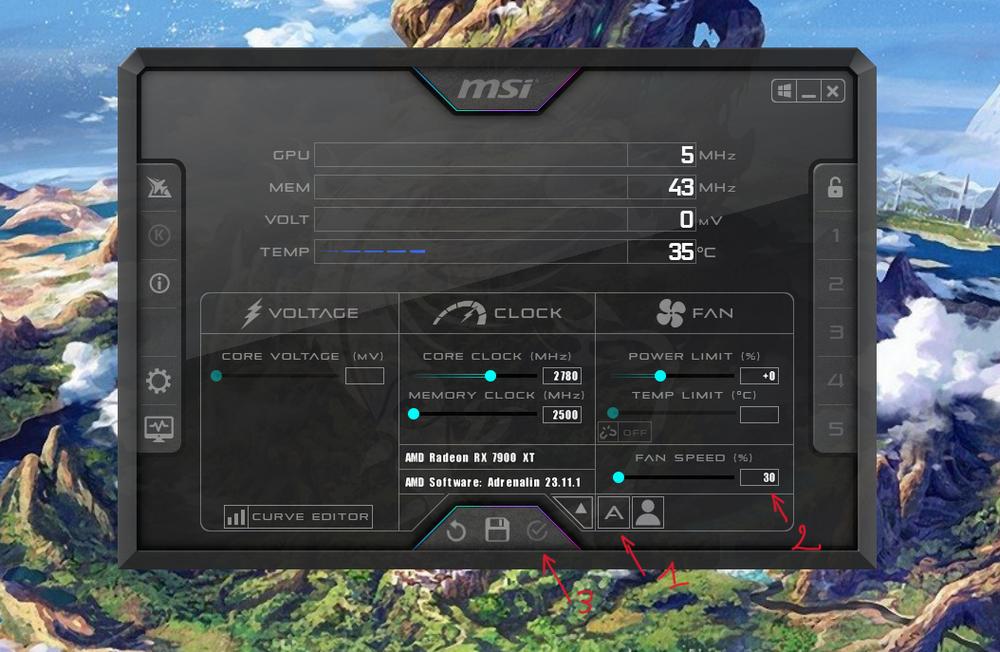
- Install MSI Afterburner for your graphics card and launch it.
- Disable auto fan speed by pressing the A-looking button on the bottom right.
- Select the fan speed box, and write 30, then press enter key to confirm.
- Press the apply button to save the changes.
Your PC should be silent now. If another part other than the graphics card, chassis fans, CPU cooler fans, or liquid cooling pump is making noise, this guide can’t help you further.
Step 3
Now that we have a good silent base, we will begin raising the fan speed step by step until we start noticing noise. To do so.
- Choose a fan.
- Select the far-left red circle and drag it up bit by bit until you begin hearing noise.
- Record that speed on a paper and turn it back to the previous 30 or 40% to continue.
Preferably do this for all fans to be sure no one is louder than the others. This noise level will thus be the lowest point at which the PC will run. This way hardware will keep cool at idle without being annoying.
Step 4
Now you need to decide at which temperature you want the fans to go from silent to ‘who cares as long as the PC is cool’. Note that temperature is generally based on the CPU, i.e. if you choose 50% speed at 70°C, the fan will run at 50% when the CPU reaches 70°C. Some boards let you choose another reference than the processor, but it’s a perfect choice since we don’t want it to run hot anyway.
80°C or even 90°C are acceptable. Latest Intel CPUs can go as far as 100°C before starting to lower their frequency to reduce temps. While I like to keep a silent machine if my hardware is below 70°C, I rather have my fans at full throttle on a hot summer day to avoid reaching 90°C.
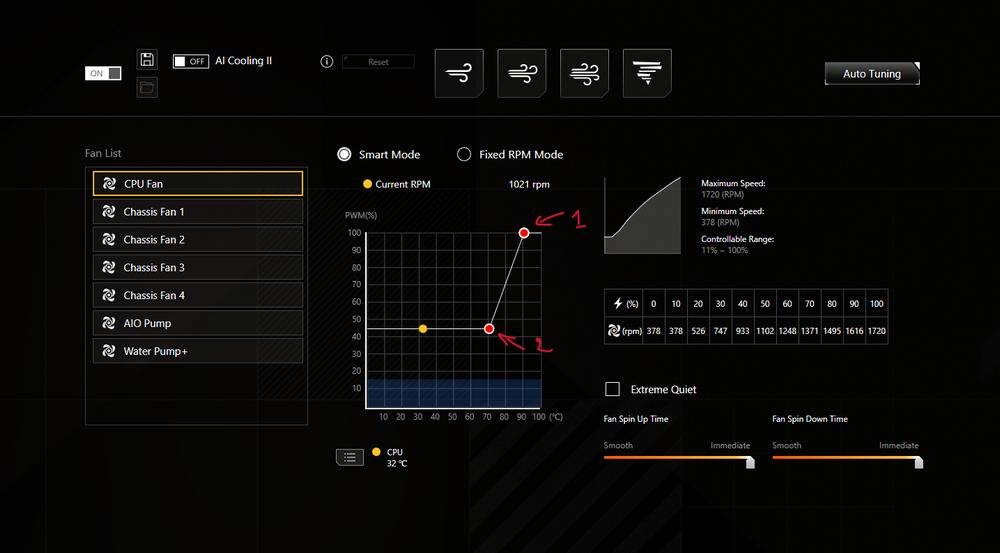
Taking my case as an example, you will need to:
- Drag all the red circles to 100% at 90°C, apart from one which we are using for the minimum speed.
- Drag the remaining circle to the speed and temps you choose for silent operations – in this instant, it is 45% speed at 70°C.
In simple words, this means that the fans will run at the constant speed you found silent (45% in this example) until your chosen CPU temperature is reached (70°C in this example). After this, if the CPU temperature continues to rise, the fans will keep ramping up speed until the CPU stops at a steady state. For example, if the CPU stops at 80°C, the fans will be running at 70%, and so on.
While these steps can also apply to pumps, some boards (like Asus’ TUF Gaming X670E Plus) may lock the pump header’s minimum speed to 60%. But this shouldn’t be an issue, as pumps make for a quieter PC at 80% or 100%.
Step 5
If you also find your graphics card to be loud using its default settings, you can use the aforementioned MSI Afterburner to configure its fan curve like we did for the chassis and CPU fans.
To do so:
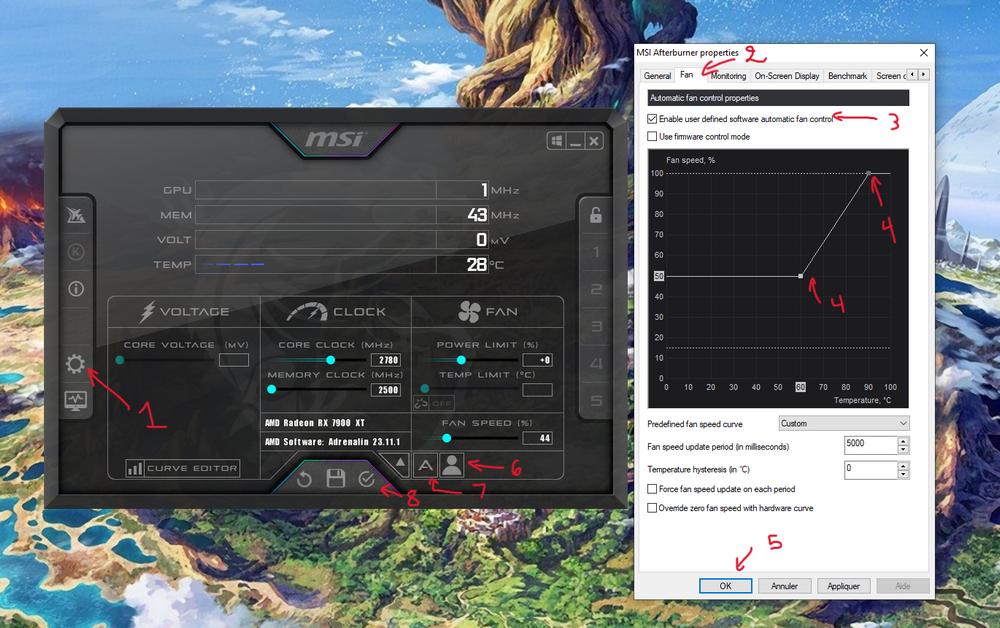
- Click on the cog wheel (settings).
- A new menu should open, select Fan on the top row.
- Check ‘Enable user defined software automatic fan control’.
- Set your preferred speed and temperature parameters – you can follow the same procedure as chassis fans to find the best noise/temperature.
- Press OK.
- Make sure the icons marked by numbers 6 and 7 are active, then press the confirm button.
Step 6 (optional)
Now that you’ve configured your machine for silent operation, you may want to save these settings directly to the BIOS. This means that you would no longer need software like Armoury Crate running all the time in the background, saving you a bit of CPU performance.
To set these parameters in BIOS:
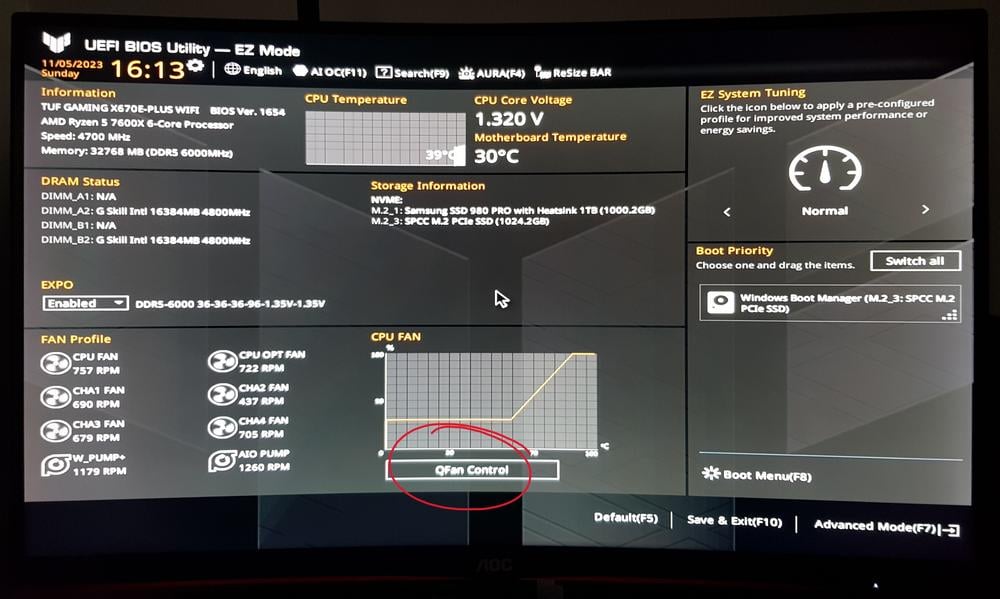
- Restart your computer and press the Delete key on your keyboard until you enter BIOS.
- Click on QFan Control. Gigabyte calls it Smart Fan, and MSI calls it Hardware Monitor.
On Asus’ BIOS too, you can select the Silent preset and call it a day if you find it good enough, choose a static speed to maintain the fans at a constant speed regardless of temperatures, or go for manual tuning. We are using the latter.
- Select the fan you would like to configure.
- Verify that Manual mode is selected.
- Set up the fan curve however you like.
- Apply the changes.
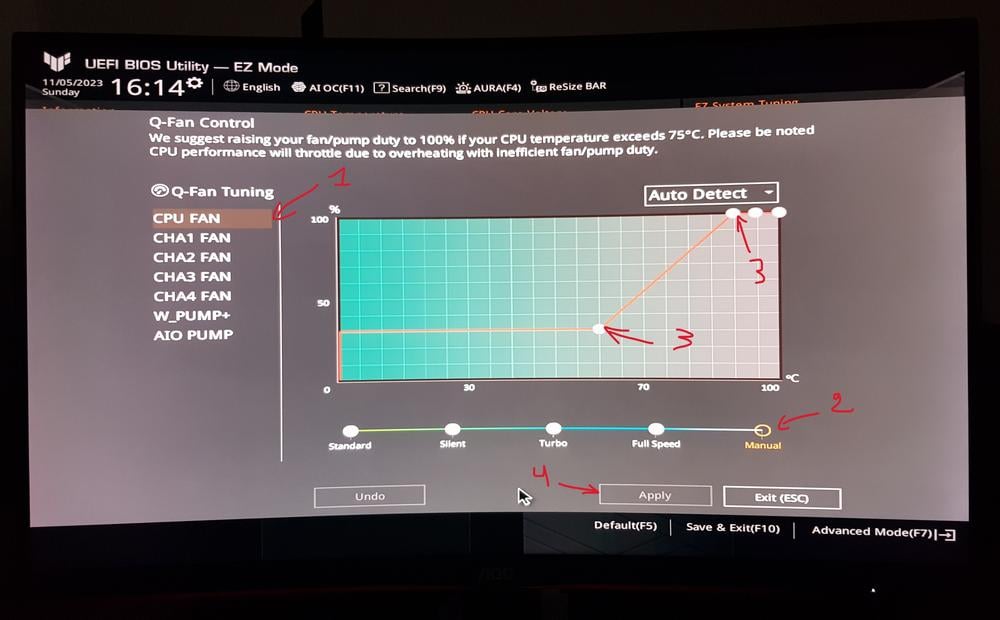
Configure all your fans like so, and when you finish press F10 on your keyboard to save the changes and leave the BIOS.
Congrats, you now have a quieter PC.
A couple of notes before we close up:
- Software settings tend to take the upper hand, so if you change these settings on BIOS and don’t plan to use the app anymore, delete it to avoid any issues.
- BIOS updates will delete any saved parameters including overclocking and fan curves, so save a backup, just in case.
- Some users like to put their fan speeds in a curved shape, I prefer the straight line to have a smooth speedup. It’s up to you, both are good.
- Others recommend selecting a slightly different speed for each fan to avoid amplifying the noise if, let’s say, three fans produce the exact waveform. We don’t focus on this aspect too much since fans already have about a 10% tolerance, meaning chances are speed/waveform won’t be identical between your fans. But hey, you are free to do whatever you like.
That’s all, and enjoy the silence.